Bonding eth0 and wlan0 on Arch Linux
Yesterday at work, a couple of my coworkers were trying to bond two ethernet ports on a Synology NAS. For whatever reason, this made me want to play with bonding network interfaces on my own computers. So I began trying to come up with a good reason to use valuable time to play with interface bonding.
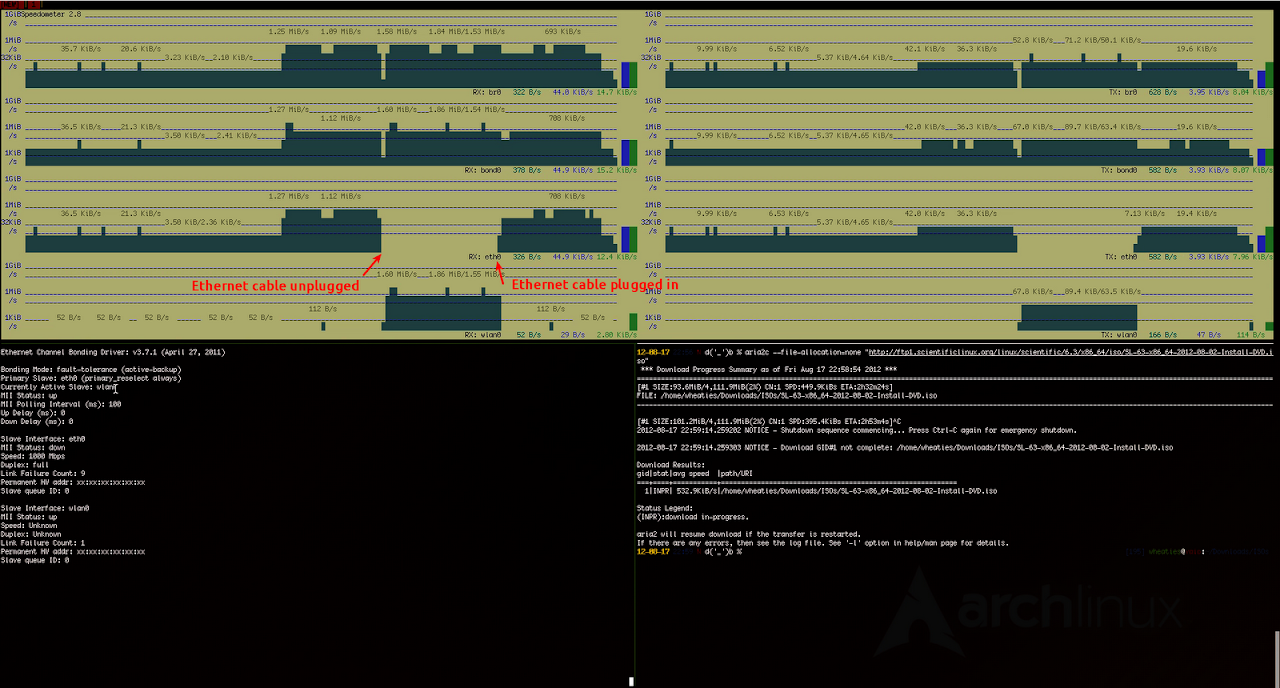
One thing that has always driven me nuts about laptops is that connections are severed when I have to unplug my ethernet cable and take the laptop elsewhere. It never seemed to matter if I was using NetworkManager or anything else--connections were dropped, and the resulting annoyances ranged from minor to much rage. Having Pidgin drop connections and reconnect was a minor annoyance. Downloading a 4.2GB linux ISO and having the connection cut at 96% caused much rage.
Anyway, I decided to see if I could use bonding to reduce the frustration with such situations. Since my laptop is usually plugged into the ethernet, I wanted to use eth0 as my primary interface. It's faster and more reliable than wireless. When my ethernet connection fails, for whatever reason, I wanted it to fall back to wlan0. Ideally, things like downloads or streaming music/movies would continue uninterrupted.
Furthermore, I wanted my KVM to be able to use the bonded interfaces inside of my virtual machines. This called for a bridge.
To quickly see this in action, check the videos below!
Software
I configured this on a relatively new Arch Linux installation. Here's the software I used:
- linux: 3.4.8-1
- initscripts: 2012.08.2-1
- netcfg: 2.8.9-1
- netcfg-bonding: 1.5.1-1
- ifenslave: 1.1.0-7
- bridge-utils: 1.5-1
Configuration
The first thing you need to do to get this working, after installing all of the above packages, is load the bonding kernel module. In my particular case, as I mentioned earlier, I wanted to use eth0 when available and use wlan0 otherwise. As such, I used the active-backup bonding mode. If you're interested in the other bonding modes, I would suggest reading up on bonding. I'm pretty new to all of this bonding magic, so I can't guarantee that I'll be of any use if you don't follow my instructions :)
Back to configuration. I placed my bonding configuration in /etc/modprobe.d/bonding.conf. The only thing that may not be self-explanatory is the miimon setting. I learned from this bonding article that this option "specifies the MII link monitoring frequency in milliseconds." In other words, this is how often the system will check to see if a failover is necessary.
/etc/modprobe.d/bonding.conf
options bonding mode=active-backup
options bonding miimon=100
options bonding primary=eth0
After creating that file, you simply insert the module into the kernel:
modprobe bonding
To get bonding to work when you reboot your machine, you should either add bonding to your MODULES array in /etc/rc.conf or, if you're using more recent initscripts stuff, place a file in /etc/modules-load.d. I chose the latter solution.
/etc/modules-load.d/bonding.conf
bonding
Next, you must create some network profiles for netcfg. Prior to this bonding project, I had been using wicd or networkmanager to handle most of my networking needs. It seems like a bad idea to try using either of these, or the standard network daemon even, if you plan to use a configuration similar to what follows. Just FYI.
I created a network profile for the bonded interfaces as such:
/etc/network.d/bonded
CONNECTION="bonding"
INTERFACE="bond0"
SLAVES="eth0"
IP="dhcp"
DHCP_TIMEOUT=10
SLAVE_TIMEOUT=5
Notice that wlan0 isn't in the SLAVES list. This is because I also have a network profile for my home wireless connection to handle the authentication and whatnot:
/etc/network.d/home
CONNECTION="wireless"
DESCRIPTION="Home connection"
INTERFACE="wlan0"
SECURITY="wpa"

ESSID="wouldntyouliketoknow"
KEY="derpies"

IP="static"
IFOPTS="0.0.0.0"
PRE_UP="ifenslave bond0 wlan0"
PRE_DOWN="ifenslave -d bond0 wlan0"
I have one more network profile for the bridged interface that allows my KVM guests to live on the same network as everything else. If you're not using KVM or don't want a bridged interface, you don't need this one.
/etc/network.d/br0
INTERFACE="br0"
CONNECTION="bridge"
DESCRIPTION="KVM Bridge Connection"
BRIDGE_INTERFACES="bond0"
IP="dhcp"
POST_UP="brctl setfd br0 0"
Finally, I added these profiles to my /etc/conf.d/netcfg:
NETWORKS=(bonded home br0)
Again, if you don't need a bridged interface, you don't need to include the br0 profile in there.
You may or may not want to test your individual network profiles by doing something like:
netcfg -u home # try to bring the profile up
netcfg -d home # bring the profile down
If you have problems connecting to your wireless access point, I suggest tweaking and testing your profile until it works. If you use MAC address filtering for wireless security on your router, you might want to make sure that the MAC of your ethernet interface is in the list of permitted MAC addresses. When you setup bonding, all of the bonded interfaces seem to share the same MAC.
Try It Out
Pretty much all that's left is starting up the new network configuration! To do this, first make sure your previous networking daemon is turned off. For example, you might run one of the following commands:
rc.d stop network
rc.d stop wicd
rc.d stop networkmanager
Once you've done that, you simply run:
rc.d start net-profiles
If your setup is anything like mine, you might see ifconfig output similar to this (notice that my MAC addresses have been changed, but that they're identical for bond0, br0, eth0, and wlan0):
bond0: flags=5443<UP,BROADCAST,RUNNING,PROMISC,MASTER,MULTICAST>  mtu 1500
        ether 00:24:be:00:24:be  txqueuelen 0  (Ethernet)
        RX packets 7318719  bytes 8578112000 (7.9 GiB)
        RX errors 0  dropped 33241  overruns 0  frame 0
        TX packets 3404477  bytes 3562828808 (3.3 GiB)
        TX errors 0  dropped 0 overruns 0  carrier 0  collisions 0

br0: flags=4163<UP,BROADCAST,RUNNING,MULTICAST>  mtu 1500
        inet 192.168.128.55  netmask 255.255.255.128  broadcast 192.168.128.127
        inet6 fe80::224:beff:fec7:9895  prefixlen 64  scopeid 0x20<link>
        ether 00:24:be:00:24:be  txqueuelen 0  (Ethernet)
        RX packets 4759641  bytes 4771378631 (4.4 GiB)
        RX errors 0  dropped 0  overruns 0  frame 0
        TX packets 2119926  bytes 3491247232 (3.2 GiB)
        TX errors 0  dropped 0 overruns 0  carrier 0  collisions 0

eth0: flags=6211<UP,BROADCAST,RUNNING,SLAVE,MULTICAST>  mtu 1500
        ether 00:24:be:00:24:be  txqueuelen 1000  (Ethernet)
        RX packets 7243938  bytes 8512402737 (7.9 GiB)
        RX errors 0  dropped 0  overruns 0  frame 0
        TX packets 3388055  bytes 3561344335 (3.3 GiB)
        TX errors 0  dropped 0 overruns 0  carrier 0  collisions 0
        device interrupt 18

lo: flags=73<UP,LOOPBACK,RUNNING>  mtu 16436
        inet 127.0.0.1  netmask 255.0.0.0
        inet6 ::1  prefixlen 128  scopeid 0x10<host>
        loop  txqueuelen 0  (Local Loopback)
        RX packets 338869  bytes 263959385 (251.7 MiB)
        RX errors 0  dropped 0  overruns 0  frame 0
        TX packets 338869  bytes 263959385 (251.7 MiB)
        TX errors 0  dropped 0 overruns 0  carrier 0  collisions 0

virbr0: flags=4099<UP,BROADCAST,MULTICAST>  mtu 1500
        inet 192.168.122.1  netmask 255.255.255.0  broadcast 192.168.122.255
        ether 36:11:59:de:92:73  txqueuelen 0  (Ethernet)
        RX packets 0  bytes 0 (0.0 B)
        RX errors 0  dropped 0  overruns 0  frame 0
        TX packets 0  bytes 0 (0.0 B)
        TX errors 0  dropped 0 overruns 0  carrier 0  collisions 0

wlan0: flags=6211<UP,BROADCAST,RUNNING,SLAVE,MULTICAST>  mtu 1500
        ether 00:24:be:00:24:be  txqueuelen 1000  (Ethernet)
        RX packets 74781  bytes 65709263 (62.6 MiB)
        RX errors 0  dropped 33241  overruns 0  frame 0
        TX packets 16422  bytes 1484473 (1.4 MiB)
        TX errors 0  dropped 0 overruns 0  carrier 0  collisions 0
Also, if you haven't been using netcfg already, you will probably want to update your DAEMONS array in /etc/rc.conf. Again, be sure you disable your previous networking daemon (if necessary) by placing a ! before the daemon's name (or just remove it from the array). Then add net-profiles into the array somewhere, probably closer to the beginning of the array.
Hopefully that works for you! Please share your experiences (both good and bad) in the comments! If you run into troubles, I will try to be of use, and hopefully others will chime in too.
Videos
Here are a couple of videos for those of you who are interested. The first is a lower-quality, but maybe easier-to-read-on-small-screens video. The second is just shy of 1080p size-wise.
Comments
Comments powered by Disqus