Another I-Heart-Linux Story

Just had another experience that represents much of what I love about Linux and free software, and I thought I would share.

I just got my first bluray burner. I have it in a USB3-capable enclosure to use with my USB2-capable laptop. I knew burn speeds would be much lower than the drive is rated to handle primarily because of this arrangement.

A good portion of yesterday included me trying to burn my first bluray in Linux. Unfortunately, the nature of bluray standards and Linux still don't jive very well. My usual burning applications didn't have any trouble at all detecting the burner or the media, but none of them seemed to want to actually burn anything. K3b made a coaster out of one disc; Brasero did nothing. I didn't try using the command line burning tricks that I found on the interwebs.

I decided to give ImgBurn a shot. I installed it with WINE, and it ran beautifully. However, I failed to realize that I left K3b's coaster in the drive and couldn't get a disc to burn. In my own defense, the coaster was still recognized by the computer as a blank BD-R. It was at this point that I just rebooted into Windows just to verify that the drive itself worked for burning.

Windows obviously burned the first disc fine (after I realized the coaster was still in the drive and replaced it with a fresh disc). The media I have are only rated for 4x burn speeds, while the drive itself is rated for 14x burning. Windows only managed to achieve ~2x for the duration of the burn (using ImgBurn again). Also, Windows seemed to struggle trying to keep the buffers full. Every 70 seconds or so, ImgBurn would stop burning to allow the buffers to fill up again and for the hard drive to settle down a bit. But it did end up working--the disc worked in my bluray player that's hooked up to the TV!!! Success!

I decided to give ImgBurn in WINE another shot. I popped a fresh BD-R into the drive, specified the files I wanted to burn, and initiated the burn process. Right off the bat, ImgBurn under WINE was burning at 2.4x. I watched the process for 10 minutes or so before heading upstairs to let it finish. Not once was the main buffer depleted. The drive buffer (4MB) was up and down every so often, but it was never empty from the time the burn began until the time when I left my computer.

I realize that some of you out there will just see the moral of this story being something like, "Linux doesn't support burning bluray discs very well, and Windows worked on the first try." If you find yourself in this boat, you're probably not part of the intended audience of this tale. This is probably because you have some bias against any operating system that isn't the one you're currently using. No, this story is intended for people who like to tinker and don't think it's a waste of time to go through exercises like this.

Anyway, the real reason I wrote this story was to illustrate one of my favorite things about Linux: it's fast! Burning a bluray disc using an application that was written for Windows, running with a (free, open source, community-driven) Windows compatibility layer in Linux is still faster than the same program running natively on Windows. Sure, it might not always be the case, but in my ~12 years of hands-on experience with Linux, I find that it usually is the case.

UPDATE

So I've burned another 5 blurays under Linux with ImgBurn. Here's the interesting part of my most recent burn log:

I 00:51:40 Operation Started!
I 00:51:40 Source File: -==/\/[BUILD IMAGE]\/\==-
I 00:51:40 Source File Sectors: 11,978,272 (MODE1/2048)
I 00:51:40 Source File Size: 24,531,501,056 bytes
I 00:51:40 Source File Volume Identifier: Stargate - Disc 6
I 00:51:40 Source File Volume Set Identifier: 4222067200B6C611
I 00:51:40 Source File Application Identifier: IMGBURN V2.5.7.0 - THE ULTIMATE IMAGE BURNER!
I 00:51:40 Source File Implementation Identifier: ImgBurn
I 00:51:40 Source File File System(s): ISO9660, UDF (1.02)
I 00:51:40 Destination Device: [3:0:0] HL-DT-ST BD-RE  WH14NS40 1.00
I 00:51:40 Destination Media Type: BD-R (Disc ID: PHILIP-R04-000)
I 00:51:40 Destination Media Supported Write Speeds: 4x, 6x, 8x
I 00:51:40 Destination Media Sectors: 12,219,392
I 00:51:40 Write Mode: BD
I 00:51:40 Write Type: DAO
I 00:51:40 Write Speed: MAX
I 00:51:41 Hardware Defect Management Active: No
I 00:51:41 BD-R Verify Not Required: Yes
I 00:51:41 Link Size: Auto
I 00:51:41 Lock Volume: Yes
I 00:51:41 Test Mode: No
I 00:51:41 OPC: No
I 00:51:41 BURN-Proof: Enabled
I 00:51:41 Write Speed Successfully Set! - Effective: 35,968 KB/s (8x)
I 00:52:00 Filling Buffer... (80 MB)
I 00:52:02 Writing LeadIn...
I 00:52:03 Writing Session 1 of 1... (1 Track, LBA: 0 - 11978271)
I 00:52:03 Writing Track 1 of 1... (MODE1/2048, LBA: 0 - 11978271)
I 01:18:33 Synchronising Cache...
I 01:18:34 Closing Track...
I 01:18:35 Finalising Disc...
I 01:18:50 Exporting Graph Data...
I 01:18:50 Graph Data File: C:\users\wheaties\Application Data\ImgBurn\Graph Data Files\HL-DT-ST_BD-RE_WH14NS40_1.00_WEDNESDAY-JANUARY-02-2013_12-51_AM_PHILIP-R04-000_MAX.ibg
I 01:18:50 Export Successfully Completed!
I 01:18:50 Operation Successfully Completed! - Duration: 00:27:09
I 01:18:50 Average Write Rate: 15,067 KB/s (3.4x) - Maximum Write Rate: 18,615 KB/s (4.1x)

As you can see, the last line suggests things are working quite nicely in Linux:

I 01:18:50 Average Write Rate: 15,067 KB/s (3.4x) - Maximum Write Rate: 18,615 KB/s (4.1x)

I would like to note also that two of the discs I've burned so far have had some problems being read on the computer afterwards. These discs do, however, work quite nicely in the bluray player for my TV. Might just be circumstance.
Arduino-Powered Webcam Mount

Earlier this month, I completed yet another journey around the biggest star in our galaxy. Some of my beloved family members thought this would be a good occasion to send me some cash, and I also got a gift card for being plain awesome at work. Even though we really do need a bigger car and whatnot, my wife insisted that I only spend this money on myself and whatever I wanted.

Little did she know the can of worms she just opened up.

I took pretty much all of the money and blew it on stuff for my electronics projects. Up to this point, my projects have all been pretty boring simply because nothing ever moved--it was mostly just lights turning on and off or changing colors. Sure, that's fun, but things really start to get interesting when you actually interact with the physical world. With the birthday money, I was finally able to buy a bunch of servos to begin living out my childhood dream of building robots.

My first project since getting all of my new toys was a motorized webcam mount. My parents bought me a Logitech C910 for my birthday because they were tired of trying to see their grandchildren with the crappy webcam that is built into my laptop. It was a perfect opportunity to use SparkFun's tutorial for some facial tracking (thanks to OpenCV) using their Pan/Tilt Servo Bracket.

It took a little while to get everything setup properly, but SparkFun's tutorial explains perfectly how you can get everything setup if you want to repeat this project.

The problem I had with the SparkFun tutorial, though, is that it basically only gives you a standalone program that does the facial tracking and displays your webcam feed. What good is that? I actually wanted to use this rig to chat with people!! That's when I set out to figure out how to do this.

While the Processing sketch ran absolutely perfect on Windows, it didn't want to work on my Arch Linux system due to some missing dependencies that I didn't know how/care to satisfy. As such, I opted to rewrite the sketch using Python so I could do the facial tracking in Linux.

This is still a work in progress, but here's the current facial tracking program which tells the Arduino where the webcam should be pointing, along with the Arduino sketch.

Now that I could track a face and move my webcam in Linux, I still faced the same problem as before: how can I use my face-tracking, webcam-moving program during a chat with my mom? I had no idea how to accomplish this. I figured I would have to either intercept the webcam feed as it was going to Skype or the Google Talk Plugin, or I'd have to somehow consume the webcam feed and proxy it back out as a V4L2 device that the Google Talk Plugin could then use.

Trying to come up with a way of doing that seemed rather impossible (at least in straight Python), but I eventually stumbled upon a couple little gems.

So the GStreamer tutorial walks you step-by-step through different ways of using a gst-launch utility, and I found this information very useful. I learned that you can use tee to split a webcam feed and do two different things with it. I wondered if it would be possible to split one webcam feed and send it to two other V4L2 devices.

Enter v4l2loopback.

I was able to install this module from Arch's AUR, and using it was super easy (you should be root for this):

modprobe v4l2loopback devices=2

This created two new /dev/video* devices on my system, which happened to be /dev/video4 and /dev/video5 (yeah... been playing with a lot of webcams and whatnot). One device, video4, is for consumption by my face-tracking program. The other, video5, is for VLC, Skype, Google+ Hangouts, etc. After creating those devices, I simply ran the following command as a regular user:

gst-launch-0.10 v4l2src device=/dev/video1 ! \
    'video/x-raw-yuv,width=640,height=480,framerate=30/1' ! \
    tee name=t_vid ! queue ! \
    v4l2sink sync=false device=/dev/video4 t_vid. ! \
    queue ! videorate ! 'video/x-raw-yuv,framerate=30/1' ! \
    v4l2sink device=/dev/video5

There's a whole lot of stuff going on in that command that I honestly do not understand. All I know is that it made it so both my face-tracking Python program AND VLC can consume the same video feed via two different V4L2 devices! A co-worker of mine agreed to have a quick Google+ Hangout with me to test this setup under "real" circumstances (thx man). It worked :D Objective reached!

I had really hoped to find a way to handle this stuff inside Python, but I have to admit that this is a pretty slick setup. A lot of things are still hardcoded, but I do plan on making things a little more generic soon enough.

So here's my little rig (why yes, I did mount it on top of an old Kool-Aid powder thingy lid):

And a video of it in action. Please excuse the subject of the webcam video, I'm not sure where that guy came from or why he's playing with my webcam.

2Ze.us Updates

There has been quite a bit of recent activity in my 2ze.us project since I first released it nearly a year ago. My intent was not to become a competitor with bit.ly, is.gd, or anyone else in the URL-shortening arena. I created the site as a way for me to learn more about Google's AppEngine. It didn't take very long to get it up and running, and it seemed to work fairly well.

AppEngine and Extensions

I was able to basically leave the site alone on AppEngine for several months--through about September 2009. In that time, I came up with a Firefox extension to make its use more convenient.

The extension allows you to quickly get a shortened URL for the page you're currently looking at, and a couple of context menu items let you get a short URL for things like specific images on a page. Also included in the extension is a preview for 2ze.us links. The preview can tell you the title and domain of the link's target. It can tell you how much smaller the 2ze.us URL is compared to the full URL. Finally, it displays how many times that particular 2ze.us link has been clicked.

That as all fine and dandy. It was the second Firefox extension I had ever written, and it's still running strong. In June or July of 2009, I started working on a little program to make it easier for me to interact with Twitter the way I wanted to. This was a great opportunity for me to incorporate 2ze.us into the application so any URL I wanted to post to Twitter would automatically be shortened for me, using my own shortener.

Porting to WebFaction And PHP

Anyway, around the end of September 2009, I noticed that there were a lot of problems with 2ze.us. It was slow and sometimes completely unresponsive. Certain URLs would redirect to their full URLs, while others wouldn't. The Firefox extension stopped working nicely. Oh yeah, and AppEngine rolled back to a previous revision of the code without me telling it to. That's when everything just died. It didn't take long for me to decide to migrate my project from AppEngine onto my awesome WebFaction hosting.

At this point, I was faced with a small dilemma: keep the code in Python, or port it to PHP. I opted to port it over to PHP, because I didn't want all of the overhead of a full Django instance for a site that needed to be very zippy. And I was unacquainted with other Python options.

By early October 2009, I had managed to turn the project into a PHP beast, running on Apache. It was a lot more responsive than AppEngine ever let 2ze.us be. There were a few bumps along the road, what with the extension and Twitter client relying on various parts of the site. Eventually it got to a point where I could just let it sit and work.

Chromium Extension

Sometime around the end of December, I decided to write another extension for 2ze.us, only for Google Chrome and Chromium this time. This extension isn't quite as feature-packed as its Firefox brother, but it gets the job done.

Clip2Zeus

Shortly after "completing" the Chromium extension, I had what seemed like a pretty original idea. Who knows if it really is, but I still haven't seen another tool quite like the one that I made as a result of this idea. I thought, "Now, why should I need to install an extension in each Web browser I use on each computer I use? Is there a better way?"

The answer came quickly: a standalone, desktop application. Write one program that handles shortening URLs for you. My laziness told me to make a program that monitors your system clipboard for URLs. If a URL is detected, try to shorten it, and update the clipboard contents in place. Boom. Done. All extensions become useless beyond things like the URL preview (which is very useful, imo).

The next question I asked was, "Do I make it platform-dependent? Should I stick it to the majority of computer users and write my tool for Linux only? For OSX only? For, uh... Windows only?" Again, an easy question to answer. Support them all or don't even bother writing the application.

A week's worth of midnight hacking saw the birth of Clip2Zeus 1.0a. It's a cross-platform compatible desktop application that does exactly what I just mentioned. When it's running and detects a URL on your system clipboard, it will try to shorten it and update it in your clipboard. If you copy a block of text, the application will only modify the URLs in that block of text--meaning the block of text will still be in your clipboard, but it will have shorter URLs.

I use the program every day at work (on OSX). It's been very fun for me to see a short URL any time I copy a nasty URL to my clipboard. Imagine that; I'm a big fan of my own work...

Tornado

Lately, I've noticed that the site was getting kind of slow again. Sometimes it would take several seconds for Clip2Zeus to shorten URLs in my clipboard, when it was normally instantaneous. Every once in a while, Clip2Zeus would completely fail to connect to the website.

One of my friends has asked me a lot of questions about the Tornado framework in the past months. I had read a few things about Tornado when it was open-sourced last year, but I didn't really feel the need to dabble with it. These questions prompted me to tinker a little.

Last night I re-ported 2ze.us to Python, using the Tornado framework this time. So far I'm very impressed with its responsiveness. The framework offers a lot of neat little utilities, and it is very fast (as reported by dozens of other reputable sources).

On top of the speed increase that came with the transition to Tornado, my RAM usage on WebFaction has come down by nearly 100MB. Just by turning off the one Apache-backed website. Now I'm nowhere near my RAM cap! Wahoo!!

Enough rambling. Like I said at the beginning of this article, a lot has been happening with this project in the past year. I didn't even think about all of the time I put into projects related to my simple little side project. Looking back, I'm quite satisfied with how things have unfolded.

Statistics

Here are some simple statistics for 2ze.us. Since March 2009...

  • 5,252 URLs have been shortened using 2ze.us
  • 2ze.us links have been clicked 198,267 times
  • 315,951 URL characters have been turned into 11,532 characters

In April 2009...

  • 217 URLs were shortened
  • 2ze.us links were clicked 617 times

In February 2010...

  • 1,182 URLs were shortened
  • 2ze.us links were clicked 32,830 times

Not too shabby for a side project.

Network Manager, Cisco VPN, And Internet

Those of us out on the eastern side of the United States are currently experiencing quite a snow storm. While this sort of storm would probably have not even made the local news in Rexburg (where my wife and I attended university), everyone is making a big deal about it around here. Part of that big deal included the option, and even recommendation, that we work from home on Friday, using the company VPN to take care of our tasks.

I was pretty excited at the idea of working from home once again (my last job was almost exclusively a work-at-home gig), so I made sure I was able to connect to the VPN a few days ago, after receiving the credentials. It took a few tries to get everything right in Windows, but eventually it started working quite well. Then I tried connecting from Linux, using the awesomeness known as Network Manager.

Since I'm currently on Fedora 12, all I had to do was make sure that I had network-manager-vpnc installed, and I could then configure a connection using the same credentials I used in Windows. I had a successful connection on the very first try, and it was working fabulously. I had access to all of my development machines and all of the tools I use on a daily basis.

It didn't take long, however, for me to notice a big problem: no Internet access. I could get to any machine I dang well pleased on the company network, but nothing on the Internet. Quite frustrating, to say the least.

I decided to leave the investigation as to why I had no Internet access and how to fix it for another night. Here I am now, tinkering with it again. I found out what I needed to change:

  • Right click on the Network Manager icon in the system tray, and select "Edit Connections..."
  • Click on the VPN tab
  • Edit your VPN connection
  • Click on the "IPv4 Settings" tab
  • Click the "Routes..." button
  • Make sure that the "Use this connection only for resources on its network" option is checked
  • Connect to your VPN, and enjoy access to the devices there as well as on the Internet!

Hopefully this saves someone else's sanity (Jeremy?)

Auto-Generating Documentation Using Mercurial, ReST, and Sphinx

I often find myself taking notes about various aspects of my job that I feel I would forget as soon as I moved onto another project. I've gotten into the habit of taking my notes using reStructured Text, which shouldn't come as any surprise to any of my regular visitors. On several occasions, I had some of the other guys in the company ask me for some clarification on some things I had taken notes on. Lucky for me, I had taken some nice notes!

However, these individuals probably wouldn't appreciate reading ReST markup as much as I do, so I decided to do something nice for them. I setup Sphinx to prettify my documentation. I then wrote a small Web server using Python, so people within the company network could access the latest version of my notes without much hassle.

Just like I take notes to remind myself of stuff at work, I want to do that again for this automated ReST->HTML magic--I want to be able to do this in the future! I figured I would make my notes even more public this time, so you all can enjoy similar bliss.

Platform Dependence

I am writing this article with UNIX-like operating systems in mind. Please forgive me if you're a Windows user and some of this is not consistent with what you're seeing. Perhaps one day I'll try to set this sort of thing up on Windows.

Installing Sphinx

The first step that we want to take is installing Sphinx. This is the project that Python itself uses to generate its online documentation. It's pretty dang awesome. Feel free to skip this section if you have already installed Sphinx.

Depending on your environment of choice, you may or may not have a package manager that offers python-sphinx or something along those lines. I personally prefer to install it using pip or easy_install:

$ sudo pip install sphinx

Running that command will likely respond with a bunch of output about downloading Sphinx and various dependencies. When I ran it in my sandbox VM, I saw it install the following packages:

  • pygments
  • jinja2
  • docutils
  • sphinx

It should be a pretty speedy installation.

Installing Mercurial

We'll be using Mercurial to keep track of changes to our ReST documentation. Mercurial is a distributed version control system that is built using Python. It's wonderful! Just like with Sphinx, if you have already installed Mercurial, feel free to skip to the next section.

I personally prefer to install Mercurial using pip or easy_install--it's usually more up-to-date than what you would have in your package repositories. To do that, simply run a command such as the following:

$ sudo pip install mercurial

This will go out and download and install the latest stable Mercurial. You may need python-dev or something like that for your platform in order for that command to work. However, if you're on Windows, I highly recommend TortoiseHg. The installer for TortoiseHg will install a graphical Mercurial client along with the command line tools.

Create A Repository

Now let's create a brand new Mercurial repository to house our notes/documentation. Open a terminal/console/command prompt to the location of your choice on your computer and execute the following commands:

$ hg init mydox
$ cd mydox

Configure Sphinx

The next step is to configure Sphinx for our project. Sphinx makes this very simple:

$ sphinx-quickstart

This is a wizard that will walk you through the configuration process for your project. It's pretty safe to accept the defaults, in my opinion. Here's the output of my wizard:

$ sphinx-quickstart
Welcome to the Sphinx quickstart utility.

Please enter values for the following settings (just press Enter to
accept a default value, if one is given in brackets).

Enter the root path for documentation.
> Root path for the documentation [.]:

You have two options for placing the build directory for Sphinx output.
Either, you use a directory "_build" within the root path, or you separate
"source" and "build" directories within the root path.
> Separate source and build directories (y/N) [n]: y

Inside the root directory, two more directories will be created; "_templates"
for custom HTML templates and "_static" for custom stylesheets and other static
files. You can enter another prefix (such as ".") to replace the underscore.
> Name prefix for templates and static dir [_]:

The project name will occur in several places in the built documentation.
> Project name: My Dox
> Author name(s): Josh VanderLinden

Sphinx has the notion of a "version" and a "release" for the
software. Each version can have multiple releases. For example, for
Python the version is something like 2.5 or 3.0, while the release is
something like 2.5.1 or 3.0a1.  If you don't need this dual structure,
just set both to the same value.
> Project version: 0.0.1
> Project release [0.0.1]:

The file name suffix for source files. Commonly, this is either ".txt"
or ".rst".  Only files with this suffix are considered documents.
> Source file suffix [.rst]:

One document is special in that it is considered the top node of the
"contents tree", that is, it is the root of the hierarchical structure
of the documents. Normally, this is "index", but if your "index"
document is a custom template, you can also set this to another filename.
> Name of your master document (without suffix) [index]:

Please indicate if you want to use one of the following Sphinx extensions:
> autodoc: automatically insert docstrings from modules (y/N) [n]:
> doctest: automatically test code snippets in doctest blocks (y/N) [n]:
> intersphinx: link between Sphinx documentation of different projects (y/N) [n]:
> todo: write "todo" entries that can be shown or hidden on build (y/N) [n]:
> coverage: checks for documentation coverage (y/N) [n]:
> pngmath: include math, rendered as PNG images (y/N) [n]:
> jsmath: include math, rendered in the browser by JSMath (y/N) [n]:
> ifconfig: conditional inclusion of content based on config values (y/N) [n]:

A Makefile and a Windows command file can be generated for you so that you
only have to run e.g. `make html' instead of invoking sphinx-build
directly.
> Create Makefile? (Y/n) [y]:
> Create Windows command file? (Y/n) [y]: n

Finished: An initial directory structure has been created.

You should now populate your master file ./source/index.rst and create other documentation
source files. Use the Makefile to build the docs, like so:
   make builder
where "builder" is one of the supported builders, e.g. html, latex or linkcheck.

If you followed the same steps I did (I separated the source and build directories), you should see three new files in your mydox repository:

  • build/
  • Makefile
  • source/

We'll do our work in the source directory.

Get Some ReST

Now is the time when we start writing some ReST that we want to turn into HTML using Sphinx. Open some file, like first_doc.rst and put some ReST in it. If nothing comes to mind, or you're not familiar with ReST syntax, try the following:

=========================
This Is My First Document
=========================

Yes, this is my first document.  It's lame.  Deal with it.

Save the file (keep in mind that it should be within the source directory if you used the same settings I did). Now it's time to add it to the list of files that Mercurial will pay attention to. While we're at it, let's add the other files that were created by the Sphinx configuration wizard:

$ hg add
adding ../Makefile
adding conf.py
adding first_doc.rst
adding index.rst
$ hg st
A Makefile
A source/conf.py
A source/first_doc.py
A source/index.rst

Don't worry that we don't see all of the directories in the output of hg st--Mercurial tracks files, not directories.

Automate HTML-ization

Here comes the magic in automating the conversion from ReST to HTML: Mercurial hooks. We will use the precommit hook to fire off a command that tells Sphinx to translate our ReST markup into HTML.

Edit your mydox/.hg/hgrc file. If the file does not yet exist, go ahead and create it. Add the following content to it:

[hooks]
precommit.sphinxify = ~/bin/sphinxify_docs.sh

I've opted to call a Bash script instead of using an inline Python call. Now let's create the Bash script, ~/bin/sphinxify_docs.sh:

#!/bin/bash
cd $HOME/mydox
sphinx-build source/ docs/

Notice that I used the $HOME environment variable. This means that I created the mydox directory at /home/myusername/mydox. Adjust that line according to your setup. You'll probably also want to make that script executable:

$ chmod +x ~/bin/sphinxify_docs.sh

Three, Two, One...

You should now be at a stage where you can safely commit changes to your repository and have Sphinx build your HTML documentation. Execute the following command somewhere under your mydox repository:

$ hg ci -m "Initial commit"

If your setup is anything like mine, you should see some output similar to this:

$ hg ci -m "Initial commit"
Making output directory...
Running Sphinx v0.6.4
No builder selected, using default: html
loading pickled environment... not found
building [html]: targets for 2 source files that are out of date
updating environment: 2 added, 0 changed, 0 removed
reading sources... [100%] index
looking for now-outdated files... none found
pickling environment... done
checking consistency... /home/jvanderlinden/mydox/source/first_doc.rst:: WARNING: document isn't included in any toctree
done
preparing documents... done
writing output... [100%] index
writing additional files... genindex search
copying static files... done
dumping search index... done
dumping object inventory... done
build succeeded, 1 warning.
$ hg st
? docs/.buildinfo
? docs/.doctrees/environment.pickle
? docs/.doctrees/first_doc.doctree
? docs/.doctrees/index.doctree
? docs/_sources/first_doc.txt
? docs/_sources/index.txt
? docs/_static/basic.css
? docs/_static/default.css
? docs/_static/doctools.js
? docs/_static/file.png
? docs/_static/jquery.js
? docs/_static/minus.png
? docs/_static/plus.png
? docs/_static/pygments.css
? docs/_static/searchtools.js
? docs/first_doc.html
? docs/genindex.html
? docs/index.html
? docs/objects.inv
? docs/search.html
? docs/searchindex.js

If you see something like that, you're in good shape. Go ahead and take a look at your new mydox/docs/index.html file in the Web browser of your choosing.

Not very exciting, is it? Notice how your first_doc.rst doesn't appear anywhere on that page? That's because we didn't tell Sphinx to put it there. Let's do that now.

Customizing Things

Edit the mydox/source/index.rst file that was created during Sphinx configuration. In the section that starts with .. toctree::, let's tell Sphinx to include everything we ReST-ify:

.. toctree::
   :maxdepth: 2
   :glob:

   *

That should do it. Now, I don't know about you, but I don't really want to include the output HTML, images, CSS, JS, or anything in my documentation repository. It would just take up more space each time we change an .rst file. Let's tell Mercurial to not pay attention to the output HTML--it'll just be static and always up-to-date on our filesystem.

Create a new file called mydox/.hgignore. In this file, put the following content:

syntax: glob
docs/

Save the file, and you should now see something like the following when running hg st:

$ hg st
M source/index.rst
? .hgignore

Let's include the .hgignore file in the list of files that Mercurial will track:

$ hg add .hgignore
$ hg st
M source/index.rst
A .hgignore

Finally, let's commit one more time:

$ hg ci -m "Updating the index to include our .rst files"
Running Sphinx v0.6.4
No builder selected, using default: html
loading pickled environment... done
building [html]: targets for 1 source files that are out of date
updating environment: 0 added, 1 changed, 0 removed
reading sources... [100%] index
looking for now-outdated files... none found
pickling environment... done
checking consistency... done
preparing documents... done
writing output... [100%] index
writing additional files... genindex search
copying static files... done
dumping search index... done
dumping object inventory... done
build succeeded.

Tada!! The first_doc.rst should now appear on the index page.

Serving Your Documentation

Who seriously wants to have HTML files that are hard to get to? How can we make it easier to access those HTML files? Perhaps we can create a simple static file Web server? That might sound difficult, but it's really not--not when you have access to Python!

#!/usr/bin/env python
# -*- coding: utf-8 -*-

from BaseHTTPServer import HTTPServer
from SimpleHTTPServer import SimpleHTTPRequestHandler

def main():
    try:
        server = HTTPServer(('', 80), SimpleHTTPRequestHandler)
        server.serve_forever()
    except KeyboardInterrupt:
        server.socket.close()

if __name__ == '__main__':
    main()

I created this simple script and put it in my ~/bin/ directory, also making it executable. Once that's done, you can navigate to your mydox/docs/ directory and run the script. Since I called the script webserver.py, I just do this:

$ cd ~/mydox/docs
$ sudo webserver.py

This makes it possible for you to visit http://localhost/ on your own computer, or to use your computer's IP in place of localhost to access your documentation from a different computer on your network. Pretty slick, if you ask me.

I suppose there's more I could add, but that's all I have time for tonight. Enjoy!

Announcing: Clip2Zeus

Sometime last year, I embarked on a mission to create my own TinyURL or bit.ly. This project had no real purpose other than to help me learn how to use Google's AppEngine. All of the URL-shortening services I had tried up to that point were perfectly satisfactory for my needs, but I wanted to explore a little.

It didn't take long for me to come up with the site that is now 2ze.us. I learned some neat things about AppEngine, and the site worked well enough for my needs (just like the others). Eventually I wrote a Firefox extension to make it easier to use the site. It offers the ability to quickly shorten "any" URL, and it also has a preview utility. This allows you to hover your cursor over a 2ze.us link and learn various bits of information about it--target domain name, the target page's title, number of hits, etc.

Toward the end of 2009, I started writing the same sort of extension for Chrome/Chromium. It offers pretty much the same sort of functionality as its Firefox brother, minus keyboard shortcuts.

Before long, I found myself embarking on another 2zeus-related endeavor. This new project is one that I am actually quite proud of and satisfied with. I wrote a program that will run in the background on your computer. I call it "Clip2Zeus". This program will periodically poll your clipboard, looking for URLs in whatever text you currently have on it. If any URLs are found, the program will run out to 2ze.us and try to shorten them. Once a valid result comes back from 2ze.us, your clipboard is automatically updated with the original URLs replaced by the shortened version.

It doesn't stop there, though. You can control the program using a couple of interfaces. One interface is a Tk GUI, which allows you to set the polling interval or turn off polling altogether. Should you choose to do that, you can click a button in the GUI any time you explicitly want to shorten URLs in your clipboard. There is another command line interface that offers the same sort of functionality.

I've been using this program on several computers for a couple of weeks, and I haven't noticed any memory/performance problems at all. It works just as well on Windows as it does on Linux, and just as well on OSX as it does on Linux. It just sits there silently until you give it a URL. It works with any program that can access the standard clipboard mechanism for whatever OS you're using.

You can download and install it using easy_install or pip. Or you can download it and install it directly from http://pypi.python.org/pypi/Clip2Zeus/

PyPI Download Stats

Every so often I find myself in need of a small ego boost (or reality check). One of the things I've done in the past to satisfy such a need is go to the PyPI and see how many downloads my packages have. Depending on how much time I have or how much effort I want to put into my pride, I may or may not check the download stats for all releases of each package.

A couple of weeks ago, I was in the mood for an ego boost. It was actually an every day thing for nearly a week! So, instead of wasting a lot of time checking download stats for each version of each package I have on PyPI, I wrote a script to do it for me. It uses the XML-RPC API that PyPI offers.

Here she is!

#!/usr/bin/env python
# -*- coding: utf-8 -*-

"""
Calculates the total number of downloads that a particular PyPI package has
received across all versions tracked by PyPI
"""

from datetime import datetime
import locale
import sys
import xmlrpclib

locale.setlocale(locale.LC_ALL, '')

class PyPIDownloadAggregator(object):

    def __init__(self, package_name, include_hidden=True):
        self.package_name = package_name
        self.include_hidden = include_hidden
        self.proxy = xmlrpclib.Server('http://pypi.python.org/pypi')
        self._downloads = {}

        self.first_upload = None
        self.first_upload_rel = None
        self.last_upload = None
        self.last_upload_rel = None

    @property
    def releases(self):
        """Retrieves the release number for each uploaded release"""

        result = self.proxy.package_releases(self.package_name, self.include_hidden)

        if len(result) == 0:
            # no matching package--search for possibles, and limit to 15 results
            results = self.proxy.search({
                'name': self.package_name,
                'description': self.package_name
            }, 'or')[:15]

            # make sure we only get unique package names
            matches = []
            for match in results:
                name = match['name']
                if name not in matches:
                    matches.append(name)

            # if only one package was found, return it
            if len(matches) == 1:
                self.package_name = matches[0]
                return self.releases

            error = """No such package found: %s

Possible matches include:
%s
""" % (self.package_name, '\n'.join('\t- %s' % n for n in matches))

            sys.exit(error)

        return result

    @property
    def downloads(self, force=False):
        """Calculate the total number of downloads for the package"""

        if len(self._downloads) == 0 or force:
            for release in self.releases:
                urls = self.proxy.release_urls(self.package_name, release)
                self._downloads[release] = 0
                for url in urls:
                    # upload times
                    uptime = datetime.strptime(url['upload_time'].value, "%Y%m%dT%H:%M:%S")
                    if self.first_upload is None or uptime < self.first_upload:
                        self.first_upload = uptime
                        self.first_upload_rel = release

                    if self.last_upload is None or uptime > self.last_upload:
                        self.last_upload = uptime
                        self.last_upload_rel = release

                    self._downloads[release] += url['downloads']

        return self._downloads

    def total(self):
        return sum(self.downloads.values())

    def average(self):
        return self.total() / len(self.downloads)

    def max(self):
        return max(self.downloads.values())

    def min(self):
        return min(self.downloads.values())

    def stats(self):
        """Prints a nicely formatted list of statistics about the package"""

        self.downloads # explicitly call, so we have first/last upload data
        fmt = locale.nl_langinfo(locale.D_T_FMT)
        sep = lambda s: locale.format('%d', s, 3)
        val = lambda dt: dt and dt.strftime(fmt) or '--'

        params = (
            self.package_name,
            val(self.first_upload),
            self.first_upload_rel,
            val(self.last_upload),
            self.last_upload_rel,
            sep(len(self.releases)),
            sep(self.max()),
            sep(self.min()),
            sep(self.average()),
            sep(self.total()),
        )

        print """PyPI Package statistics for: %s

    First Upload: %40s (%s)
    Last Upload:  %40s (%s)
    Number of releases: %34s
    Most downloads:    %35s
    Fewest downloads:  %35s
    Average downloads: %35s
    Total downloads:   %35s
""" % params

def main():
    if len(sys.argv) < 2:
        sys.exit('Please specify at least one package name')

    for pkg in sys.argv[1:]:
        PyPIDownloadAggregator(pkg).stats()

if __name__ == '__main__':
    main()

Usage is pretty simple. All you need to do is call the script (I called it pypi_downloads.py with the name or names of the package(s) you want download stats for:

bash-4.0$ ./pypi_downloads.py clip2zeus
PyPI Package statistics for: Clip2Zeus

    First Upload:             Sun 10 Jan 2010 03:25:30 AM  (0.1)
    Last Upload:              Mon 18 Jan 2010 06:58:42 PM  (0.9d)
    Number of releases:                                 12
    Most downloads:                                     41
    Fewest downloads:                                   21
    Average downloads:                                  28
    Total downloads:                                   342

And there you have it!

Mercurial 1.4.1 Released

I just noticed that Mercurial 1.4.1 was released today. Most of the changes are pretty minor, but I wanted to voice my appreciation for a new extension that is included with this release: schemes.

This extension basically makes your life easier by shortening redundant URLs for you. For example, you can now use the following command to snag my simple Mercurial extensions repo from BitBucket:

hg clone bb://codekoala/hgext

Without hgext.schemes, that command would be something like one of the following commands:

hg clone http://bitbucket.org/codekoala/hgext
hg clone ssh://hg@bitbucket.org/codekoala/hgext

Not the most ground-breaking of extensions, but still pretty slick!

Mercurial 1.3 Released

Today marks the official release of Mercurial 1.3, an awesome distributed version control system. This release comes with several nifty features, including the following, straight from the What's New wiki page:

Major Changes

  • experimental support for sub-repositories
  • Python 2.3 is no longer supported; now requires Python 2.4-2.6

Commands

  • merge: add -P/--preview option
  • update: don't unlink added files when -C/--clean is specified
  • update: added -c/--check option to abort on local changes
  • update: allow merges going backwards
  • push: improved handling of named branches
  • branches/heads: add a -c/--closed option to show closed branches
  • help: new extensions topic

General

  • add patch.eol config setting to work with cross-platform patches
  • fixed support for SSL through proxies
  • add ability to load hooks from arbitrary Python modules
  • hide passwords for HTTP repositories in error and log output
  • fix Python 2.6 support in the Windows installer
  • add mechanism for specifying HTTP authentication details in hgrc
  • prompts and choices are now shown even in non-interactive mode
  • performance improvements, especially on Windows
  • much improved zsh completion
  • improved Danish, Japanese, Italian and simplified Chinese translations
  • new German, French, Greek, Brazilian Portuguese and traditional Chinese translations

Web interface

  • read configuration data from webdir configs
  • add branches page to hgweb
  • pluggable templater engine support
  • refresh hgwebdir configuration periodically
  • let web.encoding override ui.encoding setting
  • deal with dicts/lists like webdir config paths

I'm quite stoked about this release :) For additional information, please check the project's wiki.

My Fedora 11 Adventures: Part III

Alrighty folks. Good night's rest? Check. Need to get work done? Check. Today's adventure will be about getting my computer set up for the regular development tasks that I need to do every day for my work and hobbies.

Getting Work Done

The first thing I noticed this morning when I turned on my computer was that it took exactly 1 minute from the time I hit the power button to the time I hit the enter key to log into my computer. Logging in took an additional 15-20 seconds. That was quite nice.

The next thing I noticed was that I was not connected to my network as I should be. Clicking the system tray menu item as I did last night did the trick, but I'm going to have to investigate how to make it connect automatically at boot.

Automatic Network Connectivity

It looks like I can have my Ethernet be activated automatically by right clicking on the network manager icon in my system tray, selecting "Edit Connections," selecting "System eth0," clicking the "Edit" button, and finally checking the "Connect automatically" option in the subsequent window. We'll see if this truly activates my connection next time I boot.

In an effort to get my wireless working, I poked around a little more in the "Edit Connections" screen, but I didn't see anything that seemed useful. I did find something that seemed a bit more interesting by selecting Applications > Administration > Network Configuration from the KDE menu. This utility suggested that my wireless adapter was actually wlan1 instead of the wlan0 that the tray icon seemed to think it was.

I tweaked a few settings about my wireless adapter, such as marking the "Activate device when computer starts" and "Allow all users to enable and disable the device." In the Hardware Device tab, I selected my actual Broadcom wireless adapter instead of the non-existant wlan0. I also hit the probe button next to the "Bind to MAC address" box.

My network manager tray icon still shows no wireless networks (of which there is no shortage around here), and running iwlist scan as root says "Network is down" next to wlan1. I think I will just mess with it later. Maybe it will "just work" when I reboot next time.

Installing/Configuring The Tools

As I previously mentioned, I prefer to use things that work well without getting in my way. When talking about text editors, VIM is just fine for me, and VIM 7.2.148 is already installed on my Fedora 11. One less thing to install.

Next up comes the installation of all of the goods for Firefox. It turns out that Fedora comes with Firefox 3.5 Beta 4--a bold move. I hope my extensions all work! The extensions I will be installing right now include:

  • AdBlock Plus: get rid of pesky ads that slow down my computer
  • Firebug: an amazing tool when debugging Web pages
  • Web Developer: has some niceties that Firebug doesn't come with
  • Screengrab: fantastic for taking screenshots of full Web pages
  • 2Zeus: my own little extension that allows me to quickly get short URLs a la tinyurl.com and is.gd

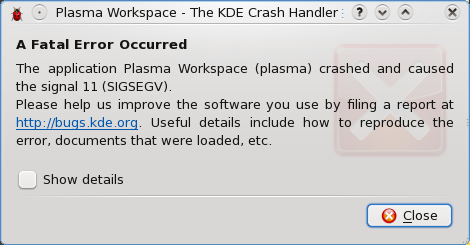
When I plugged in my external 1TB Seagate hard drive, I got a delicious Fatal Error message:

/images/fedora/p3/fatal_error.png

All appears to be in order, however, as I have access to all of the partitions on the external drive.

Next I want to install Opera. It appears that the place to look is Applications > System > Software Management in the KDE menu. Let's see what we have. Searching for Opera in the only obvious search box sent my computer into a crazy "let me do something without telling you" cycle. I have no idea what's really going on, but my processor has been maxed out for the past 3 minutes and my network has been working a little here and there. Can it really be that difficult to find a simple package? Oh! It finished! It took 6 minutes and 54 seconds to find nothing. Excellent. Let me look somewhere else.

Awesome. My computer is non-responsive. The hard drive is still working, but my GUI is doing nothing. I love it. Attempts to drop back to a trusty console using Control, Alt, and F1-F6 rendered no results. I wonder if I can SSH in from here... I sure can! Fantastic. Let's see what's happening.

It appears that X is taking up 90% of my processing power, but my computer is still not responding to any of my input. Dang it! Now my SSH session isn't working. Looks like the only option I have now is to do a hard reset. Joy of joys. Thank you for this opportunity, Fedora. Last time I did a hard reset, I was in Windows and it trashed my 1TB external.

So far rebooting seems to be going well. I wonder if my network will be setup properly still... Fantastic! It works! Wireless is still not available though. I can live without that for the time being.

Back in the Software Management utility, searching for Opera again proved to work much more quickly, but I didn't get any results. I suppose I'll just go download it from their site. The download for Opera 10 beta 1 is a mere 7.2MB, and it looks like it will open in the same Software Management utility that I've been dinking around in.

When I downloaded the Opera package, I asked it to open directly in the default program, KPackageKit. That doesn't seem to be working in the least, so I am going to try to just save it to my home directory and install it some other way. Sorry guys and gals, I ended up just dropping back to a terminal to run rpm -Uvh opera-10.00-b1.gcc4-shared-qt3.x86_64.rpm and that seemed to work fine. Opera appeared in my KDE menu, and it runs well now.

Next up is Pidgin. Pidgin 2.5.5 is installed by default, and getting it up and running was as trivial as ever.

Now to test Flash... YouTube, here I come!! Beh, Flash is not installed by default, and it's also not in the Software Management tool. What use is that thing?! Maybe if I apply all of the updates in the "Software Updates" section it will feel more useful... Here it goes.

Cool. System is unresponsive again. Let's see if I can reboot from here. Nope! Thank you, Fedora, for making me hard reset my system more in 2 hours than I have had to in YEARS. Yeah, thanks buddy.

10:50 AM So the software updates continue to not work. It appears that a ypbind package is the culprit which is causing everything to hang... I disabled it and tried to install the software updates again.

10:53 AM GUI is non-responsive again. Yay.

10:56 AM Third hard reset in 3 hours. Maybe I will have to modify my original parameters and try GNOME to see if that makes the computer usable for more than an hour at a time.

11:00 AM That's it! I'm getting rid of KDE 4... sorry folks, GNOME is my only hope of getting work done. Second clean shutdown out of 5 since the installation completed last night.