SaltConf 2014

Being one to try to automate all teh things, I'm always curious to find and experiment with new tools that appear which are supposed to help me be lazy. SaltStack is one such tool.

I first stumbled upon references to SaltStack sometime before the summer of 2012. At the time, I only put enough effort into SaltStack to be aware of what it does and a little bit of its history. I remember telling a few of my friends about it, and adding it to my TODO list. At some point, I even installed it on a couple of my computers.

The problem was that I never made time to actually learn how to use it. I kept telling myself that I'd experiment with it, but something else always got in the way--kids, work, gaming... Also, I had briefly used tools like chef and puppet (or tried to), and I had a bad taste in my mouth about configuration management utilities. I'm sure part of my hesitation had to do with those tools.

Anyway, fast forward to the beginning of January 2014. Salt is still installed on my main computer, but I've never even launched or configured it. I decided to uninstall salt and come back to it another time. Just a few short days after uninstalling salt, my supervisor at work sent me an email, asking if I'd be interested in attending SaltConf. I was more than happy to jump on the opportunity to finally learn about this tool that I had been curious and hesitant to use (and get paid to do it!).

The Training

I was able to sign up for an introductory course for SaltStack, which took place on Tuesday, January 28th. This was an all-day ordeal, but it was very intriguing to me. Normally, I'm one of the quiet ones in a classroom setting. I rarely ask questions or comment on this or that. This was not the case with the training course. I was all over everything our instructors had to say. I was hooked.

A lot of topics were quickly reviewed during the training. What normally takes 3 days was compressed into a single-day course. It was rather brutal in that sense--tons of material to digest. I think they did a fantastic job of explaining the core concepts and giving a fair number of examples during the training.

The Conference

SaltConf really began on Wednesday, and there were some absolutely fantastic sessions. I was particularly impressed with a demo of VMware's vCloud Application Director, which can orchestrate the creation of entire clusters of inter-related servers.

Other sessions that were quite interesting to me mostly related to virtualization using Docker, straight LXC, and libvirt. I'm very excited to become proficient with salt when dealing with virtualized environments.

The Certification

SaltStack officially introduced its first certification, known as SSCE (SaltStack Certified Engineer). The certification fee was included in the registration for the conference. Despite only having a matter of hours worth of rudimentary experience with SaltStack, I decided I might as well take a stab at the exam. I fully expected to fail, but I had absolutely nothing to lose other than an hour taking the exam.

Well, I took the exam Wednesday night, after the full day of training and another full day of seeing real-world uses for salt. I did spend an hour or two reading docs, installing, and configuring salt on my home network too. Eighty questions and 56 minutes later, I learned my score.

I got 68 our of the 80 questions correct--85%! Not bad for a newbie. I hear the pass/fail threshold is 80%, but I've yet to receive my SSCE number or anything like that. Hopefully by Monday I'll receive that information.

Moving Forward

It actually occurred to me that I've basically built my own version of the platform-independent remote execution portion of SaltStack (for work). Many of the same concepts exist in both salt and my own implementation. I will say that I am partial to the my design, but I'll most likely be phasing it out to move toward salt in the long term.

After attending all three days of SaltStack deliciousness, I'm absolutely convinced that salt will be a part of my personal and professional toolkit for a long time to come. It's an extremely powerful and modular framework.

In the little bit of experimentation that I've done with salt on my home network, I've already found a few bug that appear to be low-hanging fruit. I plan on working closely with the community to verify that they are indeed bugs, and I most definitely plan on contributing back everything I can. This is such an exciting project!!

If you haven't used it yet, you must research it and give it a try. It is a game-changer.

Django Projects

Over the past 6 years, I've built a lot of things with Django. It has treated me very well, and I have very much enjoyed seeing it progress. I got into Django when I helped the company I was working for transition away from a homegrown PHP framework toward something more reliable and flexible. It was very exciting to learn more about Django at a time when the ecosystem was very young.

When I started with Django, there weren't a lot of pluggable apps to fill the void for things like blogs, event calendars, and other useful utilities for the kinds of sites I was building. That has changed quite a bit since then. The ecosystem has evolved and progressed like mad, and it's wonderful. We have so many choices for simple things to very complex things. It's amazing!

Unfortunately, during this whole time period, my development efforts have shifted from creating my own open source projects to share with the world toward more proprietary solutions for my employers. If it's not obvious to you from my blog activity in recent years, I've become very busy with family life and work. I have very little time to give my open source projects the attention they deserve.

For at least 4 years, I've been telling myself that I'd have/make time to revamp all of my projects. To make them usable with what Django is today instead of what it was when I built the projects. Yeah, this time has never showed up. Take a look at the last time I wrote a blog article!

I have decided to disown pretty much all of my open source Django projects. I've basically done this with one or two of the more popular projects already--let someone else take the reigns while I lurk in the background and occasionally comment on an issue here or there. I truly appreciate those who have taken the initiative here. But there are still plenty of projects that people may find useful that need some attention. I'm putting it up to the community to take these projects over if you find them useful so they can get the love and attention they need.

Here is a list of Django projects that anyone is free to assume responsibility for. Most of them are silly and mostly useless now. Some are unpleasant to look at and could use an entire rewrite.

  • django-articles - Blogging engine, which I wrote for my own site many years ago. This one could probably use a full rewrite. [already maintained by John Leith].
  • django-tracking - Visitor tracking to see what page a user is on and their general location based on IP. Update 2015-07-28: Adopted by bashu.
  • django-axes - Track failed login attempts and ban users. This one is already pretty much owned by aclark4life
  • django-reploc - Designed to show representative/retailer locations. I only used it on one site, but it was designed to be generic.
  • django-smileys - To easily replace things like :) and B-) with emoticons or whatever. Pretty lame. Update 2015-07-28: Adopted by bashu.
  • django-pendulum - A very basic time-tracking app. I believe this has already been forked and used for some more interesting commercial projects.
  • django-bibliophile - A way to let your visitors know what you're reading.
  • django-watermark - Some utilities to add watermarks to images. Update 2015-07-28: Adopted by bashu.
  • Any other Django-related project you see at https://github.com/codekoala?tab=repositories or https://bitbucket.org/codekoala/

The fact that I'm giving up these projects does not mean I'm giving up on Django. On the contrary, I'm still using it quite heavily. I'm just doing it in such a way that I can't necessarily post my work for everyone to use. I honestly don't expect much of this disowning effort, since the projects are mostly stale and incompatible with recent versions of Django. But please let me know if you do want to take over one of my projects and care for it.

Another I-Heart-Linux Story

Just had another experience that represents much of what I love about Linux and free software, and I thought I would share.

I just got my first bluray burner. I have it in a USB3-capable enclosure to use with my USB2-capable laptop. I knew burn speeds would be much lower than the drive is rated to handle primarily because of this arrangement.

A good portion of yesterday included me trying to burn my first bluray in Linux. Unfortunately, the nature of bluray standards and Linux still don't jive very well. My usual burning applications didn't have any trouble at all detecting the burner or the media, but none of them seemed to want to actually burn anything. K3b made a coaster out of one disc; Brasero did nothing. I didn't try using the command line burning tricks that I found on the interwebs.

I decided to give ImgBurn a shot. I installed it with WINE, and it ran beautifully. However, I failed to realize that I left K3b's coaster in the drive and couldn't get a disc to burn. In my own defense, the coaster was still recognized by the computer as a blank BD-R. It was at this point that I just rebooted into Windows just to verify that the drive itself worked for burning.

Windows obviously burned the first disc fine (after I realized the coaster was still in the drive and replaced it with a fresh disc). The media I have are only rated for 4x burn speeds, while the drive itself is rated for 14x burning. Windows only managed to achieve ~2x for the duration of the burn (using ImgBurn again). Also, Windows seemed to struggle trying to keep the buffers full. Every 70 seconds or so, ImgBurn would stop burning to allow the buffers to fill up again and for the hard drive to settle down a bit. But it did end up working--the disc worked in my bluray player that's hooked up to the TV!!! Success!

I decided to give ImgBurn in WINE another shot. I popped a fresh BD-R into the drive, specified the files I wanted to burn, and initiated the burn process. Right off the bat, ImgBurn under WINE was burning at 2.4x. I watched the process for 10 minutes or so before heading upstairs to let it finish. Not once was the main buffer depleted. The drive buffer (4MB) was up and down every so often, but it was never empty from the time the burn began until the time when I left my computer.

I realize that some of you out there will just see the moral of this story being something like, "Linux doesn't support burning bluray discs very well, and Windows worked on the first try." If you find yourself in this boat, you're probably not part of the intended audience of this tale. This is probably because you have some bias against any operating system that isn't the one you're currently using. No, this story is intended for people who like to tinker and don't think it's a waste of time to go through exercises like this.

Anyway, the real reason I wrote this story was to illustrate one of my favorite things about Linux: it's fast! Burning a bluray disc using an application that was written for Windows, running with a (free, open source, community-driven) Windows compatibility layer in Linux is still faster than the same program running natively on Windows. Sure, it might not always be the case, but in my ~12 years of hands-on experience with Linux, I find that it usually is the case.

UPDATE

So I've burned another 5 blurays under Linux with ImgBurn. Here's the interesting part of my most recent burn log:

I 00:51:40 Operation Started!
I 00:51:40 Source File: -==/\/[BUILD IMAGE]\/\==-
I 00:51:40 Source File Sectors: 11,978,272 (MODE1/2048)
I 00:51:40 Source File Size: 24,531,501,056 bytes
I 00:51:40 Source File Volume Identifier: Stargate - Disc 6
I 00:51:40 Source File Volume Set Identifier: 4222067200B6C611
I 00:51:40 Source File Application Identifier: IMGBURN V2.5.7.0 - THE ULTIMATE IMAGE BURNER!
I 00:51:40 Source File Implementation Identifier: ImgBurn
I 00:51:40 Source File File System(s): ISO9660, UDF (1.02)
I 00:51:40 Destination Device: [3:0:0] HL-DT-ST BD-RE  WH14NS40 1.00
I 00:51:40 Destination Media Type: BD-R (Disc ID: PHILIP-R04-000)
I 00:51:40 Destination Media Supported Write Speeds: 4x, 6x, 8x
I 00:51:40 Destination Media Sectors: 12,219,392
I 00:51:40 Write Mode: BD
I 00:51:40 Write Type: DAO
I 00:51:40 Write Speed: MAX
I 00:51:41 Hardware Defect Management Active: No
I 00:51:41 BD-R Verify Not Required: Yes
I 00:51:41 Link Size: Auto
I 00:51:41 Lock Volume: Yes
I 00:51:41 Test Mode: No
I 00:51:41 OPC: No
I 00:51:41 BURN-Proof: Enabled
I 00:51:41 Write Speed Successfully Set! - Effective: 35,968 KB/s (8x)
I 00:52:00 Filling Buffer... (80 MB)
I 00:52:02 Writing LeadIn...
I 00:52:03 Writing Session 1 of 1... (1 Track, LBA: 0 - 11978271)
I 00:52:03 Writing Track 1 of 1... (MODE1/2048, LBA: 0 - 11978271)
I 01:18:33 Synchronising Cache...
I 01:18:34 Closing Track...
I 01:18:35 Finalising Disc...
I 01:18:50 Exporting Graph Data...
I 01:18:50 Graph Data File: C:\users\wheaties\Application Data\ImgBurn\Graph Data Files\HL-DT-ST_BD-RE_WH14NS40_1.00_WEDNESDAY-JANUARY-02-2013_12-51_AM_PHILIP-R04-000_MAX.ibg
I 01:18:50 Export Successfully Completed!
I 01:18:50 Operation Successfully Completed! - Duration: 00:27:09
I 01:18:50 Average Write Rate: 15,067 KB/s (3.4x) - Maximum Write Rate: 18,615 KB/s (4.1x)

As you can see, the last line suggests things are working quite nicely in Linux:

I 01:18:50 Average Write Rate: 15,067 KB/s (3.4x) - Maximum Write Rate: 18,615 KB/s (4.1x)

I would like to note also that two of the discs I've burned so far have had some problems being read on the computer afterwards. These discs do, however, work quite nicely in the bluray player for my TV. Might just be circumstance.

Long Time No See

Hello again everyone! Soooo much has happened since I last posted on my blog. I figured it was about time to check in and actually be active on my own site again. What follows is just a summary of what has happened in our lives since the beginning of February this year.

Leaving ScienceLogic

First of all, my wife and I decided toward the end of 2011 that it was time for us to move away from Virginia. For reasons that we did not quite understand yet, we both wanted to move to Utah. I applied for my first Utah-based job opportunity just before Christmas 2011. Several of my friends in the Salt Lake City area were kind enough to get me a few interviews here and there, but none of the opportunities were very serious.

Probably about the time I wrote my last blog post, I was contacted by a recruiter in Boise. I would have loved to move back to Idaho, but my wife would have nothing to do with me if I did that. When I shared this information with the recruiter, he said he had a recruiter friend in the SLC area and that he'd pass my information along to him. Within a day, his friend had me set up with a screening problem for a company just outside of SLC.

I was a little hesitant about that particular opportunity, because it was a Ruby on Rails development shop and an advertising company. However, our timeline was getting smaller and smaller--we had to be out of our apartment by the 1st of April--and I didn't see any other serious opportunities on the horizon. So anyway, I completed the programming problem in both Python and Ruby and had a few video chats with some guys with the company. I guess they liked my work, even though I hadn't touched Ruby in several years.

Sometime in the middle of February, the company extended me an offer letter, which my wife and I considered for a few days before accepting. My last day with ScienceLogic was the 30th of February. My first day with the new company was the 12th of March, so we had a couple of weeks to pack everything up and drive across the country. Packing was ridiculously stressful, but the drive was actually quite enjoyable (my wife wouldn't agree). I drove my Mazda 3 with my 2 year old son in the back, and my wife drove the Dodge Grand Caravan with our 7 month old twins.

The New Job

We arrived in Utah on the 10th of March and immediately fell in love with the little town house we're renting and the surrounding community. It's a really nice area. We spent the first couple of days exploring the area and learning our routes to various locations.

My first week on the new job was interesting. They didn't have much for me to do, and we were all scheduled to go to a local tech conference for the last three days of the week. Very appealing way to begin a new job!

As time went on, I did a bit of work here and there, but most of my time on the job was just spent warming a chair in between requests for things to do. Eventually, I just got fed up with the amount of work I was (or, rather, wasn't) doing. By the beginning of May, I was already looking for another job where I could feel useful.

I got in touch with a guy I worked with for a couple of weeks before he quit working for the company that brought us to Utah (I'm intentionally avoiding the use of the company's name). This guy was only able to stand working for that company for about 3 weeks before he quit and went back to his prior company. He referred me for an interview with his managers, and by the middle of May, I had a new job lined up.

The Better New Job

While I was initially hesitant about the job (test automation), I looked at it as a major step up from what I had been doing since March. That and it cut my commute in half. And they provide excellent hardware. Anyway, I started working for StorageCraft Technology Company at the end of May as a Senior Software Engineer in Test.

My task was to build a framework to make the jobs of the manual testers easier. I had no requirements document to refer to, or any specific guidance other than that. I was simply asked to build something that would make lives easier. StorageCraft had recently hired another test automation developer, and the two of us worked together to come up with a design plan for the framework.

We built a lot of neat things into the framework, gave a couple of demos, and it seems like people are really quite pleased with the direction we've gone. I gave a demo of the (Django) UI just the other day, and my supervisors basically gave me the green light to keep building whatever I wanted to. Since the other test automation guy got the boot for being unreliable, I will get to see many of my plans through exactly the way I want! I'm really excited about that.

Enough About Work

Aside from all of the excitement in my career decisions, things are going very well with the family. We live about 3 hours away from my mom, and we've been out there to visit a few times already. It's really fun to see the kids playing with their grandma! The last time we were out for a visit, for my grandmother's 80th birthday, my son and I took my dad's Rhino for a spin. We got stuck, and it was sooo much fun!

Mudding in the Rhino

The twins are growing so well too. They're crawling and getting around very well now. Jane has started to stand up on her own, and she tries to take a step every once in a while. Claire prefers to sit, but she loves to wave, clap, and repeat noises that she hears.

My wife is planning on starting up a new website soon, and she keeps taunting me with the possibility of having me build it for her. Yes, taunting.

Okay, Back to Hobbies

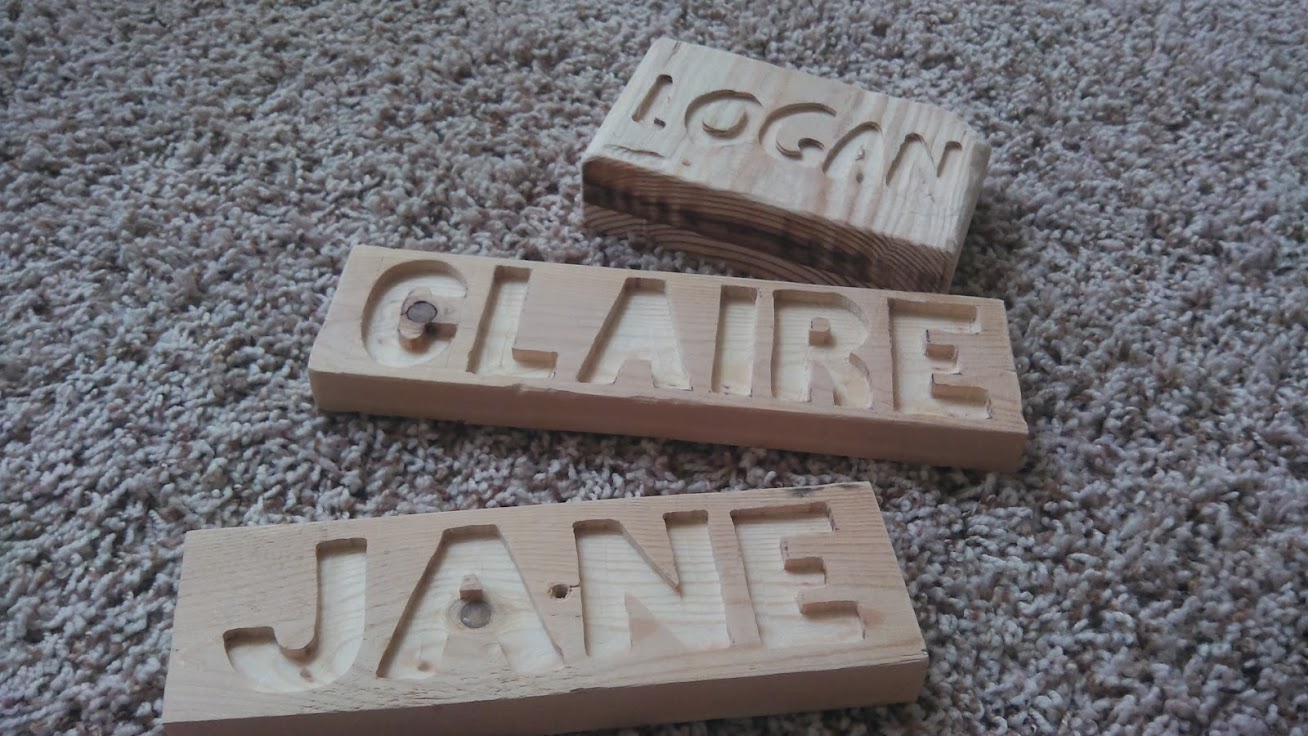
My wife also picked up a Dremel Trio for Dad's Day. To get used to it, I made some little wooden signs with the kids' names on them. Being the quasi-perfectionist that I am, I'm not completely satisfied with how they all turned out. I suppose they'll do for a "first attempt" sort of result though!

First project with the Dremel Trio

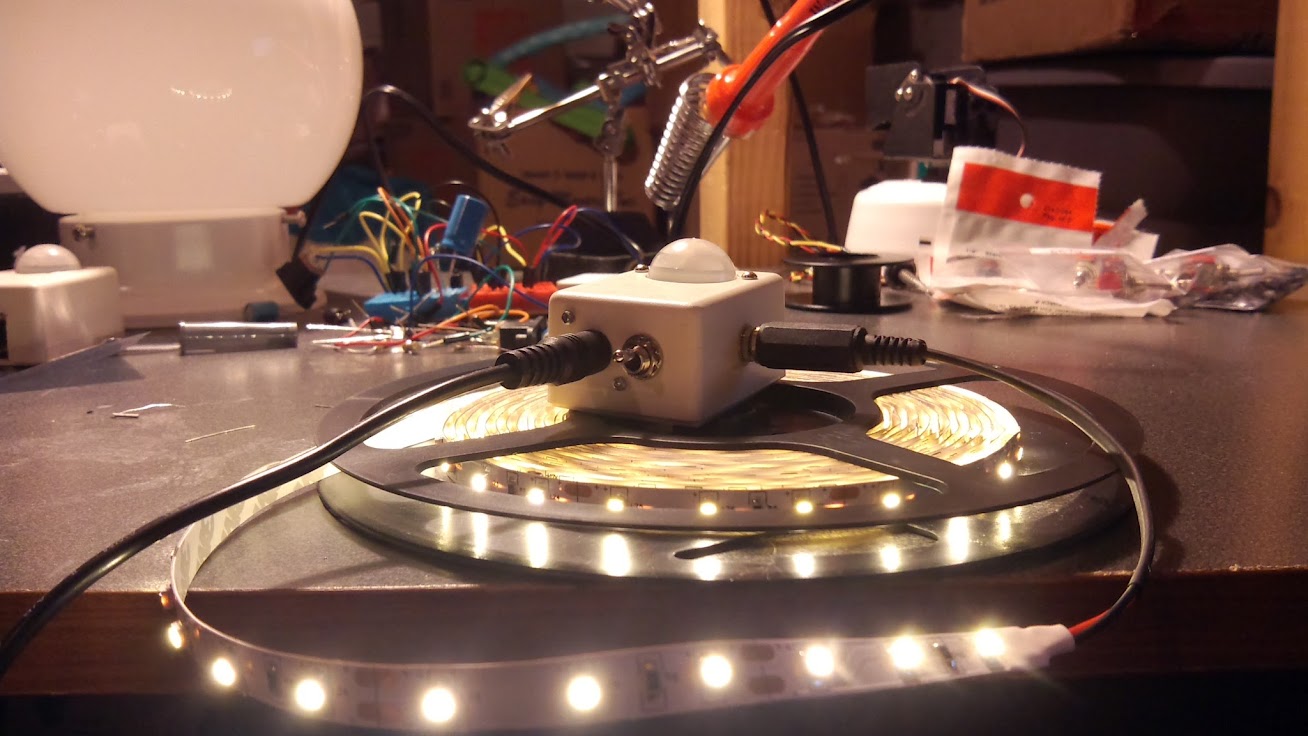
I've still got various projects in the works with my Arduino and whatnot. A couple of months ago, I finished a project that helps me see where I'm walking when I go down to my mancave at night. The light switches for the basement are all at the stairs, and my setup is on the opposite side of the basement. I typically prefer to have the lights off when I'm on my computer, and it was annoying and horribly inefficient to turn the lights on when entering the basement, go to my computer, then go back to turn the lights off.

To solve that problem, I re-purposed one of my PIR motion sensors and picked up a LED strip from eBay. I have the motion sensor pointing at the entrance to the basement, and the LED strip strung across the ceiling along the path that I take to get to my desk. When the motion sensor detects movement, it fades the LED strip on, continues to power it for a few seconds, and gradually fades them out when it no longer detects movement. It's all very sexy, if I do say so myself.

Lazy man's light switch

I've tried to capture videos of the setup, but my cameras all have poor light sensors or something, so it's difficult to really show what it's like. The LED strip illuminates the basement perfectly just long enough for me to get to my desk, but the videos just show a faint outline of my body lurking in the dark. :(

One project that is in the works right now is a desk fan that automatically turns on when the ambient temperature reaches a certain level. The fan's speed will vary depending on the temperature, and there will be an LCD screen to allow simple reporting and configuration of thresholds and whatnot. I'm pretty excited about it, but I want to order a few things off of eBay before I go much further with it.

Obviously, much more had happened in the past months, but this post is long enough already. Things are calming down quite a bit now that we're settled in, so I hope to resume activity on my open source projects as well as this blog.

Arduino-Powered Webcam Mount

Earlier this month, I completed yet another journey around the biggest star in our galaxy. Some of my beloved family members thought this would be a good occasion to send me some cash, and I also got a gift card for being plain awesome at work. Even though we really do need a bigger car and whatnot, my wife insisted that I only spend this money on myself and whatever I wanted.

Little did she know the can of worms she just opened up.

I took pretty much all of the money and blew it on stuff for my electronics projects. Up to this point, my projects have all been pretty boring simply because nothing ever moved--it was mostly just lights turning on and off or changing colors. Sure, that's fun, but things really start to get interesting when you actually interact with the physical world. With the birthday money, I was finally able to buy a bunch of servos to begin living out my childhood dream of building robots.

My first project since getting all of my new toys was a motorized webcam mount. My parents bought me a Logitech C910 for my birthday because they were tired of trying to see their grandchildren with the crappy webcam that is built into my laptop. It was a perfect opportunity to use SparkFun's tutorial for some facial tracking (thanks to OpenCV) using their Pan/Tilt Servo Bracket.

It took a little while to get everything setup properly, but SparkFun's tutorial explains perfectly how you can get everything setup if you want to repeat this project.

The problem I had with the SparkFun tutorial, though, is that it basically only gives you a standalone program that does the facial tracking and displays your webcam feed. What good is that? I actually wanted to use this rig to chat with people!! That's when I set out to figure out how to do this.

While the Processing sketch ran absolutely perfect on Windows, it didn't want to work on my Arch Linux system due to some missing dependencies that I didn't know how/care to satisfy. As such, I opted to rewrite the sketch using Python so I could do the facial tracking in Linux.

This is still a work in progress, but here's the current facial tracking program which tells the Arduino where the webcam should be pointing, along with the Arduino sketch.

Now that I could track a face and move my webcam in Linux, I still faced the same problem as before: how can I use my face-tracking, webcam-moving program during a chat with my mom? I had no idea how to accomplish this. I figured I would have to either intercept the webcam feed as it was going to Skype or the Google Talk Plugin, or I'd have to somehow consume the webcam feed and proxy it back out as a V4L2 device that the Google Talk Plugin could then use.

Trying to come up with a way of doing that seemed rather impossible (at least in straight Python), but I eventually stumbled upon a couple little gems.

So the GStreamer tutorial walks you step-by-step through different ways of using a gst-launch utility, and I found this information very useful. I learned that you can use tee to split a webcam feed and do two different things with it. I wondered if it would be possible to split one webcam feed and send it to two other V4L2 devices.

Enter v4l2loopback.

I was able to install this module from Arch's AUR, and using it was super easy (you should be root for this):

modprobe v4l2loopback devices=2

This created two new /dev/video* devices on my system, which happened to be /dev/video4 and /dev/video5 (yeah... been playing with a lot of webcams and whatnot). One device, video4, is for consumption by my face-tracking program. The other, video5, is for VLC, Skype, Google+ Hangouts, etc. After creating those devices, I simply ran the following command as a regular user:

gst-launch-0.10 v4l2src device=/dev/video1 ! \
    'video/x-raw-yuv,width=640,height=480,framerate=30/1' ! \
    tee name=t_vid ! queue ! \
    v4l2sink sync=false device=/dev/video4 t_vid. ! \
    queue ! videorate ! 'video/x-raw-yuv,framerate=30/1' ! \
    v4l2sink device=/dev/video5

There's a whole lot of stuff going on in that command that I honestly do not understand. All I know is that it made it so both my face-tracking Python program AND VLC can consume the same video feed via two different V4L2 devices! A co-worker of mine agreed to have a quick Google+ Hangout with me to test this setup under "real" circumstances (thx man). It worked :D Objective reached!

I had really hoped to find a way to handle this stuff inside Python, but I have to admit that this is a pretty slick setup. A lot of things are still hardcoded, but I do plan on making things a little more generic soon enough.

So here's my little rig (why yes, I did mount it on top of an old Kool-Aid powder thingy lid):

And a video of it in action. Please excuse the subject of the webcam video, I'm not sure where that guy came from or why he's playing with my webcam.

Firefox 6.0 Is My Default Browser Again

I've just made Firefox my default browser again (after using Chrome/Chromium as my default for quite some time). FF6 renders things almost as fast as Chrome, even on our ridiculously complicated pages at work. This was my primary reason for not using FF for such a long time.

However, there are other things that I've decided are worth going back to FF at least for the time being. If any of you know of ways to accomplish this stuff with Chrome, please enlighten me!

  • Tab groups. I often have dozens and dozens of tabs open. Some I like to have open for my "night life." Some I like to have open for research. Some I like to have open for work. Tab groups let me organize these, and hide the ones I'm currently not interested in.
  • Vimperator. This was one thing I missed dearly when I decided to ditch FF for Chrome back in the day. Vimium just doesn't work as well. It's close, but still not as robust. For example, I can still use Vimperator shortcuts when viewing a raw file. Not so with Vimium.
  • Permanent exceptions for bad certificates. Normally this wouldn't be a big deal. You visit a site that has a bad certificate, your browser warns you that bad things could be happening and advises you to be careful. That's great! However, for work we all use several VMs for development (I often have 7 VMs running all the time just for my day-to-day routine). They all share the same certificate, which is bad. Chrome doesn't let me tell it to stop bothering me about the bad certificate. Firefox does.
  • Memory usage. Strangely enough, memory usage isn't something that most people say is awesome in FF these days. But I've personally discovered that it is better than Chrome on "poorly-endowed" systems. Both Chrome and FF are consume gobs of RAM on my regular 8GB+ RAM machines, but I have plenty to spare so it doesn't bother me much. I recently inherited my wife's old MacBook, which only has 1GB of RAM. Chrome is absolutely painful to use--it's slow and brings the rest of the system to a crawl. Firefox is noticeably more responsive on that machine.
  • Selenium. I don't do much UI testing these days, but I do still use Selenium to automate some mundane tasks for work. Haven't checked to see if this is available for Chrome for a while...

So far, the only regret I really have with my decision to move back to Firefox (again, for the time being) is the amount of chrome. Chrome does a good job of staying out of the way and letting me see the web page. Firefox just has just a bit more going on at the top and bottom of the window. Definitely not a deal-breaker on my 1920x1080 laptop though ;)

Follow-Up to Weighted Sorting in Python

The activity on my latest blog post has been tremendous! I never expected that much activity within an hour or two of posting the article.

The aim of this article is to provide an alternative solution to my weighted sort when you're after increased performance. It might just be useful to those who came here in search of a way to do weighted sorting in Python. I need to give a shout out to Jeremy Brown for suggesting this solution. He's so awesome :P

While the example I posted in my previous article addressed my needs just fine, it is definitely not the fastest option. A better solution would be to completely remove the special IDs from the object list altogether and just place them in front of the list:

import itertools
import random

object_ids = [random.randint(0, 100) for i in range(20)]
special_ids = [random.choice(object_ids) for i in range(5)]

not_special_ids = (i for i in object_ids if i not in special_ids)
for i in itertools.chain(special_ids, not_special_ids):
    # do stuff with each ID
    pass

This solution is quite different from my weighted sort, as there's no sorting going on at all, just a simple generator and using itertools to chain two collections together.

Here's a way you can benchmark see which solution is faster:

from copy import copy
import cProfile
import itertools
import random

object_ids = [random.randint(0, 100) for i in range(20)]
special_ids = [random.choice(object_ids) for i in range(5)]

ITERATIONS = 1000000

def sorting():
    for i in xrange(ITERATIONS):
        l = copy(object_ids)
        l.sort(key=lambda i: int(i in special_ids) * -2 + 1)
        for i in l:
            pass

def chaining():
    for i in xrange(ITERATIONS):
        l = (i for i in object_ids if i not in special_ids)
        for i in itertools.chain(special_ids, l):
            pass

cProfile.run('sorting()')
cProfile.run('chaining()')

Sample output on my box is:

$ python weighted_sort.py
         24000003 function calls in 18.411 CPU seconds

   Ordered by: standard name

   ncalls  tottime  percall  cumtime  percall filename:lineno(function)
        1    0.000    0.000   18.411   18.411 <string>:1(<module>)
  1000000    0.580    0.000    0.580    0.000 copy.py:112(_copy_with_constructor)
  1000000    0.791    0.000    1.510    0.000 copy.py:65(copy)
        1    1.397    1.397   18.411   18.411 weighted_sort.py:11(sorting)
 20000000    8.907    0.000    8.907    0.000 weighted_sort.py:14(<lambda>)
        1    0.000    0.000    0.000    0.000 {method 'disable' of '_lsprof.Profiler' objects}
  1000000    0.139    0.000    0.139    0.000 {method 'get' of 'dict' objects}
  1000000    6.597    0.000   15.503    0.000 {method 'sort' of 'list' objects}


         16000003 function calls in 7.381 CPU seconds

   Ordered by: standard name

   ncalls  tottime  percall  cumtime  percall filename:lineno(function)
        1    0.000    0.000    7.381    7.381 <string>:1(<module>)
        1    2.744    2.744    7.381    7.381 weighted_sort.py:18(chaining)
 16000000    4.636    0.000    4.636    0.000 weighted_sort.py:20(<genexpr>)
        1    0.000    0.000    0.000    0.000 {method 'disable' of '_lsprof.Profiler' objects}

So, you can see that the chaining solution is easily twice as fast as the sorting solution over 1 million iterations. Both of these solutions work perfectly well for my purposes, and I will probably end up switching to the chaining solution sometime in the future.

EDIT After reading lqc's comment on my previous article, I've decided to update this one with more appropriate benchmarks. The information that lqc has shared makes the speed of these solutions much closer.

Here's my updated test script:

$ python weighted_sort.py
         4000003 function calls in 8.437 CPU seconds

   Ordered by: standard name

   ncalls  tottime  percall  cumtime  percall filename:lineno(function)
        1    0.000    0.000    8.437    8.437 <string>:1(<module>)
  1000000    0.558    0.000    0.558    0.000 copy.py:112(_copy_with_constructor)
  1000000    0.741    0.000    1.431    0.000 copy.py:65(copy)
        1    1.319    1.319    8.437    8.437 weighted_sort.py:11(sorting)
        1    0.000    0.000    0.000    0.000 {method 'disable' of '_lsprof.Profiler' objects}
  1000000    0.133    0.000    0.133    0.000 {method 'get' of 'dict' objects}
  1000000    5.688    0.000    5.688    0.000 {method 'sort' of 'list' objects}


         17000003 function calls in 7.545 CPU seconds

   Ordered by: standard name

   ncalls  tottime  percall  cumtime  percall filename:lineno(function)
        1    0.000    0.000    7.545    7.545 <string>:1(<module>)
        1    2.818    2.818    7.545    7.545 weighted_sort.py:18(chaining)
 17000000    4.726    0.000    4.726    0.000 weighted_sort.py:20(<genexpr>)
        1    0.000    0.000    0.000    0.000 {method 'disable' of '_lsprof.Profiler' objects}

So if you only gain a second over 1 million iterations, I think I prefer the sort(key=special_ids.__contains__) solution! I hope these two articles will help you get started on your adventures with handling special objects before others!

Simple Weighted Sort in Python

Last night I found myself in need of a simple weighted sort function in Python. I had a list of integers which represented object IDs in my project. Some of the objects needed to be processed before the others while iterating over the list of integers, and I already knew which object IDs those were. The order the rest of the object IDs were processed didn't matter at all. I just wanted the special object IDs to arrive at the beginning of the list, and the remaining object IDs could be in any order.

I was surprised at how simple it was to produce such a weighted sort. Here's an example of what I did:

import random
object_ids = [random.randint(0, 100) for i in range(20)]
special_ids = [random.choice(object_ids) for i in range(5)]
print 'Object IDs:', object_ids
print 'Special IDs:', special_ids

object_ids.sort(key=special_ids.__contains__, reverse=True)
print 'Object IDs:', object_ids

And some sample output:

Object IDs: [13, 97, 67, 5, 77, 58, 24, 99, 29, 20, 29, 75, 100, 31, 79, 5, 27, 11, 6, 1]
Special IDs: [13, 1, 27, 6, 67]
Object IDs: [13, 67, 27, 6, 1, 97, 5, 77, 58, 24, 99, 29, 20, 29, 75, 100, 31, 79, 5, 11]

Notice that each of the "special" IDs have shifted from their original position in the object_ids list to be at the beginning of the list after the sort.

The Python documentation for sort says that the key argument "specifies a function of one argument that is used to extract a comparison key from each list element." I'm using it to check to see if a given element in the list is in my special_ids list. If the element is present in the special_ids list, it will be shifted to the left because of the way the special_ids.__contains__ works.

In sorting, a value of 1 (or other positive integer) out of a comparison function generally means "this belongs to the right of the other element." A value of -1 (or other negative integer) means "this belongs to the left of the other element." A value of 0 means "these two elements are equal" (for the purposes of sorting). I'm assuming it works similarly with the key argument. Please correct me if I'm wrong!

As lqc states in the comments below, the key argument works differently. It creates a new sequence of values which is then sorted. Before lqc jumped in, I was using key=int(i in special_ids) * -2 + 1 to do the sorting, which is pretty dumb. Using key=special_ids.__contains__ is much more appropriate. Thanks lqc!!

This sort of weighted sort might not be just right for your needs, but hopefully it will give you a place to start to build your customized weighted sort!

PIR Motion Sensor + LCD Screen + Arduino Uno

For one reason or another, I've recently had the urge to follow in my father's footsteps and start tinkering with electronics. He's basically a wizard. He has fixed a lot of appliances that others tossed out the door without the slightest bit of investigation. I think he did this with the monitor I had hooked up to my very first computer. He just popped open the case, found the problem, soldered some solution in there, and that monitor worked for probably a decade afterwards. Amazing stuff.

Anyway, I have an itch to create a laser trip wire (don't ask). I took a basic electronics class my freshman year in college, so I am already familiar with resistors, capacitors, ICs, breadboards, soldering, etc. It doesn't seem like a very daunting task to create that trip wire, but I'm starting fresh with electronics (it's been a good 8 or 9 years since I last soldered or anything like that).

One of my co-workers mentioned the Arduino as something to get me started on the trip wire, so I started doing some research here and there. The more I read, the more excited I got. I wanted soo badly to buy all of the junk that I'd need to start tinkering with an Arduino, but I didn't think my wife would appreciate that--especially around Christmas time.

Several of my awesome relatives sent me very generous gift cards for Christmas this year, which finally gave me the opportunity to buy a load of stuff for the Arduino without feeling bad. So I ordered loads of stuff. Most of it is here, some of it is still on its way. My Arduino Uno arrived around noon today, and I haven't been able to stop tinkering! It's really a lot of fun, and stupid easy even if you're not a programmer!

I started with the basic "oooh, blinking LEDs!" sort of projects (or "sketches" in Arduino parlance). Then I moved on to tweak those to work with multiple LEDs. There were a few different scenarios I ran though because two of my LEDs weren't lighting up very well. I guess I either hooked them up wrong or I didn't seat them properly... whatever.

The next project was when I hooked up a PIR (passive infrared) motion sensor ($9.99 at RadioShack) and installed a demo sketch that I found on the Arduino wiki. I wasn't quite sure how to wire everything for the PIR sensor, so I took a look at this Make Magazine video to see one way of setting up the circuit. That one simply lights up an LED and makes some noise. I just made mine light up and LED since I don't have a buzzer (yet).

Next I moved on to the LCD. The package came with a 20x4 green-on-black backlit LCD display, a 2.2k Ohm resistor, and a set of pins to connect the LCD to my breadboard or whatever. I actually soldered the pins onto the LCD display board (wow, was that even more difficult than I remember!) so I would have less of a hassle getting all of the contacts working. Getting the LCD to work was pretty easy after that.

Then I took those two projects a bit further. I'm certain others have done this years ago, but I didn't use a sketch that was completely written for me this time so I felt special enough to share :) I added the PIR circuit from before less the LED, merged pieces from both demo programs, and came up with a motion sensor that would flash "INTRUDER ALERT!!" on the LCD screen a few times when triggered. Based on my testing, the sensor works extremely well (once calibrated!!), and it will detect motion well across the open area of my apartment (maybe a bit further than 20 feet)!

I'm quite happy with my work, especially for not having "dealt with" electronics for such a long time. When I tried to share my success with some of my friends, they wanted a video to prove I'm awesome (I guess?). So here it is. Trust me, I know the video is horrible--I speak too quietly (baby sleeping in next room), I stumble over my words (that's just me), and I neglected to even offer you some music to rock out to as I blabber about this stuff.

Here's the program I wrote/modified:

 /*
  * //////////////////////////////////////////////////
  * //making sense of the Parallax PIR sensor's output
  * //////////////////////////////////////////////////
  *
  * Switches a LED according to the state of the sensors output pin. Determines
  * the beginning and end of continuous motion sequences.
  *
  * @author: Kristian Gohlke / krigoo (_) gmail (_) com / http://krx.at
  * @author: Josh VanderLinden / codekoala (.) gmail (@) com / http://www.codekoala.com
  * @date:   3 Jan 2011
  *
  * kr1 (cleft) 2006
  * Released under a creative commons "Attribution-NonCommercial-ShareAlike 2.0" license
  * http://creativecommons.org/licenses/by-nc-sa/2.0/de/
  *
  *
  * The Parallax PIR Sensor is an easy to use digital infrared motion sensor module.
  * (http://www.parallax.com/detail.asp?product_id=555-28027)
  *
  * The sensor's output pin goes to HIGH if motion is present. However, even if
  * motion is present it goes to LOW from time to time, which might give the
  * impression no motion is present. This program deals with this issue by
  * ignoring LOW-phases shorter than a given time, assuming continuous motion is
  * present during these phases.
  *
  */

 #include <LiquidCrystal.h>

 int calibrationTime = 10;   // seconds to calibrate PIR
 long unsigned int pause = 5000; // timeout before we "all" motion has ceased
 long unsigned int lowIn; // the time when the sensor outputs a low impulse

 boolean lockLow = true;
 boolean takeLowTime;

 int flashCnt = 4;  // number of times the LCD will flash when there's motion
 int flashDelay = 500; // number of ms to wait while flashing LCD
 int pirPin = 7;    // the digital pin connected to the PIR sensor's output
 int lcdPin = 13;   // pin connected to LCD
 LiquidCrystal lcd(12, 11, 10, 5, 4, 3, 2);

 void setup() {
     // Calibrates the PIR

     Serial.begin(9600);
     pinMode(pirPin, INPUT);
     pinMode(lcdPin, OUTPUT);

     digitalWrite(pirPin, LOW);

     clearLcd();

     // give the sensor some time to calibrate
     lcd.setCursor(0,0);
     lcd.print("Calibrating...");

     for(int i = 0; i < calibrationTime; i++){
         lcd.print(".");
         delay(1000);
     }

     lcd.print("done");
     delay(50);
 }

 void clearLcd() {
     // Clears the LCD, turns off the backlight
     lcd.begin(20, 4);
     lcd.clear();
     digitalWrite(lcdPin, LOW);
 }

 void alertLcd() {
     // Turns on the LCD backlight and notifies user of motion
     lcd.setCursor(2, 1);
     digitalWrite(lcdPin, HIGH);
     lcd.print("INTRUDER ALERT!!");
     lcd.setCursor(2, 2);
     lcd.print("================");
 }

 void loop() {
     // Main execution loop

     if(digitalRead(pirPin) == HIGH) {
         // flash an alert a few times
         for (int c = 0; c < flashCnt; c++) {
             alertLcd();
             delay(flashDelay);
             lcd.clear();
             delay(flashDelay);
         }

         if(lockLow) {
             // makes sure we wait for a transition to LOW before any further
             // output is made:
             lockLow = false;
             delay(50);
         }
         takeLowTime = true;
     }

     if (digitalRead(pirPin) == LOW) {
         clearLcd();

         if (takeLowTime) {
             // save the time of the transition from high to LOW
             // make sure this is only done at the start of a LOW phase
             lowIn = millis();
             takeLowTime = false;
         }

         // if the sensor is low for more than the given pause,
         // we assume that no more motion is going to happen
         if (!lockLow && millis() - lowIn > pause) {
             // makes sure this block of code is only executed again after
             // a new motion sequence has been detected
             lockLow = true;
             delay(50);
         }
     }
 }

Django-Tracking 0.3.5

I've finally gotten around to looking at a bunch of tickets that had been opened for django-tracking in the past year and a half or so. I feel horrible that it's really taken that long for me to get to them! Every time I got a ticket notification, I told myself, "Okay, I'll work on that this weekend." Many have weekends have passed without any work on any of my projects. I'm going to get better about that!

Anyway, several fixes have gone into the latest version of django-tracking. Some have to do with unicode problems (thanks ramusus!). Others have to do with overall performance, while yet others have to do with overall stability.

The first interesting change in this release is that django-tracking no longer relies on the GeoIP Python API. Instead it's now using django.contrib.gis.utils.GeoIP. I had hoped that this would remove the dependency on the GeoIP C API, but it appears that I was mistaken. Oh well.

Perhaps the biggest improvement in this new release is the use of caching. With caching in place, the middleware classes don't slam the database nearly as badly as they used to. There's still more that could be done with caching to improve performance, but I think what I've got now will be a big help.

Another noteworthy change, in my opinion, is the use of logging. I've sprinkled mildly useful logging messages throughout the code so you can learn when something bad happens that is silently handled. I hope that this will help me improve the quality of the code as it will allow anyone who uses the project (and pays attention to the log messages, of course) to tell me when bad things are happening.

Finally, the packaging code has been updated to be much more simple. Version 0.3.5 has been uploaded to PyPI and is available via pip or easy_install. If you prefer to have the latest copy of the code, the official code repositories are (in order of my personal preference):

I can't wait for your feedback!