Arduino-Powered Webcam Mount

Earlier this month, I completed yet another journey around the biggest star in our galaxy. Some of my beloved family members thought this would be a good occasion to send me some cash, and I also got a gift card for being plain awesome at work. Even though we really do need a bigger car and whatnot, my wife insisted that I only spend this money on myself and whatever I wanted.

Little did she know the can of worms she just opened up.

I took pretty much all of the money and blew it on stuff for my electronics projects. Up to this point, my projects have all been pretty boring simply because nothing ever moved--it was mostly just lights turning on and off or changing colors. Sure, that's fun, but things really start to get interesting when you actually interact with the physical world. With the birthday money, I was finally able to buy a bunch of servos to begin living out my childhood dream of building robots.

My first project since getting all of my new toys was a motorized webcam mount. My parents bought me a Logitech C910 for my birthday because they were tired of trying to see their grandchildren with the crappy webcam that is built into my laptop. It was a perfect opportunity to use SparkFun's tutorial for some facial tracking (thanks to OpenCV) using their Pan/Tilt Servo Bracket.

It took a little while to get everything setup properly, but SparkFun's tutorial explains perfectly how you can get everything setup if you want to repeat this project.

The problem I had with the SparkFun tutorial, though, is that it basically only gives you a standalone program that does the facial tracking and displays your webcam feed. What good is that? I actually wanted to use this rig to chat with people!! That's when I set out to figure out how to do this.

While the Processing sketch ran absolutely perfect on Windows, it didn't want to work on my Arch Linux system due to some missing dependencies that I didn't know how/care to satisfy. As such, I opted to rewrite the sketch using Python so I could do the facial tracking in Linux.

This is still a work in progress, but here's the current facial tracking program which tells the Arduino where the webcam should be pointing, along with the Arduino sketch.

Now that I could track a face and move my webcam in Linux, I still faced the same problem as before: how can I use my face-tracking, webcam-moving program during a chat with my mom? I had no idea how to accomplish this. I figured I would have to either intercept the webcam feed as it was going to Skype or the Google Talk Plugin, or I'd have to somehow consume the webcam feed and proxy it back out as a V4L2 device that the Google Talk Plugin could then use.

Trying to come up with a way of doing that seemed rather impossible (at least in straight Python), but I eventually stumbled upon a couple little gems.

So the GStreamer tutorial walks you step-by-step through different ways of using a gst-launch utility, and I found this information very useful. I learned that you can use tee to split a webcam feed and do two different things with it. I wondered if it would be possible to split one webcam feed and send it to two other V4L2 devices.

Enter v4l2loopback.

I was able to install this module from Arch's AUR, and using it was super easy (you should be root for this):

modprobe v4l2loopback devices=2

This created two new /dev/video* devices on my system, which happened to be /dev/video4 and /dev/video5 (yeah... been playing with a lot of webcams and whatnot). One device, video4, is for consumption by my face-tracking program. The other, video5, is for VLC, Skype, Google+ Hangouts, etc. After creating those devices, I simply ran the following command as a regular user:

gst-launch-0.10 v4l2src device=/dev/video1 ! \
    'video/x-raw-yuv,width=640,height=480,framerate=30/1' ! \
    tee name=t_vid ! queue ! \
    v4l2sink sync=false device=/dev/video4 t_vid. ! \
    queue ! videorate ! 'video/x-raw-yuv,framerate=30/1' ! \
    v4l2sink device=/dev/video5

There's a whole lot of stuff going on in that command that I honestly do not understand. All I know is that it made it so both my face-tracking Python program AND VLC can consume the same video feed via two different V4L2 devices! A co-worker of mine agreed to have a quick Google+ Hangout with me to test this setup under "real" circumstances (thx man). It worked :D Objective reached!

I had really hoped to find a way to handle this stuff inside Python, but I have to admit that this is a pretty slick setup. A lot of things are still hardcoded, but I do plan on making things a little more generic soon enough.

So here's my little rig (why yes, I did mount it on top of an old Kool-Aid powder thingy lid):

And a video of it in action. Please excuse the subject of the webcam video, I'm not sure where that guy came from or why he's playing with my webcam.
Lots Of Happenings

Yay! First post in nearly 4 months! I feel kinda bad for leaving my April Fools Day joke on the front page for such a long time, but lucky for me my blog isn't very popular! I could have found myself in a world of hurt.

I'd like to give you all a quick update on what's been going on in my life that somewhat justifies a 4-month window of no blog posts. First of all, we had 25% of our backend development team (1 person, leaving 3 developers) get fired earlier in the year, so the workload at my day job got to be a bit heavier.

Second, my wife and I were pregnant with identical twin girls. It was a relatively high-risk pregnancy, so we spent many days in the hospital for checkups and whatnot. The doctors gave her somewhat strict bed rest orders, and I worked from home since the beginning of July (my job is awesome that way) so I could keep and eye on my wife and help with our soon-to-be two year old son.

Third, we had our identical twin girls this past Tuesday. They arrived at 9:25 and 9:27, and their names are Claire and Jane. Claire weighed 5 lb 3 oz, and Jane weighed 4 lb 14 oz. As expected, they lost a bit of weight at the beginning, but they're starting to gain weight again. My wife and the girls are all doing very well.

My son, on the other hand, is starting to realize that his world is changing quite drastically. We're trying to give him as much attention as we can, but it's definitely not the amount that he's used to. He seems to do very well with his new baby sisters, but there have already been several episodes where he just breaks down. It's sad.

I have a few days of leave and vacation that I'll be taking to help get everything settle at home. The girls are still in the "let's sleep all day and night until we're hungry" sort of phase (which is quite awesome), and my wife is up most of the night with them. That means the only person who doesn't sleep a ton during the day is my son, so we get some good father/son time.

Anyway, on to the nerdy stuff. Since I find myself with a couple hours of downtime here and there, I plan to do a bug-smashing ticket-resolving spree. Just as my blog has sat dormant for months, so have many of my side projects. Now is the time to change that!

Learned Something New Today

I learned something very interesting today regarding JavaScript. Back in the day, I used to put something like this in my HTML when I wanted to include some JS:

<script language="javascript">
...
</script>

Then I learned that I should be using something like this instead:

<script type="text/javascript">
...
</script>

I've been doing that for years and years now. Turns out I've been wrong all this time. Well, at least for 4 years of that time. I stumbled upon RFC4329 today for whatever reason and noticed that it said the text/javascript mimetype is obsolete. I dug into the RFC a bit and found this:

Various unregistered media types have been used in an ad-hoc fashion
to label and exchange programs written in ECMAScript and JavaScript.
These include:

   +-----------------------------------------------------+
   | text/javascript          | text/ecmascript          |
   | text/javascript1.0       | text/javascript1.1       |
   | text/javascript1.2       | text/javascript1.3       |
   | text/javascript1.4       | text/javascript1.5       |
   | text/jscript             | text/livescript          |
   | text/x-javascript        | text/x-ecmascript        |
   | application/x-javascript | application/x-ecmascript |
   | application/javascript   | application/ecmascript   |
   +-----------------------------------------------------+

Use of the "text" top-level type for this kind of content is known to
be problematic.  This document thus defines text/javascript and text/
ecmascript but marks them as "obsolete".  Use of experimental and
unregistered media types, as listed in part above, is discouraged.
The media types,

   * application/javascript
   * application/ecmascript

which are also defined in this document, are intended for common use
and should be used instead.

So yeah. It's time to go update all of my JavaScript stuff I guess. I thought the rest of you who are/were in the same boat as me might like to know about this...

My Preferred Filesystem

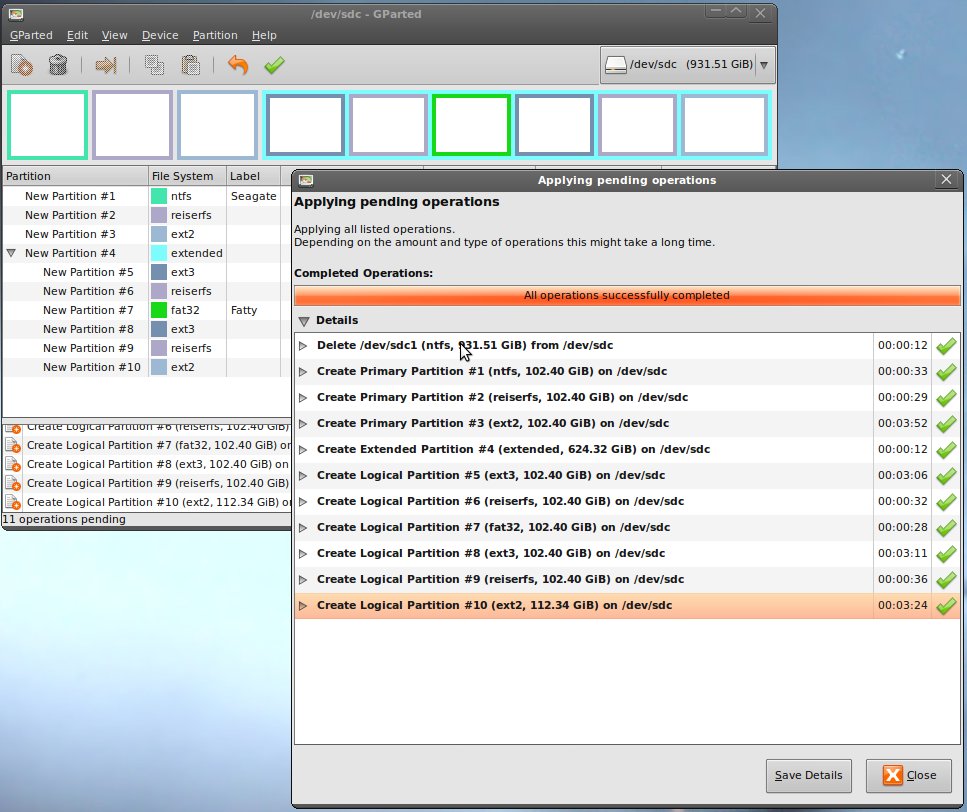
I just thought I would share this little screenshot with you all:

GParted on a 1TB

Can anyone guess what my favorite filesystem is and why?

That's right, I'm a fan of reiserfs even if its daddy is a murderer. The filesystem is fast. Really fast. I have no definitive benchmarks, I just know what I've personally experienced over the last 8 years or so. I've dabbled with the major filesystems that Linux supports like xfs, ext2, ext3, and even a little with ext4. Out of the bunch, reiserfs has always come out on top for me.

I'm not trying to start any flame wars, and I don't really care to hear why my choice is wrong--it's my choice. A few people have asked me what format I prefer, and this is just a small demonstration of why I prefer what I do. Done.

In PHP's Defense

So the other day I wrote up an article that sarcastically compared PHP and Python syntax a little. While I am completely serious when I say that I prefer Python's syntax a heck of a lot more than that of PHP, I thought it might be a good thing for me to demonstrate that the code I posted before could have been more appealing had it been thought out a little more. After a solid year of not really dealing with anything besides Python, I will share a feeble attempt at cleaning up/optimizing the PHP code.

Let's start with this snippet:

<?php
$this->result=(isset($tmp["UMstatus"])?$tmp["UMstatus"]:"Error");
$this->resultcode=(isset($tmp["UMresult"])?$tmp["UMresult"]:"E");
$this->authcode=(isset($tmp["UMauthCode"])?$tmp["UMauthCode"]:"");
$this->refnum=(isset($tmp["UMrefNum"])?$tmp["UMrefNum"]:"");
$this->batch=(isset($tmp["UMbatch"])?$tmp["UMbatch"]:"");
$this->avs_result=(isset($tmp["UMavsResult"])?$tmp["UMavsResult"]:"");
$this->avs_result_code=(isset($tmp["UMavsResultCode"])?$tmp["UMavsResultCode"]:"");
$this->cvv2_result=(isset($tmp["UMcvv2Result"])?$tmp["UMcvv2Result"]:"");
$this->cvv2_result_code=(isset($tmp["UMcvv2ResultCode"])?$tmp["UMcvv2ResultCode"]:"");
$this->vpas_result_code=(isset($tmp["UMvpasResultCode"])?$tmp["UMvpasResultCode"]:"");
$this->convertedamount=(isset($tmp["UMconvertedAmount"])?$tmp["UMconvertedAmount"]:"");
$this->convertedamountcurrency=(isset($tmp["UMconvertedAmountCurrency"])?$tmp["UMconvertedAmountCurrency"]:"");
$this->conversionrate=(isset($tmp["UMconversionRate"])?$tmp["UMconversionRate"]:"");
$this->error=(isset($tmp["UMerror"])?$tmp["UMerror"]:"");
$this->errorcode=(isset($tmp["UMerrorcode"])?$tmp["UMerrorcode"]:"10132");
$this->custnum=(isset($tmp["UMcustnum"])?$tmp["UMcustnum"]:"");

$this->avs=(isset($tmp["UMavsResult"])?$tmp["UMavsResult"]:"");
$this->cvv2=(isset($tmp["UMcvv2Result"])?$tmp["UMcvv2Result"]:"");
?>

We see a lot of duplicate code in this chunk of code. The only thing that really changes much are the variable names and associative array keys. If we had defined a function that looked something like this...

1
2
3
4
5
<?php
function assign($member, $arr, $key, $default='') {
    $this->$member = isset($arr[$key]) ? $arr[$key] : $default;
}
?>

...things might just look a bit better. Let's see what the snippet might look like with this function defined in the same class:

<?php
$this->assign("result", $tmp, "UMstatus", "Error");
$this->assign("resultcode", $tmp, "UMresult", "E");
$this->assign("authcode", $tmp, "UMauthCode");
$this->assign("refnum", $tmp, "UMrefNum");
$this->assign("batch", $tmp, "UMbatch");
$this->assign("avs_result", $tmp, "UMavsResult");
$this->assign("avs_result_code", $tmp, "UMavsResultCode");
$this->assign("cvv2_result", $tmp, "UMcvv2Result");
$this->assign("cvv2_result_code", $tmp, "UMcvv2ResultCode");
$this->assign("vpas_result_code", $tmp, "UMvpasResultCode");
$this->assign("convertedamount", $tmp, "UMconvertedAmount");
$this->assign("convertedamountcurrency", $tmp, "UMconvertedAmountCurrency");
$this->assign("conversionrate", $tmp, "UMconversionRate");
$this->assign("error", $tmp, "UMerror");
$this->assign("errorcode", $tmp, "UMerrorcode", "10132");
$this->assign("custnum", $tmp, "UMcustnum");

$this->assign("avs", $tmp, "UMavsResult");
$this->assign("cvv2", $tmp, "UMcvv2Result");
?>

In my opinion, this still isn't as appealing as the Python solution, but I'd take it over the original code. It's a lot easier to read. This may or may not be the best solution on any level of scrutiny--feel free to comment with any suggestions for ways to further improve things.

The second snippet from my original post could use a lot more help than the first one. I don't know who these guys are who wrote the PHP USA ePay module, but I think they could use a little assistance. No offense if you're reading this article--just some friendly constructive criticism. I would expect no less from anyone else who was examining my code and found ways to improve its efficiency.

Here's the original:

<?php
switch(substr($ccnum,0,1))
{
    case 2: //enRoute - First four digits must be 2014 or 2149. Only valid length is 15 digits
        if((substr($ccnum,0,4) == "2014" || substr($ccnum,0,4) == "2149") && strlen($ccnum) == 15) return 20;
        break;
    case 3: //JCB - Um yuck, read the if statement below, and oh by the way 300 through 309 overlaps with diners club.  bummer.
        if((substr($ccnum,0,4) == "3088" || substr($ccnum,0,4) == "3096" || substr($ccnum,0,4) == "3112" || substr($ccnum,0,4) == "3158" || substr($ccnum,0,4) == "3337" ||
            (substr($ccnum,0,8) >= "35280000" ||substr($ccnum,0,8) <= "358999999")) && strlen($ccnum)==16)
        {
            return 28;
        } else {
            switch(substr($ccnum,1,1))
            {
                case 4:
                case 7: // American Express - First digit must be 3 and second digit 4 or 7. Only Valid length is 15
                    if(strlen($ccnum) == 15) return 3;
                    break;
                    case 0:
                case 6:
                case 8: //Diners Club/Carte Blanche - First digit must be 3 and second digit 0, 6 or 8. Only valid length is 14
                    if(strlen($ccnum) == 14) return 4;
                    break;
            }
        }
        break;
    case 4: // Visa - First digit must be a 4 and length must be either 13 or 16 digits.
        if(strlen($ccnum) == 13 || strlen($ccnum) == 16)
        {
            return 2;
        }
        break;

    case 5: // Mastercard - First digit must be a 5 and second digit must be int the range 1 to 5 inclusive. Only valid length is 16
        if((substr($ccnum,1,1) >=1 && substr($ccnum,1,1) <=5) && strlen($ccnum) == 16)
        {
            return 1;
        }
        break;
case 6: // Discover - First four digits must be 6011. Only valid length is 16 digits.
        if(substr($ccnum,0,4) == "6011" && strlen($ccnum) == 16) return 10;
}
?>

The first, and most obvious, improvement I would make to this code is to cram the substr($ccnum,0,4) junk into its own variable. It's used 8 different times up there. While substring operations might not be the most costly of functions out there, there's no need to repeatedly call the same function to get the same value that many times in the same block of code.

Similar to how I wrote the Python version, I would also throw the things that are repeatedly compared to the substr($ccnum,0,4) into an array and use the in_array function to increase readability. Oh, and consistent indentation (and not just because I like Python--it's good style to align things).

<?php
$four = substr($ccnum, 0, 4);
switch (substr($ccnum, 0, 1)) {
    case 2:
        /* enRoute - First four digits must be 2014 or 2149. Only valid
           length is 15 digits */
        if (in_array($four, array("2014", "2149")) && strlen($ccnum) == 15) return 20;
        break;
    case 3:
        /* JCB - Um yuck, read the if statement below, and oh by the way
           300 through 309 overlaps with diners club.  bummer. */
        if (in_array($four, array("3088", "3096", "3112", "3158", "3337")) ||
            in_array(substr($ccnum, 0, 8), array("35280000", "358999999")) &&
            strlen($ccnum) == 16) {
            return 28;
        } else {
            switch (substr($ccnum, 1, 1)) {
                case 4:
                case 7:
                    /* American Express - First digit must be 3 and second
                       digit 4 or 7. Only Valid length is 15 */
                    if(strlen($ccnum) == 15) return 3;
                    break;
                case 0:
                case 6:
                case 8:
                    /* Diners Club/Carte Blanche - First digit must be 3
                       and second digit 0, 6 or 8. Only valid length is 14 */
                    if(strlen($ccnum) == 14) return 4;
                    break;
            }
        }
        break;
    case 4:
        /* Visa - First digit must be a 4 and length must be either 13 or
           16 digits. */
        if (strlen($ccnum) == 13 || strlen($ccnum) == 16) {
            return 2;
        }
        break;
    case 5:
        /* Mastercard - First digit must be a 5 and second digit must be
           int the range 1 to 5 inclusive. Only valid length is 16 */
        if ($ccnum[1] >= 1 && $ccnum[1] <= 5 && strlen($ccnum) == 16) {
            return 1;
        }
        break;
    case 6:
        /* Discover - First four digits must be 6011. Only valid length
           is 16 digits. */
        if ($four == "6011" && strlen($ccnum) == 16) return 10;
}
?>

That just feels better to me. It should work exactly the same as the original snippet (though I admit I haven't tested it--don't even have PHP installed these days), but it just looks a heck of a lot better to me. Again, it might not be the most efficient way of accomplishing the desired task, but I consider these minor changes to make all the difference when you're required to maintain the code you wrote :)

You might notice that my version of the PHP is 10 lines longer than the original. That's mostly due to the fact that I try to respect the 80-character margin by wrapping lines before reaching that point. I believe this also adds to the pleasing appearance, but I realize that's more of a subjective thing these days.

Flame away folks!

Syntax Highlighting, ReST, Pygments, and Django

Some of you regulars out there may have noticed an interesting change in the presentation of some of my articles: source code highlighting. I've been interested in doing this for quite some time, I just never really got around to implementing it until last night.

I found this implementation process to be a bit more complicatd than I had anticipated. For my own benefit as well as for anyone else who wants to do the same thing, I thought I'd document my findings in a thorough article for how to add syntax highlighting to an existing Django- and reStructuredText-powered Web site.

The power behind the syntax highlighting is:

Python is a huge player in this feature because reStructuredText (ReST) was built for Python, Pygments is the source highlighter (written in Python), and Django is written in Python (and my site is powered by Django). Some of you may recall that I converted all of my articles to ReST not too long ago because it suited my needs better than Textile, my previous markup processor. At the time, I was not aware that the conversion to ReST would make it all the easier for me to implement the syntax highlighting, but last night I figured out that that conversion probably saved me a lot of frustration. Cascading Stylesheets (CSS) are responsible for making the source code actually look good, while Pygments takes care of assigning classes to various parts of the designated source code and generating the CSS.

So, the first set of requirements, which I will not document in this article, are that you already have a Django site up and running and that you're familiar with ReST syntax. If you have the django.contrib.flatpages application installed already, you can type up some ReST documents there and apply the concepts discussed in this article.

Next, you should ensure that you have Pygments installed. There are a variety of ways to install this. Perhaps the easiest and most platform-independent method is to use easy_install:

$ easy_install pygments

This command should work essentially the same on Windows, Linux, and Macintosh computers. If you don't have it installed, you can get it from its website. If you're using a Debian-based distribution of Linux, such as Ubuntu, you could do something like this:

$ sudo apt-get install python-pygments

...and it should take care of downloading and installing Pygments. Alternatively, you can download it straight from the PyPI page and install it manually.

Now we need to install the Pygments ReST directive. A ReST directive is basically like a special command to the ReST processor. I think this part was the most difficult aspect of the implementation, simply because I didn't know where to find the Pygments directive or how to write my own. Eventually, I ended up downloading the Pygments-1.0.tar.gz file from PyPI, opening the Pygments-1.0/external/rst-directive.py file from the archive, and copying the stuff in there into a new file within my site.

For my own purposes, I made some small adjustments to the directive over what come with the Pygments distribution. I think it would save us all a lot of hassle if I just copied and pasted the directive, as I currently have it, so you can see it first-hand.

"""
    The Pygments reStructuredText directive
    ~~~~~~~~~~~~~~~~~~~~~~~~~~~~~~~~~~~~~~~

    This fragment is a Docutils_ 0.4 directive that renders source code
    (to HTML only, currently) via Pygments.

    To use it, adjust the options below and copy the code into a module
    that you import on initialization.  The code then automatically
    registers a ``code-block`` directive that you can use instead of
    normal code blocks like this::

    .. code:: python

            My code goes here.

    If you want to have different code styles, e.g. one with line numbers
    and one without, add formatters with their names in the VARIANTS dict
    below.  You can invoke them instead of the DEFAULT one by using a
    directive option::

    .. code:: python
       :number-lines:

            My code goes here.

    Look at the `directive documentation`_ to get all the gory details.

    .. _Docutils: http://docutils.sf.net/
    .. _directive documentation:
       http://docutils.sourceforge.net/docs/howto/rst-directives.html

    :copyright: 2007 by Georg Brandl.
    :license: BSD, see LICENSE for more details.
"""

# Options
# ~~~~~~~

# Set to True if you want inline CSS styles instead of classes
INLINESTYLES = False

from pygments.formatters import HtmlFormatter

# The default formatter
DEFAULT = HtmlFormatter(noclasses=INLINESTYLES)

# Add name -> formatter pairs for every variant you want to use
VARIANTS = {
    'linenos': HtmlFormatter(noclasses=INLINESTYLES, linenos=True),
}


from docutils import nodes
from docutils.parsers.rst import directives

from pygments import highlight
from pygments.lexers import get_lexer_by_name, TextLexer

def pygments_directive(name, arguments, options, content, lineno,
                       content_offset, block_text, state, state_machine):
    try:
        lexer = get_lexer_by_name(arguments[0])
    except ValueError:
        # no lexer found - use the text one instead of an exception
        lexer = TextLexer()
    # take an arbitrary option if more than one is given
    formatter = options and VARIANTS[options.keys()[0]] or DEFAULT
    parsed = highlight(u'\n'.join(content), lexer, formatter)
    parsed = '<div class="codeblock">%s</div>' % parsed
    return [nodes.raw('', parsed, format='html')]

pygments_directive.arguments = (1, 0, 1)
pygments_directive.content = 1
pygments_directive.options = dict([(key, directives.flag) for key in VARIANTS])

directives.register_directive('code-block', pygments_directive)

I won't explain what that code means, because, quite frankly, I'm still a little hazy on the inner workings of ReST directives myself. Suffice it to say that this snippet allows you to easily highlight blocks of code on ReST-powered pages.

The question now is: where do I put this snippet? As far as I'm aware, this code can be located anywhere so long as it is loaded at one point or another before you start your ReST processing. For the sake of simplicity, I just stuffed it in the __init__.py file of my Django site. This is the __init__.py file that lives in the same directory as manage.py and settings.py. Putting it in that file just makes sure it's loaded each time you start your Django site.

To make Pygments highlight a block of code, all you need to do is something like this:

.. code:: python

    print 'Hello world!'

...which would look like...

print 'Hello world!'

If you have a longer block of code and would like line numbers, use the :number-lines: option:

.. code:: python
    :number-lines:

    for i in range(100):
        print i

...which should look like this...

for i in range(100):
    print i

That's all fine and dandy, but it probably doesn't look like the code is highlighted at all just yet (on your site, not mine). It's just been marked up by Pygments to have some pretty CSS styles applied to it. But how do you know which styles mean what?

Luckily enough, Pygments takes care of generating the CSS files for you as well. There are several attractive styles that come with Pygments. I would recommend going to the Pygments demo to see which one suits you best. You can also roll your own styles, but I haven't braved that yet so I'll leave that for another day.

Once you choose a style (I chose native for Code Koala), you can run the following commands:

$ pygmentize -S native -f html > native.css
$ cp native.css /path/to/site/media/css

(obviously, you'd want to replace native with the name of the style you like the most) Finally, add a line to your HTML templates to load the newly created CSS file. In my case, it's something like this:

<link rel="stylesheet" type="text/css" href="/static/styles/native.css" />

Now you should be able to see nicely-formatted source code on your Web pages (assuming you've already got ReST processing your content).

If you haven't been using ReST to generate nicely-formatted pages, you should make sure a couple of things are in place. First, you must have the django.contrib.markup application installed. Second, your templates should be setup to process ReST markup into HTML. Here's a sample templates/flatpages/default.html:

{% extends 'base.html' %}
{% load markup %}

{% block title %}{{ flatpage.title }}{% endblock %}

{% block content %}
<h2>{{ flatpage.title }}</h2>

{{ flatpage.content|restructuredtext }}
{% endblock %}

So that short template should allow you to use ReST markup for your flatpages, and it should also take care of the magic behind the .. code:: python directive.

I should also note that Pygments can handle a TON of languages. Check out the Pygments demo for a list of languages it knows how to highlight.

I think that about does it. Hopefully this article will help some other poor chap who is currently in the same situation as I was last night, and hopefully it will save you a lot more time than it took me to figure out all this junk. If it looks like I've missed something, or maybe that something needs further clarification, please comment and I'll see what I can do.

Adding Captcha To Django's Built-in Comments

I recently had a good friend of mine ask for some help in adding a captcha field to his comments form. I gave him some pointers, but before he could put them into action he had to leave for a Thanksgiving roadtrip home. I didn't give much mind to the idea of putting captchas on my own site since it's not all that popular amongst spammers yet. When I woke up this morning, however, I found myself with a few spare minutes to see if my pointers were correct.

Some of the ideas I shared with my friend turned out to not work very well. As I tinkered about trying to get things to work on my own site, I think I came up with a relatively efficient way of doing things.

Installing The Captcha

The captcha field I use is quite simple and effective. I originally got it from http://django.agami.at/media/captcha/, but the project seems to be unmaintained now. Along the road to Django 1.0, some changes were made to the way form fields work, and there is a minor change required in the base code for this captcha field if you want it to work. Alternatively, you can use a copy of the field that I'm currently using.

All you need to do is extract the captcha directory somewhere on your PYTHONPATH. The author recommends putting it in django.contrib, but I usually just place it straight on the PYTHONPATH so all I need to do is from captcha import CaptchaField instead of from django.contrib.captcha import CaptchaField. Minor details...

Adding The Captcha

The first thing you'll want to do after installing the captcha field is add the field itself to your comments form. Instead of subclassing the built-in django.contrib.comments.forms.CommentForm form, I simply decorated the constructor of the form as such:

1
2
3
4
5
6
7
8
9
from django.contrib.comments.forms import CommentForm
from captcha import CaptchaField

def add_captcha(func):
    def wrapped(self, *args, **kwargs):
        func(self, *args, **kwargs)
        self.fields['security_code'] = CaptchaField()
    return wrapped
CommentForm.__init__ = add_captcha(CommentForm.__init__)

This adds a field called security_code to the CommentForm, and it works the same way as if you had done something like this:

1
2
3
4
5
6
7
from django import forms
from captcha import CaptchaField

class MyCommentForm(forms.Form):
    name = forms.CharField()
    ...
    security_code = CaptchaField()

You can put the decorating snippet from above anywhere you'd like so long as the module you put it in is loaded at some point in your project. I usually put this sort of magic in my main urls.py file so it's harder to forget about when I debug things.

Fixing the Form

The first problem with this little trick seems to be that the CaptchaField is rendered as unsafe HTML in the default form.html template in the built-in comments application. That just means that, instead of seeing the captcha, you will see the HTML necessary to render the CaptchaField directly on the page, like this:

<input type="hidden" name="security_code" value="captcha.caZ1SqQ" />
<img src="/static/captchas/caZ1SqQ/0656f09d3974850397dd4c4974f23a35.gif"
 alt="" /><br /><input type="text" name="security_code"
 id="id_security_code" />

To fix that, you can apply the safe filter to the field and make the template look something like this:

{% load comments i18n %}
<form action="{% comment_form_target %}" method="post">
<table>
{% for field in form %}
    {% if field.is_hidden %}
    {{ field }}
    {% else %}
    <tr{% ifequal field.name "honeypot" %} style="display:none;"{% endifequal %}>
        <th>{{ field.label_tag }}:</th>
        <td {% if field.errors %} class="error"{% endif %}>
            {{ field|safe }} &nbsp;
            {% if field.errors %}{{ field.errors|join:"; " }}{% endif %}
        </td>
    </tr>
    {% endif %}
{% endfor %}
</table>
<p class="submit">
    <input type="submit" name="post" class="submit-post"
     value="{% trans "Post" %}" />
    <input type="submit" name="preview" class="submit-preview"
     value="{% trans "Preview" %}" />

</form>

Notice the {{ field|safe }} in there. Also note that I prefer the table layout for the comment form over the default mode. If you change your form template as I have done, you should put the updated copy in your own project's template directory. It belongs in templates/comments/form.html, assuming that your templates directory is called templates. You'll probably also want to check out the preview.html template for the django.contrib.comments application. I changed mine to look like this:

{% extends "comments/base.html" %}
{% load i18n %}

{% block title %}{% trans "Preview your comment" %}{% endblock %}

{% block content %}
    {% load comments %}
    {% if form.errors %}
    <h1>{% blocktrans count form.errors|length as counter %}Please
     correct the error below{% plural %}Please correct the errors below
     {% endblocktrans %}</h1>
    {% else %}
    <h1>{% trans "Preview your comment" %}</h1>
        <blockquote>{{ comment|linebreaks }}</blockquote>

        {% trans "and" %} <input type="submit" name="submit"
         class="submit-post" value="{% trans "Post your comment" %}"
         id="submit" /> {% trans "or make changes" %}:

    {% endif %}

    {% include 'comments/form.html' %}
{% endblock %}

See how I just use the include tag to pull in the comments/form.html template I mentioned above? Saves a lot of typing and potential for problems... If you update the preview.html template, you should save your copy in templates/comments/preview.html, assuming your templates directory is called templates.

Testing It Out

At this point, you should be able to try out your newly installed captcha-fied comments. If it doesn't work, please comment on this article and perhaps we can figure out the problem!

Dexpot

I often find myself in need of more screen space when I'm using my computer. I have so many different things up on my screen at all times. Since Linux is my default operating system, I take advantage of the virtual desktop functionality that is built into most every popular window manager to make it seem like I have more screen space.

This is all fine and dandy, but it makes using Windows all the more frustrating to me. I've tried some utilities in the past that offered virtual desktop capabilities, but they always seemed weak and crashed a lot. For years I had given up on virtual desktops in Windows.

Today I decided to look into the current options for such functionality in Windows. In my searching, I came across Dexpot. I installed it, and it seems to be doing exactly what I want and more! It seems to be stable, and it only takes up 8,776K of my memory. That part could be better, but I'm not complaining :)

Anyway, I thought some of you might benefit from this utility as well.