Long Time No See

Hello again everyone! Soooo much has happened since I last posted on my blog. I figured it was about time to check in and actually be active on my own site again. What follows is just a summary of what has happened in our lives since the beginning of February this year.

Leaving ScienceLogic

First of all, my wife and I decided toward the end of 2011 that it was time for us to move away from Virginia. For reasons that we did not quite understand yet, we both wanted to move to Utah. I applied for my first Utah-based job opportunity just before Christmas 2011. Several of my friends in the Salt Lake City area were kind enough to get me a few interviews here and there, but none of the opportunities were very serious.

Probably about the time I wrote my last blog post, I was contacted by a recruiter in Boise. I would have loved to move back to Idaho, but my wife would have nothing to do with me if I did that. When I shared this information with the recruiter, he said he had a recruiter friend in the SLC area and that he'd pass my information along to him. Within a day, his friend had me set up with a screening problem for a company just outside of SLC.

I was a little hesitant about that particular opportunity, because it was a Ruby on Rails development shop and an advertising company. However, our timeline was getting smaller and smaller--we had to be out of our apartment by the 1st of April--and I didn't see any other serious opportunities on the horizon. So anyway, I completed the programming problem in both Python and Ruby and had a few video chats with some guys with the company. I guess they liked my work, even though I hadn't touched Ruby in several years.

Sometime in the middle of February, the company extended me an offer letter, which my wife and I considered for a few days before accepting. My last day with ScienceLogic was the 30th of February. My first day with the new company was the 12th of March, so we had a couple of weeks to pack everything up and drive across the country. Packing was ridiculously stressful, but the drive was actually quite enjoyable (my wife wouldn't agree). I drove my Mazda 3 with my 2 year old son in the back, and my wife drove the Dodge Grand Caravan with our 7 month old twins.

The New Job

We arrived in Utah on the 10th of March and immediately fell in love with the little town house we're renting and the surrounding community. It's a really nice area. We spent the first couple of days exploring the area and learning our routes to various locations.

My first week on the new job was interesting. They didn't have much for me to do, and we were all scheduled to go to a local tech conference for the last three days of the week. Very appealing way to begin a new job!

As time went on, I did a bit of work here and there, but most of my time on the job was just spent warming a chair in between requests for things to do. Eventually, I just got fed up with the amount of work I was (or, rather, wasn't) doing. By the beginning of May, I was already looking for another job where I could feel useful.

I got in touch with a guy I worked with for a couple of weeks before he quit working for the company that brought us to Utah (I'm intentionally avoiding the use of the company's name). This guy was only able to stand working for that company for about 3 weeks before he quit and went back to his prior company. He referred me for an interview with his managers, and by the middle of May, I had a new job lined up.

The Better New Job

While I was initially hesitant about the job (test automation), I looked at it as a major step up from what I had been doing since March. That and it cut my commute in half. And they provide excellent hardware. Anyway, I started working for StorageCraft Technology Company at the end of May as a Senior Software Engineer in Test.

My task was to build a framework to make the jobs of the manual testers easier. I had no requirements document to refer to, or any specific guidance other than that. I was simply asked to build something that would make lives easier. StorageCraft had recently hired another test automation developer, and the two of us worked together to come up with a design plan for the framework.

We built a lot of neat things into the framework, gave a couple of demos, and it seems like people are really quite pleased with the direction we've gone. I gave a demo of the (Django) UI just the other day, and my supervisors basically gave me the green light to keep building whatever I wanted to. Since the other test automation guy got the boot for being unreliable, I will get to see many of my plans through exactly the way I want! I'm really excited about that.

Enough About Work

Aside from all of the excitement in my career decisions, things are going very well with the family. We live about 3 hours away from my mom, and we've been out there to visit a few times already. It's really fun to see the kids playing with their grandma! The last time we were out for a visit, for my grandmother's 80th birthday, my son and I took my dad's Rhino for a spin. We got stuck, and it was sooo much fun!

Mudding in the Rhino

The twins are growing so well too. They're crawling and getting around very well now. Jane has started to stand up on her own, and she tries to take a step every once in a while. Claire prefers to sit, but she loves to wave, clap, and repeat noises that she hears.

My wife is planning on starting up a new website soon, and she keeps taunting me with the possibility of having me build it for her. Yes, taunting.

Okay, Back to Hobbies

My wife also picked up a Dremel Trio for Dad's Day. To get used to it, I made some little wooden signs with the kids' names on them. Being the quasi-perfectionist that I am, I'm not completely satisfied with how they all turned out. I suppose they'll do for a "first attempt" sort of result though!

First project with the Dremel Trio

I've still got various projects in the works with my Arduino and whatnot. A couple of months ago, I finished a project that helps me see where I'm walking when I go down to my mancave at night. The light switches for the basement are all at the stairs, and my setup is on the opposite side of the basement. I typically prefer to have the lights off when I'm on my computer, and it was annoying and horribly inefficient to turn the lights on when entering the basement, go to my computer, then go back to turn the lights off.

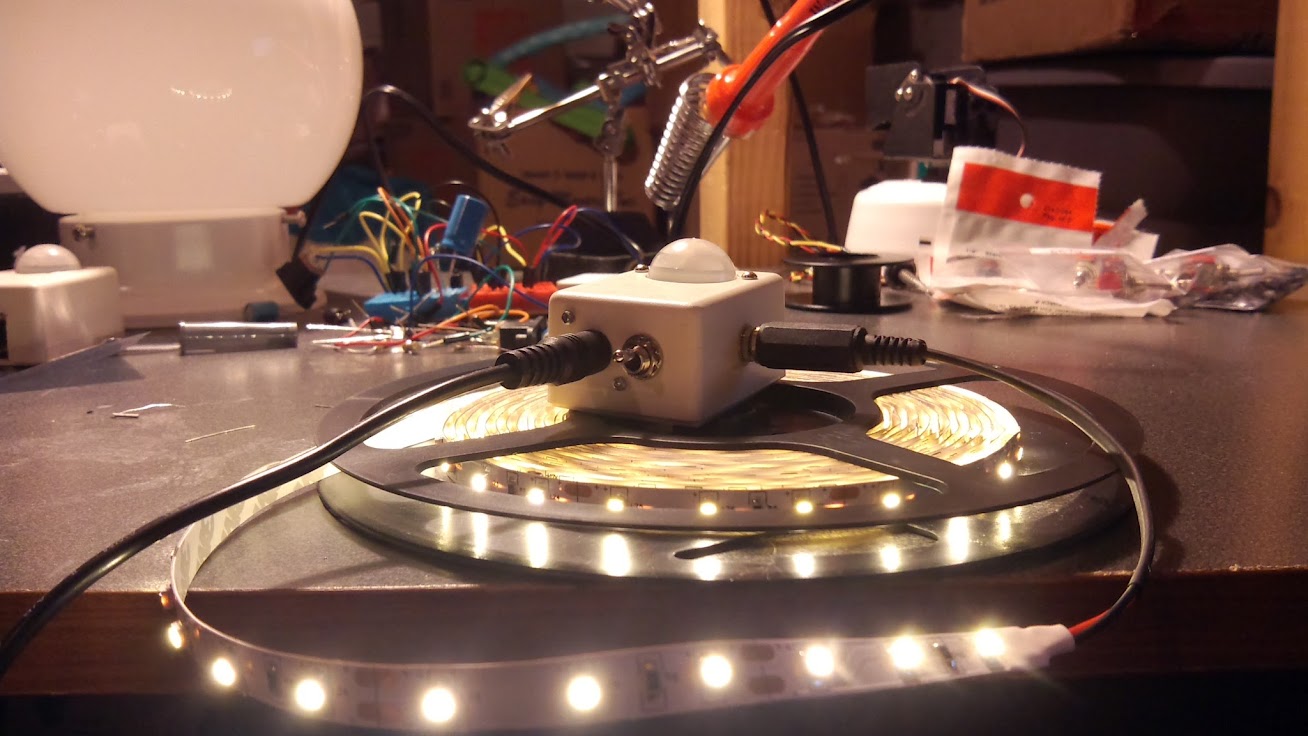
To solve that problem, I re-purposed one of my PIR motion sensors and picked up a LED strip from eBay. I have the motion sensor pointing at the entrance to the basement, and the LED strip strung across the ceiling along the path that I take to get to my desk. When the motion sensor detects movement, it fades the LED strip on, continues to power it for a few seconds, and gradually fades them out when it no longer detects movement. It's all very sexy, if I do say so myself.

Lazy man's light switch

I've tried to capture videos of the setup, but my cameras all have poor light sensors or something, so it's difficult to really show what it's like. The LED strip illuminates the basement perfectly just long enough for me to get to my desk, but the videos just show a faint outline of my body lurking in the dark. :(

One project that is in the works right now is a desk fan that automatically turns on when the ambient temperature reaches a certain level. The fan's speed will vary depending on the temperature, and there will be an LCD screen to allow simple reporting and configuration of thresholds and whatnot. I'm pretty excited about it, but I want to order a few things off of eBay before I go much further with it.

Obviously, much more had happened in the past months, but this post is long enough already. Things are calming down quite a bit now that we're settled in, so I hope to resume activity on my open source projects as well as this blog.

PIR Motion Sensor + LCD Screen + Arduino Uno

For one reason or another, I've recently had the urge to follow in my father's footsteps and start tinkering with electronics. He's basically a wizard. He has fixed a lot of appliances that others tossed out the door without the slightest bit of investigation. I think he did this with the monitor I had hooked up to my very first computer. He just popped open the case, found the problem, soldered some solution in there, and that monitor worked for probably a decade afterwards. Amazing stuff.

Anyway, I have an itch to create a laser trip wire (don't ask). I took a basic electronics class my freshman year in college, so I am already familiar with resistors, capacitors, ICs, breadboards, soldering, etc. It doesn't seem like a very daunting task to create that trip wire, but I'm starting fresh with electronics (it's been a good 8 or 9 years since I last soldered or anything like that).

One of my co-workers mentioned the Arduino as something to get me started on the trip wire, so I started doing some research here and there. The more I read, the more excited I got. I wanted soo badly to buy all of the junk that I'd need to start tinkering with an Arduino, but I didn't think my wife would appreciate that--especially around Christmas time.

Several of my awesome relatives sent me very generous gift cards for Christmas this year, which finally gave me the opportunity to buy a load of stuff for the Arduino without feeling bad. So I ordered loads of stuff. Most of it is here, some of it is still on its way. My Arduino Uno arrived around noon today, and I haven't been able to stop tinkering! It's really a lot of fun, and stupid easy even if you're not a programmer!

I started with the basic "oooh, blinking LEDs!" sort of projects (or "sketches" in Arduino parlance). Then I moved on to tweak those to work with multiple LEDs. There were a few different scenarios I ran though because two of my LEDs weren't lighting up very well. I guess I either hooked them up wrong or I didn't seat them properly... whatever.

The next project was when I hooked up a PIR (passive infrared) motion sensor ($9.99 at RadioShack) and installed a demo sketch that I found on the Arduino wiki. I wasn't quite sure how to wire everything for the PIR sensor, so I took a look at this Make Magazine video to see one way of setting up the circuit. That one simply lights up an LED and makes some noise. I just made mine light up and LED since I don't have a buzzer (yet).

Next I moved on to the LCD. The package came with a 20x4 green-on-black backlit LCD display, a 2.2k Ohm resistor, and a set of pins to connect the LCD to my breadboard or whatever. I actually soldered the pins onto the LCD display board (wow, was that even more difficult than I remember!) so I would have less of a hassle getting all of the contacts working. Getting the LCD to work was pretty easy after that.

Then I took those two projects a bit further. I'm certain others have done this years ago, but I didn't use a sketch that was completely written for me this time so I felt special enough to share :) I added the PIR circuit from before less the LED, merged pieces from both demo programs, and came up with a motion sensor that would flash "INTRUDER ALERT!!" on the LCD screen a few times when triggered. Based on my testing, the sensor works extremely well (once calibrated!!), and it will detect motion well across the open area of my apartment (maybe a bit further than 20 feet)!

I'm quite happy with my work, especially for not having "dealt with" electronics for such a long time. When I tried to share my success with some of my friends, they wanted a video to prove I'm awesome (I guess?). So here it is. Trust me, I know the video is horrible--I speak too quietly (baby sleeping in next room), I stumble over my words (that's just me), and I neglected to even offer you some music to rock out to as I blabber about this stuff.

Here's the program I wrote/modified:

 /*
  * //////////////////////////////////////////////////
  * //making sense of the Parallax PIR sensor's output
  * //////////////////////////////////////////////////
  *
  * Switches a LED according to the state of the sensors output pin. Determines
  * the beginning and end of continuous motion sequences.
  *
  * @author: Kristian Gohlke / krigoo (_) gmail (_) com / http://krx.at
  * @author: Josh VanderLinden / codekoala (.) gmail (@) com / http://www.codekoala.com
  * @date:   3 Jan 2011
  *
  * kr1 (cleft) 2006
  * Released under a creative commons "Attribution-NonCommercial-ShareAlike 2.0" license
  * http://creativecommons.org/licenses/by-nc-sa/2.0/de/
  *
  *
  * The Parallax PIR Sensor is an easy to use digital infrared motion sensor module.
  * (http://www.parallax.com/detail.asp?product_id=555-28027)
  *
  * The sensor's output pin goes to HIGH if motion is present. However, even if
  * motion is present it goes to LOW from time to time, which might give the
  * impression no motion is present. This program deals with this issue by
  * ignoring LOW-phases shorter than a given time, assuming continuous motion is
  * present during these phases.
  *
  */

 #include <LiquidCrystal.h>

 int calibrationTime = 10;   // seconds to calibrate PIR
 long unsigned int pause = 5000; // timeout before we "all" motion has ceased
 long unsigned int lowIn; // the time when the sensor outputs a low impulse

 boolean lockLow = true;
 boolean takeLowTime;

 int flashCnt = 4;  // number of times the LCD will flash when there's motion
 int flashDelay = 500; // number of ms to wait while flashing LCD
 int pirPin = 7;    // the digital pin connected to the PIR sensor's output
 int lcdPin = 13;   // pin connected to LCD
 LiquidCrystal lcd(12, 11, 10, 5, 4, 3, 2);

 void setup() {
     // Calibrates the PIR

     Serial.begin(9600);
     pinMode(pirPin, INPUT);
     pinMode(lcdPin, OUTPUT);

     digitalWrite(pirPin, LOW);

     clearLcd();

     // give the sensor some time to calibrate
     lcd.setCursor(0,0);
     lcd.print("Calibrating...");

     for(int i = 0; i < calibrationTime; i++){
         lcd.print(".");
         delay(1000);
     }

     lcd.print("done");
     delay(50);
 }

 void clearLcd() {
     // Clears the LCD, turns off the backlight
     lcd.begin(20, 4);
     lcd.clear();
     digitalWrite(lcdPin, LOW);
 }

 void alertLcd() {
     // Turns on the LCD backlight and notifies user of motion
     lcd.setCursor(2, 1);
     digitalWrite(lcdPin, HIGH);
     lcd.print("INTRUDER ALERT!!");
     lcd.setCursor(2, 2);
     lcd.print("================");
 }

 void loop() {
     // Main execution loop

     if(digitalRead(pirPin) == HIGH) {
         // flash an alert a few times
         for (int c = 0; c < flashCnt; c++) {
             alertLcd();
             delay(flashDelay);
             lcd.clear();
             delay(flashDelay);
         }

         if(lockLow) {
             // makes sure we wait for a transition to LOW before any further
             // output is made:
             lockLow = false;
             delay(50);
         }
         takeLowTime = true;
     }

     if (digitalRead(pirPin) == LOW) {
         clearLcd();

         if (takeLowTime) {
             // save the time of the transition from high to LOW
             // make sure this is only done at the start of a LOW phase
             lowIn = millis();
             takeLowTime = false;
         }

         // if the sensor is low for more than the given pause,
         // we assume that no more motion is going to happen
         if (!lockLow && millis() - lowIn > pause) {
             // makes sure this block of code is only executed again after
             // a new motion sequence has been detected
             lockLow = true;
             delay(50);
         }
     }
 }

GIT-SVN on Slackware 12.2

With all of the hype that git has been receiving lately, I started playing with it a while back to see if it suited me and my wants/needs. I found it to be an interesting utility. I won't go into any details simply because I'm not really all that knowledgeable about all the ins and outs of version control systems, but I will say that I have decided I like it. I'm still not sure whether I prefer GIT over SVN or SVN over GIT.

My problem is that basically all of my projects are based on SVN repositories. I don't want to have to start up a new GIT repository for each of my past projects. Fortunately, there is an interface for GIT to use SVN repositories called git-svn. I use this utility primarily on my EeePC because it saves a good amount of space on my small disk (the git-svn versions of the working copies are typically about half the size of their svn counterparts). Sometimes it's a little wacky, but it works well enough for my needs.

I started using this git-svn utility on a Debian-based distribution. That meant it was insanely simple to get up and running: sudo apt-get install git-svn. I recently installed Slackware 12.2, and I was surprised to find out that the git-svn utility wasn't immediately available to me.

I did some googling to see if others had encountered the same problem. There were several accurate hits, but I couldn't quite find the solution I needed. In the end, I finally got things working. The following information describes what I did to achieve this monumental success.

Trying git svn

The first roadblock that I encountered, obviously, was finding out that git-svn didn't work on my shiny new Slackware installation. After doing a bit of research, I learned that I could substitute the familiar git-svn command with git svn and continue using it as I previously had.

Installing Dependencies

Once I learned about git svn and tried it out, I got a nasty error about Alien/SVN. I've lost track of the original error, and for that I apologize. Doing a little bit of research led me to execute this command as root:

cpan Alien::SVN

I'm not sure exactly whether that step is required, but you might as well do it :).

Next, I downloaded a couple SlackBuilds to create my own Slackware packages suited for my computer.

For each SlackBuild, you must download the original source code along with the actual SlackBuild itself. For example, when retrieving the necessary files for swig, I must download both swig-1.3.35.tar.gz and swig.tar.gz from the link specified. Here are some example commands, which should be run as root:

mkdir -p ~/downloads/slackbuilds; cd ~/downloads/slackbuilds
wget http://slackbuilds.org/slackbuilds/12.2/development/swig.tar.gz
tar zxf swig.tar.gz
cd swig/
wget http://downloads.sourceforge.net/swig/swig-1.3.35.tar.gz
./swig.SlackBuild
installpkg /tmp/swig-1.3.35-i486-1_SBo.tgz

The commands above should create a new directory in /root/ called downloads/slackbuilds. Next, the SlackBuild for swig will be downloaded and extracted, after which the swig source code will be downloaded. The SlackBuild is executed, rendering an installable Slackware package. Finally, the package is installed onto the system.

The process is basically the same for the subversion-bindings SlackBuild. On my system, however, I had to modify the stock SlackBuild slightly. I didn't install Apache on my EeePC because I don't use it and it would just be taking up space. When I tried to execute the SlackBuild for subversion-bindings straight from the archive, it complained about a missing apxs file, which has something to do with Apache.

To avoid the error, I modified the subversion-bindings.SlackBuild script to ignore the apxs thingy. The original ./configure section looked like this:

CFLAGS="$SLKCFLAGS" \
./configure \
  --prefix=/usr \
  --mandir=/usr/man \
  --enable-shared \
  --disable-static \
  --with-apr=/usr \
  --with-apr-util=/usr \
  --with-apxs=/usr/sbin/apxs \
  --with-neon=/usr \
  --with-zlib=/usr \
  --with-pic \
  --with-ssl \
  --build=$ARCH-slackware-linux

I just removed the line that says --with-apxs=/usr/sbin/apxs \ and ran the SlackBuild script again. Worked like a charm.

At this point everything appeared to be able to work properly. Running git svn from the command line no longer spit out that nasty error I mentioned earlier. Instead it gave me the options I would expect to see.

That's when I tried to update an existing working copy of an SVN repository. It gave me this error:

$ git svn rebase
Authentication realm: <http://special.domain.com:80> Subversion - code
Password for 'myuser': Can't locate Term/ReadKey.pm in @INC (@INC contains:
/usr/lib/perl5/site_perl/5.10.0/i486-linux-thread-multi /usr/lib/perl5
/site_perl/5.10.0 /usr/lib/perl5/5.10.0/i486-linux-thread-multi /usr/lib
/perl5/5.10.0 /usr/lib/perl5/site_perl /usr/lib/perl5/vendor_perl/5.10.0
/i486-linux-thread-multi /usr/lib/perl5/vendor_perl/5.10.0 /usr/lib/perl5
/vendor_perl .) at /usr/libexec/git-core/git-svn line 3071.

That's not very nice, now is it? The solution was fairly simple: install Perl's Term::ReadKey module. As root, execute the following command:

cpan Term::ReadKey

After doing that I was able to happily update my working copy and move on.

I don't envision that this article will be the all-knowing, all-powerful resource for how to use git-svn on Slackware, but I sure hope it will help some other folks who run into the same problems as me.

Installing Slackware 12.2 On Your EeePC (701 4G, in my case)

Welcome to my second article about installing Slackware on an Asus EeePC. This is a follow-up article to the one I posted in May 2008 soon after Slackware 12.1 was released. In this article, I will assume that you're doing a fresh installation of Slackware 12.2 and that you have access to an external USB CD/DVD ROM drive.

In all honesty, the installation process is extremely similar to what I did with 12.1. However, looking back at my previous article, I realize that my steps may not have been the most useful in the world. This time around I will try to be more helpful.

Getting Slackware

The first, and most obvious step, is to get a copy of Slackware. Simply head on over to http://www.slackware.com/getslack/ and retrieve the appropriate ISO(s) using whichever method you prefer. I downloaded the DVD version of Slackware. If you download the CD ISOs, you really only need the first 3 ISOs. The remaining 3 are source packages for the binary packages you install from the first three discs. Rarely do you need the source code for these packages.

After retrieving the Slackware ISO(s), you must burn them to a disc of some sort: ISOs that are ~650MB should be burned to CDs and anything larger should (obviously) be burned to a DVD. Be sure you burn each ISO using the "burn disc image" functionality in your disc writing software--simply burning the ISO file onto the disc in a regular data session will not do what we need.

Booting The Install Disc

After you have a good copy of the installation disc (the DVD or the first of the CDs), put the disc into your CD/DVD ROM drive and reboot your computer. To ensure that your computer boots from the disc rather than the hard drive, hit F2 when you see the initial boot screen. Then go to the "Boot" tab and verify that your external CD/DVD drive takes precedence over the internal SSD. While we're in the BIOS, let's hop over to the "Advanced" tab and set "OS Installation" to "Start". This will increase the chances that your external drive will be recognized or something.... mine didn't work until I made that change. When you're all done with that, exit your BIOS, saving your changes.

The computer will reboot, and it should access your installation disc immediately after the initial boot screen disappears. Once you boot from the installation disc, you should be presented with a screen which allows you to pass some settings to the installation kernel.

The installation boot screen

To make the installation go faster, use the following boot string:

hugesmp.s hdc=noprobe

This makes it so the installation will see the internal SSD as /dev/sda instead of /dev/hdc, which also boosts the read/write times by about 13 times.

During the boot process you will be asked to specify your keyboard map. Unless you want something special here, just hit the enter key to proceed.

Partition Your SSD

Next you will need to login as root and partition your SSD. You can do this using one of the following two commands:

fdisk /dev/sda
cfdisk /dev/sda

Here are some steps in case you're not familiar with these utilities:

  1. Remove all partitions (unless you know what you're doing)
    1. fdisk: d to delete (you may have to select multiple partitions to delete if you have more than one for some reason)
    2. cfdisk: Select all partitions individually with up/down arrow keys and use the left/right arrow keys to select delete from the menu at the bottom. Hit enter to run the delete command when it's highlighted.
  2. Create one partition that takes the whole SSD (again, unless you know what you're doing)
    1. fdisk: n (for new); enter; p (for primary); enter; 1 (for the first primary partition); enter; enter (to start at the beginning of the drive); enter (to select the end of the drive)
    2. cfdisk: Select the new command with the left/right arrow keys and hit enter when it's selected. Make it a primary partition, and have it take the whole SSD (3997.49MB in my case).
  3. Set the type of the new partition to be Linux
    1. fdisk: t (for type); enter; 83 (for Linux); enter
    2. cfdisk: Use the left/right arrow keys to select the type command at the bottom and hit enter when it's selected. Choose 83.
  4. Set the new partition (or the first, if you decided to make more than one) to be bootable
    1. fdisk: a (for bootable); enter; 1 (for primary partition 1); enter
    2. cfdisk: Select the bootable command from the bottom using the left/right arrow keys. Hit enter when it's selected.
  5. Write the changes to the partition table and quit
    1. fdisk: w
    2. cfdisk: Use the left/right arrow keys to select the write command from the bottom. Hit enter when it's selected. Type 'yes' to verify your intent, acknowledging that your previous data will be "gone". Then select the quit command.

Installing Slackware

As soon as your partitioning has finished, go ahead and run setup to begin the actual installation program.

The first screen of the installation program

Since we don't have a swap partition, can jump straight to the TARGET option. Use the arrow keys to highlight this option and hit enter. Select /dev/sda1 from the list, and format it with ext2. On the EeePC, most people prefer this format since it is a non-journaling filesystem. That means fewer writes to the SSD, which supposedly translates to a longer lifetime.

After the SSD is formatted, you will be asked to select the installation source. Again, I'm assuming that you want to use your fresh Slackware 12.2 disc, but you are free to choose what you want if you know what you're doing.

Selecting the installation source

I went with the default "Install from a Slackware CD or DVD" and told it to auto scan for my disc drive. It was found at /dev/sr0.

Choosing Your Packages

Next, you are given the opportunity to tweak the package series which will be installed on your EeePC. I chose the following series: A, AP, K, L, N, TCL, X, and XAP. I planned on using XFCE instead of KDE on my EeePC simply because it is much more light-weight and still capable of what I need. If you want KDE, be sure to check the appropriate series.
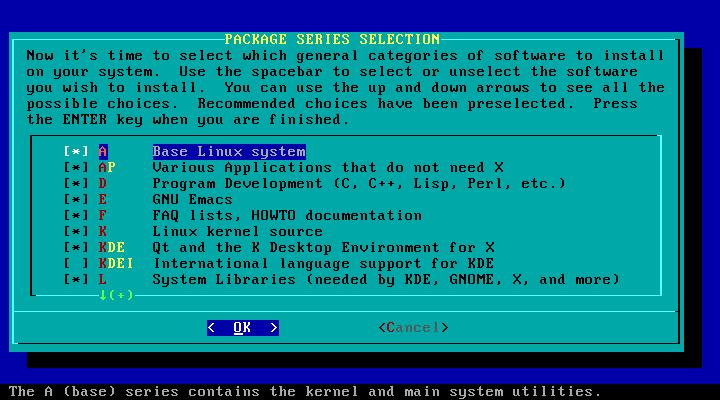
Selecting the packages to install

Once you mark each of the package series you wish to install, hit the "OK" button. You'll then have to choose which prompting mode to use. I chose menu, simply to be a little more picky about which packages I wanted installed. Installation took approximately 28 minutes with my package selection and setup.

Configuring Your System

When all of the packages are done being installed, you will be presented with some other screens to finish up the installation process.

  1. Choose whether or not you want to make a bootable USB... I skipped it.
  2. Choose how you wish to install LILO. I chose simple.
  3. Choose your frame buffer mode for the console. I chose 640x480x256.
  4. Specify any optional kernel parameters. Ensure that the hdc=noprobe from earlier is here to speed up your system considerably.
  5. Specify whether you wish to use UTF-8 on the console. I chose no.
  6. Specify where to install LILO. I chose MBR.
  7. Specify your mouse type. I chose imps2.
  8. Specify whether or not you wish to have gpm run at boot, which allows you to use your mouse in the console. I chose yes.
  9. Configure your network.
  10. Give your EeePC a hostname. This can be whatever you'd like.
  11. Specify the domain for your network. This can be whatever you'd like as well.
  12. Configure your IP address information. I just chose DHCP.
  13. Set the DHCP hostname. I left this blank.
  14. Review and confirm your network settings.
  15. Choose which services you wish to have running immediately after booting.
  16. See if you want to try custom screen fonts. I usually don't bother.
  17. Specify whether your hardware clock is set to local time or UTC.
  18. Choose your timezone.
  19. Select your preferred window manager. I chose XFCE.
  20. Set the root password.

At this point Slackware has been installed on your EeePC and you can exit the setup menu and hit Ctrl-Alt-Delete to reboot your computer.

First Boot

You should now go back into your BIOS and set "OS Installation" back to "Finished", exit and save changes, and reboot again.

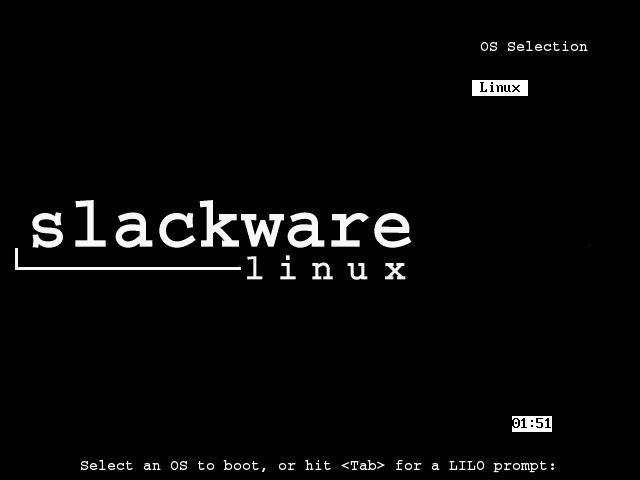
Slackware's default LILO boot screen

You should then see the Slackware boot screen. By default, it has a 2-minute timeout, which seems absolutely absurd to me, so we'll change that later. Just hit enter for now and watch your new Slackware boot. The first boot will usually take a bit longer than subsequent reboots because all sorts of things need to generate their first configuration file.

When your system is ready, you'll be presented with a login prompt. Just login as root, using the password you specified in the last step of the installation process.

Tweaking Your Slackware

Here are some of the first things I do when I install a new copy of Slackware:

Add An Unprivileged User

This step is very important, because one thing that sets Linux apart from other operating systems is security ;). If you run your Linux system as root all the time, you're begging for problems.

To create a new unprivileged user, I use the adduser command. It walks you through the process of creating a user. This is the user you should use to do your day-to-day computing. Only use the root user when performing system administration tasks. Trust me :)

Tell X Windows to Start Automatically

I have no problem with the command line interface in Linux. I actually enjoy it quite a bit. However, on a device such as the EeePC, not having a GUI just doesn't seem all that practical. It's also not very impressive to your potential converts when they look over your shoulder and see that your tiny gadget just displays a black and white screen when you turn it on...

So, to help ourselves be a little more productive and to impress our followers, let's tell X Windows to start up automatically when we turn on the computer. To do that, we want to edit /etc/inittab and change the following line:

id:3:initdefault:

to be:

id:4:initdefault:

You can use whatever program you feel comfortable with, such as vi or nano. The next time you reboot your computer, you should see a GUI as soon as all of the services are fully loaded.

Along with this step, I suppose we can mention the configuration of X Windows. I usually run xorgsetup as root to get things up and running. Usually there is also a bit of tweaking to get things like the scroll wheel on the mouse to function. This part in particular took quite some time for me to figure out.

Enable The Scroll Wheel on the Trackpad

Some of you might be able to live without being able to scroll a page or whatever without using the scroll feature on most mouse devices these days, but I'm not one of them. Here is my entire /etc/X11/xorg.conf file:

Section "ServerLayout"
    Identifier     "X.org Configured"
    Screen      0  "Screen0" 0 0
    InputDevice    "Mouse0" "CorePointer"
    InputDevice    "SynapticMouse" "AlwaysCore"
    InputDevice    "Keyboard0" "CoreKeyboard"
EndSection

Section "Files"
    RgbPath      "/usr/share/X11/rgb"
    ModulePath   "/usr/lib/xorg/modules"
    FontPath     "/usr/share/fonts/TTF"
    FontPath     "/usr/share/fonts/OTF"
    FontPath     "/usr/share/fonts/Type1"
    FontPath     "/usr/share/fonts/misc"
    FontPath     "/usr/share/fonts/75dpi/:unscaled"
EndSection

Section "Module"
    Load  "xtrap"
    Load  "GLcore"
    Load  "record"
    Load  "dri"
    Load  "dbe"
    Load  "extmod"
    Load  "glx"
    Load  "freetype"
    Load  "type1"
    Load  "synaptics"
EndSection

Section "InputDevice"
    Identifier  "Keyboard0"
    Driver      "kbd"
    Option       "XkbModel"  "pc104"
    Option       "XkbLayout"  "us"
EndSection

Section "InputDevice"
    Identifier  "Mouse0"
    Driver "mouse"
    Option "Device" "/dev/input/mice"
    Option "Protocol" "IMPS/2"
    Option "Buttons" "5"
    Option "zAxisMapping" "4 5"
    Option "SHMConfig" "on"
EndSection

Section "InputDevice"
    Identifier "SynapticMouse"
    Driver "synaptics"
    Option "Device" "/dev/input/mice"
    Option "Protocol" "auto-dev"
    Option "SHMConfig" "on"
EndSection

Section "Monitor"
    Identifier   "Monitor0"
    VendorName   "Monitor Vendor"
    ModelName    "Monitor Model"
EndSection

Section "Device"
        ### Available Driver options are:-
        ### Values: <i>: integer, <f>: float, <bool>: "True"/"False",
        ### <string>: "String", <freq>: "<f> Hz/kHz/MHz"
        ### [arg]: arg optional
        #Option     "NoAccel"               # [<bool>]
        #Option     "SWcursor"              # [<bool>]
        #Option     "ColorKey"              # <i>
        #Option     "CacheLines"            # <i>
        #Option     "Dac6Bit"               # [<bool>]
        #Option     "DRI"                   # [<bool>]
        #Option     "NoDDC"                 # [<bool>]
        #Option     "ShowCache"             # [<bool>]
        #Option     "XvMCSurfaces"          # <i>
        #Option     "PageFlip"              # [<bool>]
    Identifier  "Card0"
    Driver      "intel"
    VendorName  "Intel Corporation"
    BoardName   "Mobile 915GM/GMS/910GML Express Graphics Controller"
    BusID       "PCI:0:2:0"
EndSection

Section "Screen"
    Identifier "Screen0"
    Device     "Card0"
    Monitor    "Monitor0"
    DefaultDepth 24
    SubSection "Display"
        Viewport   0 0
        Depth     1
    EndSubSection
    SubSection "Display"
        Viewport   0 0
        Depth     4
    EndSubSection
    SubSection "Display"
        Viewport   0 0
        Depth     8
    EndSubSection
    SubSection "Display"
        Viewport   0 0
        Depth     15
    EndSubSection
    SubSection "Display"
        Viewport   0 0
        Depth     16
    EndSubSection
    SubSection "Display"
        Viewport   0 0
        Depth     24
    EndSubSection
EndSection

A lot of that stuff might not be necessary, but it's what works for me. Normally the process for enabling the scroll wheel is pretty easy, but something seems to have changed in this respect with the release of Slackware 12.2. I had to edit the /etc/modprobe.d/psmouse script to make this line:

options psmouse proto=imps

look like:

options psmouse proto=any

After making that change, things seemed to work a lot better.

Make LILO to Boot Faster

There are a couple tricks we can use to make LILO boot our EeePC slightly faster. The first is to add the compact option somewhere, and the second is to decrease the menu timeout.

Open up /etc/lilo.conf with a text editor of your choosing as root. Add a single line with the word compact somewhere. I put it under the line that says boot = /dev/sda so the top of lilo.conf looks like this:

# LILO configuration file
# generated by 'liloconfig'
#
# Start LILO global section
# Append any additional kernel parameters:
append="hdc=noprobe vt.default_utf8=8"
boot = /dev/sda
compact

I also changed the line that said timeout = 1200 to be timeout = 50 to make LILO only hang around for 5 seconds instead of 2 minutes.

After making these changes, we must reinstall LILO to the MBR with the new settings:

lilo -v

Here's my /etc/lilo.conf with most of the commented lines removed:

# LILO configuration file
# generated by 'liloconfig'
#
# Start LILO global section
# Append any additional kernel parameters:
append="hdc=noprobe vt.default_utf8=0"
boot = /dev/sda
compact

# Boot BMP Image.
# Bitmap in BMP format: 640x480x8
bitmap = /boot/slack.bmp
bmp-colors = 255,0,255,0,255,0
bmp-table = 60,6,1,16
bmp-timer = 65,27,0,255

prompt
timeout = 50
change-rules
reset
vga = normal
# End LILO global section
# Linux bootable partition config begins
image = /boot/vmlinuz
root = /dev/sda1
label = Linux
read-only
# Linux bootable partition config ends

Network Tweaking

While the wireless adapter seemed to work great for me out of the box this time, the ethernet adapter is still not functional. I compiled and installed the atl2 driver to solve the problem. You can get it from http://people.redhat.com/csnook/atl2/atl2-2.0.4.tar.bz2. Here are the steps I took to install it:

wget http://people.redhat.com/csnook/atl2/atl2-2.0.4.tar.bz2
tar jxf atl2-2.0.4.tar.bz2
cd atl2-2.0.4
make
cp atl2.ko /lib/modules/`uname -r`/kernel/drivers/net/
depmod -a
modprobe atl2
ifconfig

The next tweak I added for networking was to boost boot times... The DHCP address request hangs the entire boot process out of the box if you don't have an ethernet cable plugged in while booting. To remedy this problem, add the following line to the first section of your /etc/rc.d/rc.inet1.conf:

DHCP_TIMEOUT[0]="5"

This will tell your computer to continue booting if an IP address hasn't been assigned after 5 seconds of waiting.

Enable Frequency Scaling

We all like out battery to last a long time, right? Well, the EeePC 701 doesn't have the greatest battery in the world, but we can help increase the battery life by enabling the CPU frequency modules. I put this stuff in my /etc/rc.d/rc.local script:

#!/bin/sh
#
# /etc/rc.d/rc.local:  Local system initialization script.
#
# Put any local startup commands in here.  Also, if you have
# anything that needs to be run at shutdown time you can
# make an /etc/rc.d/rc.local_shutdown script and put those
# commands in there.

modprobe p4-clockmod
modprobe cpufreq_ondemand
modprobe cpufreq_conservative
modprobe cpufreq_powersave
modprobe cpufreq_performance

cpufreq-set -g ondemand -d 450Mhz -u 900Mhz

Add Your SD Card to /etc/fstab

I have an SD card that I leave in my EeePC all the time, and it's formatted with ext2 just like the internal SSD. Without this tweak, I have to mount the SD card each time I turn on the computer, which gets bothersome. My fix is to add the SD card to /etc/fstab, which takes care of mounting the device at boot.

First, you should make a directory that will be used to mount the device. I made one as such:

mkdir /mnt/sd

Now you need to determine your SD card's UUID. I started out by unmounting my SD card and taking it out of the slot. Then I executed this command:

ls /dev/disk/by-uuid

Next, I popped the SD card back in and executed that command again. The UUID that appears the second time but not the first time is your SD card's UUID.

It's time to add the magic line to your /etc/fstab. Add a line such as:

UUID=[your SD card's UUID] /mnt/sd ext2 defaults,noatime 1 1

somewhere in the file. While we're digging around in /etc/fstab, we might as well add the noatime option to the internal SSD to help reduce disk writes. Save the file and exit the editor. Then mount everything (using mount -a) or just the SD card (using mount /mnt/sd).

For posterity's sake, here's my entire /etc/fstab file:

/dev/sda1        /                ext2        defaults,noatime         1   1
UUID=30293ff4-5bee-457a-8528-ec296f099e9a /mnt/sd ext2 defaults,noatime 1 1
#/dev/cdrom      /mnt/cdrom       auto        noauto,owner,ro  0   0
/dev/fd0         /mnt/floppy      auto        noauto,owner     0   0
devpts           /dev/pts         devpts      gid=5,mode=620   0   0
proc             /proc            proc        defaults         0   0
tmpfs            /dev/shm         tmpfs       defaults         0   0

Preventing Shutdown Hangs

Sometimes the sound card seems to make Slackware hang when you're shutting down. Everything seems to turn off fine, but the little green power LED still shines bright. The solution to this problem appears to be adding the following line:

modprobe -r snd_hda_intel

to /etc/rc.d/rc.6 right before the "Unmounting local file systems." line (around line 195).

Enable Volume Hotkeys and Sleeping

Slackware 12.2 is already listening for ACPI events by default, so we just need to insert our custom stuff into /etc/acpi/acpi_handler.sh:

#!/bin/sh

IFS=${IFS}/
set $@

#logger "ACPI Event $1, $2, $3, $4, $5"

case "$1" in
    button)
        case "$2" in
            power) /sbin/init 0;;
            sleep) /etc/acpi/actions/lid.sh;;
            lid)
                if grep -q closed /proc/acpi/button/lid/LID/state
                then
                    /etc/acpi/actions/lid.sh
                fi
                ;;
            *) logger "ACPI action $2 is not defined";;
        esac
        ;;
    hotkey)
        case "$3" in
            # Fn+F2 Wireless/Bluetooth button
            # Fn+F7 Mute button
            00000013) amixer set Master toggle;;
            # Fn+F8 Volume down
            00000014) amixer set Master 10%-;;
            # Fn+F9 Volume up
            00000015) amixer set Master 10%+;;
        esac
        ;;
    *) logger "ACPI group $1 / action $2 is not defined";;
esac

And to handle the closing of the lid or pressing the sleep button, we need to create a new script in /etc/acpi/actions/ called lid.sh:

#!/bin/sh
# script by Fluxx from linuxquestions slackware forum
# discover video card's ID
ID=`/sbin/lspci | grep VGA | awk '{ print $1 }' | sed -e 's@:@/@'`

# securely create a temporary file
TMP_FILE=`mktemp /tmp/video_state.XXXXXX`
trap 'rm -f $TMP_FILE' 0 1 15

# switch to virtual terminal 1 to avoid graphics
# corruption in X
chvt 1

/sbin/hwclock --systohc

# remove the webcam module
rmmod uvcvideo

# write all unwritten data (just in case)
sync

# dump current data from the video card to the
# temporary file
cat /proc/bus/pci/$ID > $TMP_FILE

# suspend-to-ram
# (samwise) not using this it stuffs up the screen brightness
echo -n mem > /sys/power/state

# suspend-to-disk
#echo -n disk > /sys/power/state

# standby
#echo -n standby > /sys/power/state

# force on for now...
xset dpms force on

/sbin/hwclock --hctosys

# restore the webcam module
modprobe uvcvideo

# restore video card data from the temporary file
# on resume
cat $TMP_FILE > /proc/bus/pci/$ID

# switch back to virtual terminal 2 (running X)
chvt 6; sleep 2
chvt 2

# remove temporary file
rm -f $TMP_FILE

And we need to make sure the script is executable:

chmod +x /etc/acpi/actions/lid.sh

These scripts should enable us to use the mute key, the increase/decrease volume keys, and the sleep key. They should also allow us to close the lid of the EeePC to put it to sleep. Occasionally, when you wake up the computer, you will just see a blank black screen. To get around this, switch back to VT2 by using the keystroke Ctrl+Alt+F2.

Install Special Packages

Slackware comes with a lot of awesome stuff right out of the box, but it is missing some very important utilities at the same time. Included in this list, for me, is a program called wicd, or a network connectivity manager. This is similar to the "Network Manager" utility found in other mainstream distributions like Ubuntu, Fedora, and openSuSE. Slackware has yet to include such a utility by default.

Anyway, wicd can be found in the extra directory on the Slackware DVD or the 3rd (?) CD. To install it, find the package on the disc (or download it from the Internet) and execute the following command:

installpkg wicd-1.5.6-noarch-2.tgz

Be sure to check out the extra directory on the Slackware install disc. There are some neat tools in there. Some excellent resources for Slackware packages include:

There are some utilities out there to help you in your quest to resolve package dependencies. Two of the major ones that I've used in the past are swaret and slapt-get.

Using Slackware 12.2
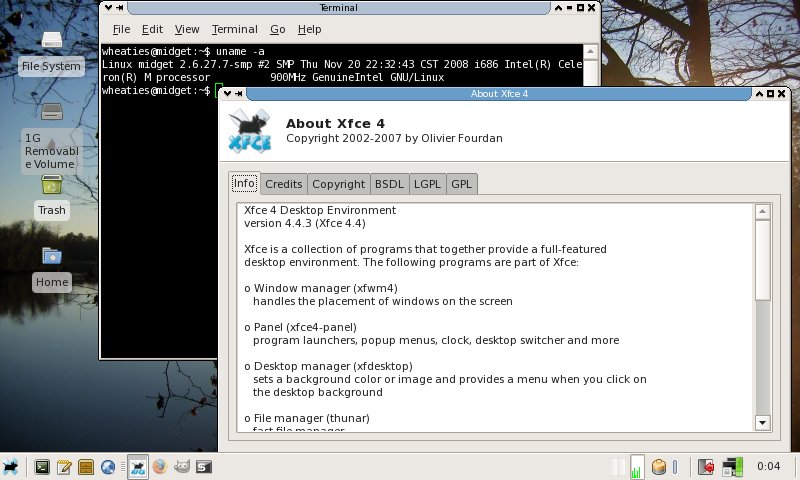
My Slackware 12.2-powered EeePC 701 4G

I have to give the Linux kernel hackers props--the 2.6.27.7 kernel is amazingly fast! I'm sure the fact that I'm running a fairly stock Slackware installation (as opposed to something like Ubuntu) helps the speed quite a bit too. This past semester I had Linux Mint 5 (XFCE edition) installed on my EeePC, and that seemed fairly responsive. Slackware blew me away though, and I can still do everything I want to do!

The webcam and sound card work out of the box, just like the wireless. I rarely use the webcam, but it's fun to play with, and my mom appreciates seeing me on Skype occasionally. The wireless connection quality exceeds what it was with the madwifi driver I was using with Slackware 12.1 and other distros like Linux Mint. Programs are ultra speedy and responsive, even with the processor clocked at 450Mhz. I love it!!!

Boot times could be better, but I'm not too concerned with it. My setup takes approximately 50 seconds from boot to a useable desktop interface. Not horrible by any means, but perhaps not the best for a netbook when all you want to do is check your e-mail.

I would like to see the Network Manager that so many other distributions offer in Slackware some day. The wicd application is nice, but it's not nearly as intuitive as Network Manager, and it seems to be relatively limited in its capabilities in comparison. I know I'm not alone in my desire to see Network Manager included, or at least available, for Slackware. It would be tremendously beneficial in a world where wireless networking and laptops are more and more pervasive. Using the command line to adjust your wireless connection settings each time you have to hop to a new access point is just annoying.

In the end, I'm excited to have Slackware on my EeePC once again. I think it will be around for quite a while this time.

Please comment with any advice or problems that you have in regards to installing Slackware 12.2 on an EeePC.