Long Time No See

Hello again everyone! Soooo much has happened since I last posted on my blog. I figured it was about time to check in and actually be active on my own site again. What follows is just a summary of what has happened in our lives since the beginning of February this year.

Leaving ScienceLogic

First of all, my wife and I decided toward the end of 2011 that it was time for us to move away from Virginia. For reasons that we did not quite understand yet, we both wanted to move to Utah. I applied for my first Utah-based job opportunity just before Christmas 2011. Several of my friends in the Salt Lake City area were kind enough to get me a few interviews here and there, but none of the opportunities were very serious.

Probably about the time I wrote my last blog post, I was contacted by a recruiter in Boise. I would have loved to move back to Idaho, but my wife would have nothing to do with me if I did that. When I shared this information with the recruiter, he said he had a recruiter friend in the SLC area and that he'd pass my information along to him. Within a day, his friend had me set up with a screening problem for a company just outside of SLC.

I was a little hesitant about that particular opportunity, because it was a Ruby on Rails development shop and an advertising company. However, our timeline was getting smaller and smaller--we had to be out of our apartment by the 1st of April--and I didn't see any other serious opportunities on the horizon. So anyway, I completed the programming problem in both Python and Ruby and had a few video chats with some guys with the company. I guess they liked my work, even though I hadn't touched Ruby in several years.

Sometime in the middle of February, the company extended me an offer letter, which my wife and I considered for a few days before accepting. My last day with ScienceLogic was the 30th of February. My first day with the new company was the 12th of March, so we had a couple of weeks to pack everything up and drive across the country. Packing was ridiculously stressful, but the drive was actually quite enjoyable (my wife wouldn't agree). I drove my Mazda 3 with my 2 year old son in the back, and my wife drove the Dodge Grand Caravan with our 7 month old twins.

The New Job

We arrived in Utah on the 10th of March and immediately fell in love with the little town house we're renting and the surrounding community. It's a really nice area. We spent the first couple of days exploring the area and learning our routes to various locations.

My first week on the new job was interesting. They didn't have much for me to do, and we were all scheduled to go to a local tech conference for the last three days of the week. Very appealing way to begin a new job!

As time went on, I did a bit of work here and there, but most of my time on the job was just spent warming a chair in between requests for things to do. Eventually, I just got fed up with the amount of work I was (or, rather, wasn't) doing. By the beginning of May, I was already looking for another job where I could feel useful.

I got in touch with a guy I worked with for a couple of weeks before he quit working for the company that brought us to Utah (I'm intentionally avoiding the use of the company's name). This guy was only able to stand working for that company for about 3 weeks before he quit and went back to his prior company. He referred me for an interview with his managers, and by the middle of May, I had a new job lined up.

The Better New Job

While I was initially hesitant about the job (test automation), I looked at it as a major step up from what I had been doing since March. That and it cut my commute in half. And they provide excellent hardware. Anyway, I started working for StorageCraft Technology Company at the end of May as a Senior Software Engineer in Test.

My task was to build a framework to make the jobs of the manual testers easier. I had no requirements document to refer to, or any specific guidance other than that. I was simply asked to build something that would make lives easier. StorageCraft had recently hired another test automation developer, and the two of us worked together to come up with a design plan for the framework.

We built a lot of neat things into the framework, gave a couple of demos, and it seems like people are really quite pleased with the direction we've gone. I gave a demo of the (Django) UI just the other day, and my supervisors basically gave me the green light to keep building whatever I wanted to. Since the other test automation guy got the boot for being unreliable, I will get to see many of my plans through exactly the way I want! I'm really excited about that.

Enough About Work

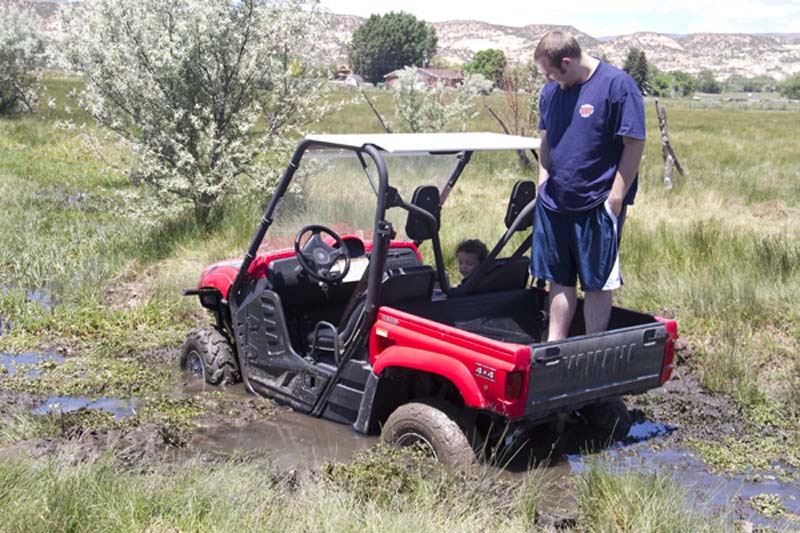
Aside from all of the excitement in my career decisions, things are going very well with the family. We live about 3 hours away from my mom, and we've been out there to visit a few times already. It's really fun to see the kids playing with their grandma! The last time we were out for a visit, for my grandmother's 80th birthday, my son and I took my dad's Rhino for a spin. We got stuck, and it was sooo much fun!

Mudding in the Rhino

The twins are growing so well too. They're crawling and getting around very well now. Jane has started to stand up on her own, and she tries to take a step every once in a while. Claire prefers to sit, but she loves to wave, clap, and repeat noises that she hears.

My wife is planning on starting up a new website soon, and she keeps taunting me with the possibility of having me build it for her. Yes, taunting.

Okay, Back to Hobbies

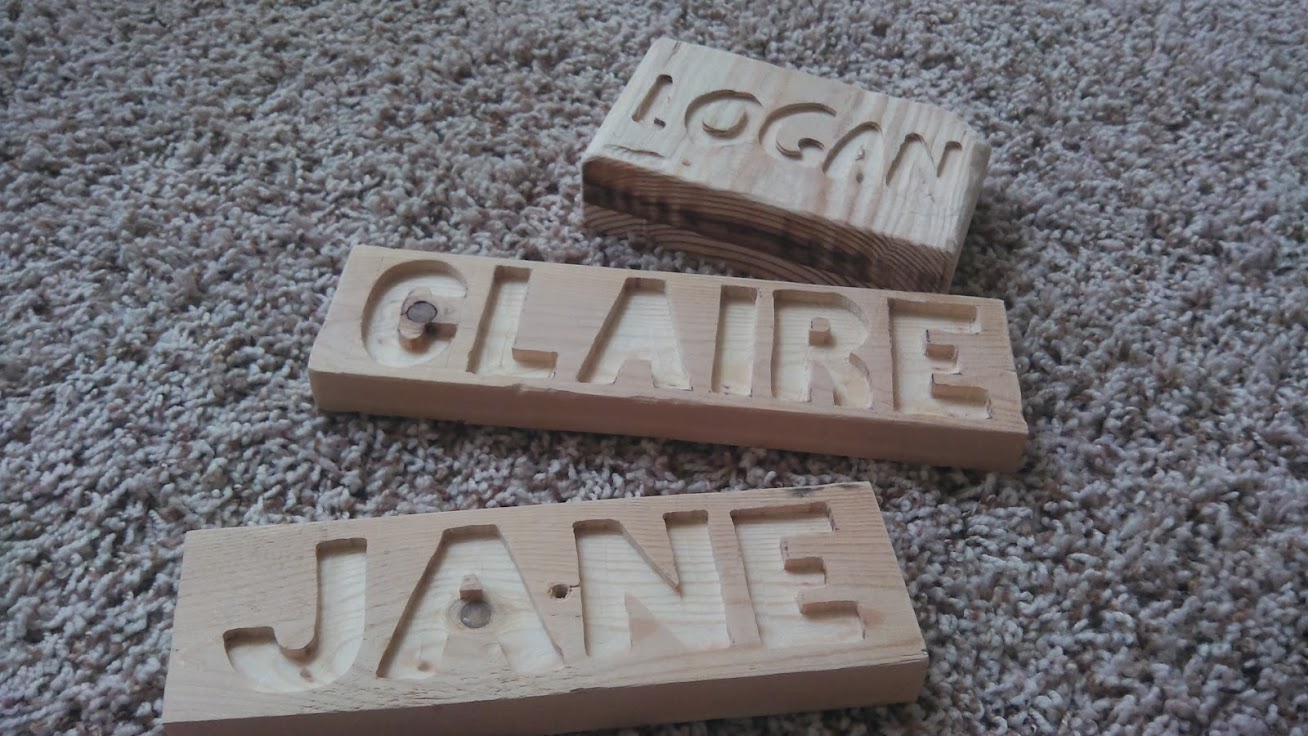
My wife also picked up a Dremel Trio for Dad's Day. To get used to it, I made some little wooden signs with the kids' names on them. Being the quasi-perfectionist that I am, I'm not completely satisfied with how they all turned out. I suppose they'll do for a "first attempt" sort of result though!

First project with the Dremel Trio

I've still got various projects in the works with my Arduino and whatnot. A couple of months ago, I finished a project that helps me see where I'm walking when I go down to my mancave at night. The light switches for the basement are all at the stairs, and my setup is on the opposite side of the basement. I typically prefer to have the lights off when I'm on my computer, and it was annoying and horribly inefficient to turn the lights on when entering the basement, go to my computer, then go back to turn the lights off.

To solve that problem, I re-purposed one of my PIR motion sensors and picked up a LED strip from eBay. I have the motion sensor pointing at the entrance to the basement, and the LED strip strung across the ceiling along the path that I take to get to my desk. When the motion sensor detects movement, it fades the LED strip on, continues to power it for a few seconds, and gradually fades them out when it no longer detects movement. It's all very sexy, if I do say so myself.

Lazy man's light switch

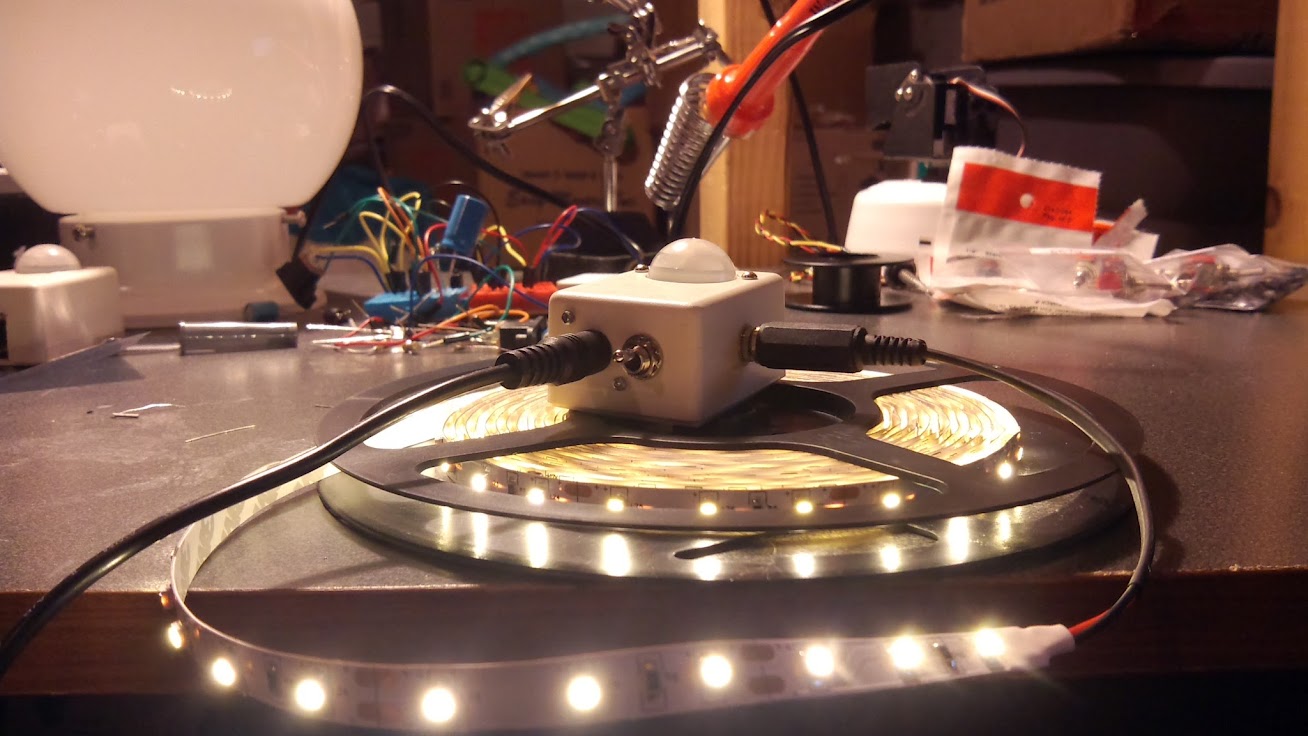
I've tried to capture videos of the setup, but my cameras all have poor light sensors or something, so it's difficult to really show what it's like. The LED strip illuminates the basement perfectly just long enough for me to get to my desk, but the videos just show a faint outline of my body lurking in the dark. :(

One project that is in the works right now is a desk fan that automatically turns on when the ambient temperature reaches a certain level. The fan's speed will vary depending on the temperature, and there will be an LCD screen to allow simple reporting and configuration of thresholds and whatnot. I'm pretty excited about it, but I want to order a few things off of eBay before I go much further with it.

Obviously, much more had happened in the past months, but this post is long enough already. Things are calming down quite a bit now that we're settled in, so I hope to resume activity on my open source projects as well as this blog.

Django Tip: Application-Specific Templates

Today I have another Django goodie to share with you. For the past few days, I've been struggling to come up with a way to only load certain Django template tag libraries when a particular Django application is installed. There may well be other, more elegant solutions for this particular problem, but it can't hurt to add my findings to the pile.

We have several templates which need to display certain information only when a particular application (Satchmo, in this case) is installed in the site. A lot of these templates are global for our 100+ Django-powered sites, such as customized admin templates and the like. It's much easier for us to maintain our code this way, as opposed to overriding templates on a per-site basis.

The Problem

We have created template tags which allow us to render "Content A" if application foo is installed or render "Content B" if foo is not installed. This works great all the way up until you need to use template tags that are specific to foo. The reason for this is that all of the template nodes appear to be parsed before they're actually rendered. That means that if foo is not installed and one of your templates included a template tag from foo's template tag library, Django will complain because it cannot find that tag (since foo is not in your settings.INSTALLED_APPS).

I investigated several possible solutions to this, including a custom loadifapp tag. The idea was to only load a template tag library if the specified application exists in settings.INSTALLED_APPS. This proved to be an interesting and very, very hacky endeavor. In the end it didn't work, and it was taking much too long to get anywhere useful.

The Solution

The solution I came up with for this situation is to create an additional include tag. I basically copied the include tag from Django itself and hacked it a bit. The result:

from django import template
from django.core.exceptions import ImproperlyConfigured
from django.db.models import get_app
from django.template.loader_tags import ConstantIncludeNode, IncludeNode

register = template.Library()

def do_include_ifapp(parser, token):
    """
    Loads a template and renders it with the current context if the specified
    application is in settings.INSTALLED_APPS.

    Example::

        {% includeifapp app_label "foo/some_include" %}
    """
    bits = token.split_contents()
    if len(bits) != 3:
        raise TemplateSyntaxError, "%r tag takes two argument: the application label and the name of the template to be included" % bits[0]

    app_name, path = bits[1:]
    app_name = app_name.strip('"\'')
    try:
        models = get_app(app_name)
    except ImproperlyConfigured:
        return template.Node()

    if path[0] in ('"', "'") and path[-1] == path[0]:
        return ConstantIncludeNode(path[1:-1])
    return IncludeNode(path)
register.tag('includeifapp', do_include_ifapp)

The magic here is the return template.Node() if Django cannot load a particular application. This makes it so the template you would be including will not be parsed, and the invalid template tag errors disappear!

To use this tag in your Django-powered site, simple plug it into one of your template tag libraries and do something like this:

{% extends 'base.html' %}
{% load our_global_tags %}

{% block content %}
<h2>Global Content Header</h2>
Bla bla

{% includeifapp foo 'foo_specific_junk.html' %}
{% endblock %}

And within foo_specific_junk.html you would load whatever template tag libraries you need that would break your templates without foo being installed. This tag should work for any application. I would be interested to hear what you use it for in the comments!

Firebug for !Firefox

Pretty much anyone who's been doing any Web development in the last few years probably prefers to use Firefox because of the incredibly powerful extensions it offers. Among the extensions I hear most Web developers complain about not having in other browsers are Web Developer and Firebug. Several people feel that they could get by with another browser (such as Google Chrome) if it only had Firebug.

Well, my friends, the trusty folks who built Firebug actually offer their amazing product for other browsers! It goes by the name of "Firebug Lite." I'm not sure exactly how long this has been around, but the earliest date I can find suggests that it was released to the public in July of 2008.

I happened upon this utility while perusing Django Snippets the other day. A member by the username of jfw posted a middleware which injects the Firebug Lite utility into a response when you're not using Firefox and when your site is in debug mode. I've found it to be quite useful. I hope you all do too!!

New Site Design

I don't know how many of you have noticed this, but I just published a new design for Code Koala. Hooray!!

Along with the change in design came several improvements to the site, including a contact me form and some code optimizations.

Here are some screenshots to illustrate the difference:

Version 1.0

Version 1

Version 2.0

Version 2

Programmers Are Tiny Gods

I stumbled across this article in my daily RSS feeding ritual. The article itself it quite short and to the point--only 9 brief paragraphs. The author brings up some valid points and uses the metaphor of programmers being "tiny" gods. Here's my favorite paragraph.

Like designers, if you give a programmer a problem with parameters, they’ll apply every bit of genius they have to solve it in the best possible way. If you tell them how to do it, you’ll suffer the wrath of an angry God.

"...be ye therefore wise..."....

The article: http://powazek.com/posts/1655

Syntax Highlighting, ReST, Pygments, and Django

Some of you regulars out there may have noticed an interesting change in the presentation of some of my articles: source code highlighting. I've been interested in doing this for quite some time, I just never really got around to implementing it until last night.

I found this implementation process to be a bit more complicatd than I had anticipated. For my own benefit as well as for anyone else who wants to do the same thing, I thought I'd document my findings in a thorough article for how to add syntax highlighting to an existing Django- and reStructuredText-powered Web site.

The power behind the syntax highlighting is:

Python is a huge player in this feature because reStructuredText (ReST) was built for Python, Pygments is the source highlighter (written in Python), and Django is written in Python (and my site is powered by Django). Some of you may recall that I converted all of my articles to ReST not too long ago because it suited my needs better than Textile, my previous markup processor. At the time, I was not aware that the conversion to ReST would make it all the easier for me to implement the syntax highlighting, but last night I figured out that that conversion probably saved me a lot of frustration. Cascading Stylesheets (CSS) are responsible for making the source code actually look good, while Pygments takes care of assigning classes to various parts of the designated source code and generating the CSS.

So, the first set of requirements, which I will not document in this article, are that you already have a Django site up and running and that you're familiar with ReST syntax. If you have the django.contrib.flatpages application installed already, you can type up some ReST documents there and apply the concepts discussed in this article.

Next, you should ensure that you have Pygments installed. There are a variety of ways to install this. Perhaps the easiest and most platform-independent method is to use easy_install:

$ easy_install pygments

This command should work essentially the same on Windows, Linux, and Macintosh computers. If you don't have it installed, you can get it from its website. If you're using a Debian-based distribution of Linux, such as Ubuntu, you could do something like this:

$ sudo apt-get install python-pygments

...and it should take care of downloading and installing Pygments. Alternatively, you can download it straight from the PyPI page and install it manually.

Now we need to install the Pygments ReST directive. A ReST directive is basically like a special command to the ReST processor. I think this part was the most difficult aspect of the implementation, simply because I didn't know where to find the Pygments directive or how to write my own. Eventually, I ended up downloading the Pygments-1.0.tar.gz file from PyPI, opening the Pygments-1.0/external/rst-directive.py file from the archive, and copying the stuff in there into a new file within my site.

For my own purposes, I made some small adjustments to the directive over what come with the Pygments distribution. I think it would save us all a lot of hassle if I just copied and pasted the directive, as I currently have it, so you can see it first-hand.

"""
    The Pygments reStructuredText directive
    ~~~~~~~~~~~~~~~~~~~~~~~~~~~~~~~~~~~~~~~

    This fragment is a Docutils_ 0.4 directive that renders source code
    (to HTML only, currently) via Pygments.

    To use it, adjust the options below and copy the code into a module
    that you import on initialization.  The code then automatically
    registers a ``code-block`` directive that you can use instead of
    normal code blocks like this::

    .. code:: python

            My code goes here.

    If you want to have different code styles, e.g. one with line numbers
    and one without, add formatters with their names in the VARIANTS dict
    below.  You can invoke them instead of the DEFAULT one by using a
    directive option::

    .. code:: python
       :number-lines:

            My code goes here.

    Look at the `directive documentation`_ to get all the gory details.

    .. _Docutils: http://docutils.sf.net/
    .. _directive documentation:
       http://docutils.sourceforge.net/docs/howto/rst-directives.html

    :copyright: 2007 by Georg Brandl.
    :license: BSD, see LICENSE for more details.
"""

# Options
# ~~~~~~~

# Set to True if you want inline CSS styles instead of classes
INLINESTYLES = False

from pygments.formatters import HtmlFormatter

# The default formatter
DEFAULT = HtmlFormatter(noclasses=INLINESTYLES)

# Add name -> formatter pairs for every variant you want to use
VARIANTS = {
    'linenos': HtmlFormatter(noclasses=INLINESTYLES, linenos=True),
}


from docutils import nodes
from docutils.parsers.rst import directives

from pygments import highlight
from pygments.lexers import get_lexer_by_name, TextLexer

def pygments_directive(name, arguments, options, content, lineno,
                       content_offset, block_text, state, state_machine):
    try:
        lexer = get_lexer_by_name(arguments[0])
    except ValueError:
        # no lexer found - use the text one instead of an exception
        lexer = TextLexer()
    # take an arbitrary option if more than one is given
    formatter = options and VARIANTS[options.keys()[0]] or DEFAULT
    parsed = highlight(u'\n'.join(content), lexer, formatter)
    parsed = '<div class="codeblock">%s</div>' % parsed
    return [nodes.raw('', parsed, format='html')]

pygments_directive.arguments = (1, 0, 1)
pygments_directive.content = 1
pygments_directive.options = dict([(key, directives.flag) for key in VARIANTS])

directives.register_directive('code-block', pygments_directive)

I won't explain what that code means, because, quite frankly, I'm still a little hazy on the inner workings of ReST directives myself. Suffice it to say that this snippet allows you to easily highlight blocks of code on ReST-powered pages.

The question now is: where do I put this snippet? As far as I'm aware, this code can be located anywhere so long as it is loaded at one point or another before you start your ReST processing. For the sake of simplicity, I just stuffed it in the __init__.py file of my Django site. This is the __init__.py file that lives in the same directory as manage.py and settings.py. Putting it in that file just makes sure it's loaded each time you start your Django site.

To make Pygments highlight a block of code, all you need to do is something like this:

.. code:: python

    print 'Hello world!'

...which would look like...

print 'Hello world!'

If you have a longer block of code and would like line numbers, use the :number-lines: option:

.. code:: python
    :number-lines:

    for i in range(100):
        print i

...which should look like this...

for i in range(100):
    print i

That's all fine and dandy, but it probably doesn't look like the code is highlighted at all just yet (on your site, not mine). It's just been marked up by Pygments to have some pretty CSS styles applied to it. But how do you know which styles mean what?

Luckily enough, Pygments takes care of generating the CSS files for you as well. There are several attractive styles that come with Pygments. I would recommend going to the Pygments demo to see which one suits you best. You can also roll your own styles, but I haven't braved that yet so I'll leave that for another day.

Once you choose a style (I chose native for Code Koala), you can run the following commands:

$ pygmentize -S native -f html > native.css
$ cp native.css /path/to/site/media/css

(obviously, you'd want to replace native with the name of the style you like the most) Finally, add a line to your HTML templates to load the newly created CSS file. In my case, it's something like this:

<link rel="stylesheet" type="text/css" href="/static/styles/native.css" />

Now you should be able to see nicely-formatted source code on your Web pages (assuming you've already got ReST processing your content).

If you haven't been using ReST to generate nicely-formatted pages, you should make sure a couple of things are in place. First, you must have the django.contrib.markup application installed. Second, your templates should be setup to process ReST markup into HTML. Here's a sample templates/flatpages/default.html:

{% extends 'base.html' %}
{% load markup %}

{% block title %}{{ flatpage.title }}{% endblock %}

{% block content %}
<h2>{{ flatpage.title }}</h2>

{{ flatpage.content|restructuredtext }}
{% endblock %}

So that short template should allow you to use ReST markup for your flatpages, and it should also take care of the magic behind the .. code:: python directive.

I should also note that Pygments can handle a TON of languages. Check out the Pygments demo for a list of languages it knows how to highlight.

I think that about does it. Hopefully this article will help some other poor chap who is currently in the same situation as I was last night, and hopefully it will save you a lot more time than it took me to figure out all this junk. If it looks like I've missed something, or maybe that something needs further clarification, please comment and I'll see what I can do.

Andy Rutledge: Don't Walk; Run

This morning I've been doing some research for work, and I stumbled upon an article that is very helpful for freelancers like me (relatively new to the freelance arena) and people looking for freelancers/design agencies.

Given the recent freelance opportunities that I have been involved with, I found this article to be particularly beneficial. There are many pieces of advice that, taken into consideration, really do distinguish the good freelancers/design agencies from the bad ones.

If the agency has any clue at all, your company will basically have to "interview for the job" in order to be accepted as a client. Agencies that know what they're doing work hard to take on only those projects and those clients that are a good fit for their skill set, even their personality. They'll want to get to know you a bit and they'll want to learn much about your project, its scope, and your specific expectations before they agree to work with you. If you find that they immediately suggest you work with them and start talking about sending you a contract, you're probably talking to the wrong agency. Hang up the phone.

I know that I am guilty of such behavior. In the past, I have quickly jumped at any opportunity to make some extra cash as a freelancer. It usually doesn't take a long time before I begin regretting my hasty acceptance of a job. This is extremely sound advice.

If anyone other than the designer who did the work presents the designs to you, something's amiss and there is likely more yet to go astray. It is an unfortunate habit among some agencies to ever get between the client and the designer. This is a terrible mistake and a clear sign that the agency, large or small, is not well run. As a result, the work produced by the agency is likely to be flawed for the voids in understanding and effectiveness that result. In short, if your project's design phase does not begin and end with direct contact between yourself and the designer, you're getting short shrift. Find another agency.

I'd like to twist this one around a little. I completely agree with what Andy has said here, but I have also been on the receiving end of this particular type of situation. On one recent project, I was receiving instructions from a person who apparently didn't have the same goals as the "real" client. The end result was a product the "real" client didn't really want. Working directly with the client/agency is critical to a successful project.

There are several other important points in Andy's article, and I wholeheartedly recommend that you read it if you find yourself in such a situation. It will only help. In conclusion, I just want to share another quote from Andy's article:

And if you do notice too many of these telltale signs of incompetence in your current agency — don't walk; run.

Using Django to Design Your Database Schema

Last night I had a buddy of mine ask me how I would approach a particular database design problem. I get similar questions quite often from my peers--suggests there is something important lacking from the database classes out there. Instead of answering him directly, I decided to come up with this tutorial for using Django to design your database schema.

For those of you new to Django, this article might seem a bit advanced. In time I will have more introductory-level Django tutorials, but I hope this one is easy enough.

Create a Django Project

The first step is to create a Django project. If you already have a project that you can play with, you can skip this step. To create a project, go to a place where you want to keep your code (like C:\projects or /home/me/projects) in a command prompt/terminal and run the following command:

django-admin.py startproject myproject

This will create a new directory in your current location called myproject (you can replace myproject with whatever you'd like so long as you're consistent). This new directory will contain a few files:

  • __init__.py
  • manage.py
  • settings.py
  • urls.py

If you get an error message when running the above command, you might not have Django installed properly. See Step-by-Step: Installing Django for details on installing Django.

Create An Application

Once you have a Django project setup, you should create a new application.

Note: If you're using Windows, you will probably need to omit the ./ on the ./manage.py commands. I will include them here for everyone else who's using Linux or a Mac.

cd myproject
./manage.py startapp specialapp

This will create a new directory in your myproject directory. This new directory will contain three files: __init__.py, models.py, and views.py. We are only concerned with the models.py file in this article.

Create Your Models

Models are usually a direct representation of what your database will be. Django makes creating these models extremely easy, and Python's syntax makes them quite readable. The Django framework asks for models to be defined in the models.py file that was created in the last step. Here's an example (for my buddy who prompted the creation of this article):

from django.db import models

class Component(models.Model):
    item_number = models.CharField(max_length=20)
    name = models.CharField(max_length=50)
    size = models.CharField(max_length=10)
    quantity = models.IntegerField(default=1)
    price = models.DecimalField(max_digits=8, decimal_places=2)

class Project(models.Model):
    name = models.CharField(max_length=50)
    components = models.ManyToManyField(Component)
    instructions = models.TextField()

(for more information about models, see the Django Model API Reference)

I don't know about you, but that code seems pretty straightforward to me. I'll spare you all the details about what's going on (that can be a future article).

Install Your New Application

Once you have your models setup, we need to add our specialapp to our list of INSTALLED_APPS in order for Django to register these models. To do that, open up settings.py in your myproject directory, go to the bottom of the file, until you see something like

1
2
3
4
5
6
INSTALLED_APPS = (
    'django.contrib.auth',
    'django.contrib.contenttypes',
    'django.contrib.sessions',
    'django.contrib.sites',
)

When you find that, add your specialapp to the list

1
2
3
4
5
6
7
INSTALLED_APPS = (
    'django.contrib.auth',
    'django.contrib.contenttypes',
    'django.contrib.sessions',
    'django.contrib.sites',
    'specialapp'
)

Setup Your Database

Now you need to let Django know what kind of database you're using. Django currently supports MySQL, SQLite3, PostgreSQL, and Oracle natively, but you can get third-party tools that allow you to use other database (like SQL Server).

Still in your settings.py, go to the top until you see DATABASE_ENGINE and DATABASE_NAME. Set that to whatever type of database you are using:

DATABASE_ENGINE = 'sqlite3'
DATABASE_NAME = 'myproject.db'

Save your settings.py and go back to your command prompt/terminal.

Get Django's Opinion For Your Schema

Make sure you're in your myproject directory and run the following command:

./manage.py sqlall specialapp

This command will examine the models that we created previously and will generate the appropriate SQL to create the tables for your particular database. For SQLite, we get something like this for output:

BEGIN;
CREATE TABLE "specialapp_component" (
      "id" integer NOT NULL PRIMARY KEY,
      "item_number" varchar(20) NOT NULL,
      "name" varchar(50) NOT NULL,
      "size" varchar(10) NOT NULL,
      "quantity" integer NOT NULL,
      "price" decimal NOT NULL
)
;
CREATE TABLE "specialapp_project" (
      "id" integer NOT NULL PRIMARY KEY,
      "name" varchar(50) NOT NULL,
      "instructions" text NOT NULL
)
;
CREATE TABLE "specialapp_project_components" (
      "id" integer NOT NULL PRIMARY KEY,
      "project_id" integer NOT NULL REFERENCES "specialapp_project" ("id"),
      "component_id" integer NOT NULL REFERENCES "specialapp_component" ("id"),
      UNIQUE ("project_id", "component_id")
)
;
COMMIT;

Notice how Django does all sorts of nifty things, like wrapping the table creation queries in a transaction, setting up indexes, unique keys, and defining relationships between tables. The output also offers a solution to the original problem my buddy had: an intermediate table that just keeps track of relationships between projects and components (the specialapp_project_components table).

Notice that the SQL above may not work with database servers other than SQLite.

Enhancing The Intermediate Table

After my buddy reviewed this article, he asked a very interesting and valid question: What if a project needs 3 of one component? In response, I offer the following models (this requires a modern version of Django--it doesn't work on Django 0.96.1 or earlier):

from django.db import models

class Component(models.Model):
    item_number = models.CharField(max_length=20)
    name = models.CharField(max_length=50)
    size = models.CharField(max_length=10)
    quantity = models.IntegerField(default=1)
    price = models.DecimalField(max_digits=8, decimal_places=2)

class Project(models.Model):
    name = models.CharField(max_length=50)
    components = models.ManyToManyField(Component, through='ProjectComponent')
    instructions = models.TextField()

class ProjectComponent(models.Model):
    project = models.ForeignKey(Project)
    component = models.ForeignKey(Component)
    quantity = models.PositiveIntegerField()

    class Meta:
        unique_together = ['project', 'component']

Running ./manage.py sqlall specialapp now generates the following SQL:

BEGIN;
CREATE TABLE "specialapp_component" (
    "id" integer NOT NULL PRIMARY KEY,
    "item_number" varchar(20) NOT NULL,
    "name" varchar(50) NOT NULL,
    "size" varchar(10) NOT NULL,
    "quantity" integer NOT NULL,
    "price" decimal NOT NULL
)
;
CREATE TABLE "specialapp_project" (
    "id" integer NOT NULL PRIMARY KEY,
    "name" varchar(50) NOT NULL,
    "instructions" text NOT NULL
)
;
CREATE TABLE "specialapp_projectcomponent" (
    "id" integer NOT NULL PRIMARY KEY,
    "project_id" integer NOT NULL REFERENCES "specialapp_project" ("id"),
    "component_id" integer NOT NULL REFERENCES "specialapp_component" ("id"),
    "quantity" integer unsigned NOT NULL,
    UNIQUE ("project_id", "component_id")
)
;
CREATE INDEX "specialapp_projectcomponent_project_id" ON "specialapp_projectcomponent" ("project_id");
CREATE INDEX "specialapp_projectcomponent_component_id" ON "specialapp_projectcomponent" ("component_id");
COMMIT;

As you can see, most of the SQL is the same. The main difference is that the specialapp_project_components table has become specialapp_projectcomponent and it now has a quantity column. This can be used to keep track of the quantity of each component that a project requires. You can add however many fields you want to this new intermediate table's model.

Using This SQL

There are several ways you can use the SQL generated by Django. If you want to make your life really easy, you can have Django create the tables for you directly. Assuming that you have specified all of the appropriate database information in your settings.py file, you can simply run the following command:

./manage.py syncdb

This will execute the queries generated earlier directly on your database, creating the tables (if they don't already exist). Please note that this command currently will not update your schema if the table exists but is missing a column or two. You must either do that manually or drop the table in question and then execute the syncdb command.

Another option, if you want to keep your DDL(Data Definition Language) in a separate script (maybe if you want to keep it in some sort of version control) is something like:

./manage.py sqlall specialapp > specialapp-ddl-080813.sql

This just puts the output of the sqlall command into a file called specialapp-ddl-080813.sql for later use.

Benefits of Using Django To Create Your Schema

  • Simple: I personally find the syntax of Django models to be very simple and direct. There is a comprehensive API that explains and demonstrates what Django models are capable of.
  • Fast: Being that the syntax is so simple, I find that it makes designing and defining your schema much faster than trying to do it with raw SQL or using a database administration GUI.
  • Understandable: Looking at the model code in Django is not nearly as intimidating as similar solutions in other frameworks (think about Java Persistence API models).
  • Intelligent: Using the same model code, Django can generate proper Data Definition Language SQL for several popular database servers. It handles indexes, keys, relationships, transactions, etc. and can tell the difference between server types.

Downfalls of Using Django To Create Your Schema

  • The Table Prefix: Notice how all of the tables in the SQL above were prefixed with specialapp_. That's Django's safe way of making sure models from different applications in the same Django project do not interfere with each other. However, if you don't plan on using Django for your end project, the prefix could be a major annoyance. There are a couple solutions:
    • A simple "search and replace" before executing the SQL in your database
    • Define the db_table option in your models
  • Another Technology: Django (or even Python) may or may not be in your organization's current development stack. If it's not, using the methods described in this article would just become one more thing to support.

Other Thoughts

I first thought about doing the things mentioned in this application when I was working on a personal Java application. I like to use JPA when developing database-backed applications in Java because it abstracts away a lot of the database operations. However, I don't like coming up with the model classes directly, so I usually reverse engineer them from existing database tables.

Before thinking about the things discussed in this article, I created the tables by hand, making several modifications to the schema before I was satisfied with my JPA models. This proved to be quite bothersome and time-consuming.

After using Django to develop my tables, the JPA models turned out to be a lot more reliable, and they were usually designed properly from the get-go. I haven't created tables manually ever since.

If you find yourself designing database schemas often, and you find that you have to make several changes to your tables before you/the project requirements are satisfied, you might consider using Django to do the grunt work. It's worked for me, and I'm sure it will work for you too.

Good luck!

Step-by-Step: Installing Django

Being the Django and Python zealot that I am, I often find myself trying to convert those around me to this awesome development paradigm. Once I break them, these people often ask me a lot of questions about Django. Over the past few months I've noticed that one of the biggest sticking points for people who are new to Django is actually getting it up and running to begin with. In response, this is the first in a series of articles dedicated to getting Django up and running.

What is Django?

The Django Web site describes Django as "a high-level Python Web framework that encourages rapid development and clean, pragmatic design." Basically, Django is just about the most amazing thing for Web development. I have tinkered with several different Web technologies, but nothing seems to even come close to what Django can do for me.

What is Python?

Python is a programming language used in numerous aspects of computing these days. It has a very simple yet powerful syntax. It's an easy language for beginners to pick up, but it provides adequate levels of power for the more experienced developers out there. If you have never programmed anything before, or you have dabbled with something like BASIC, Python should be fairly straightforward. If you are a programming veteran, but have only worked with languages like C, C++, Java, etc, you might struggle a bit with the syntax of the language. It's not difficult to overcome the differences in a couple hours of hands-on development.

Let's get started.

Installing Python...

Having Python installed is critical--Django does not work without Python. I'm guessing that you're relatively familiar with the procedures for installing software packages on your particular operating system. However, I will share a few notes to point you in the proper direction if you're lost. If nothing else, just head over to the Python download page to download anything you need to install Python. I whole-heartedly recommend using the latest stable version of Python for Django, but you should be able to get by with as early a version as 2.3.

...On Windows

Simply grab the latest version of the Python installer. It is currently version 2.5.2. Once the installer has downloaded successfully, just run through the installation wizard like any other setup program.

...On Mac OS X

Recent Mac OS X computers come with Python pre-installed. To determine whether or not you actually have it, launch the Terminal (Applications > Utilities > Terminal) and type python -c "import sys; print sys.version". If Python is already installed, you will see the version you have installed. If you have a version that is less than 2.3, you should download the newest version. If you don't have Python installed, you will get a "command not found" error. If you're in this boat, just download the latest version of the Python Universal installer and install it.

...On Linux

Most Linux distributions also have Python pre-installed. Just like with Mac OS X, you can check to see by opening up a terminal/konsole session and running the command python -c "import sys; print sys.version". If you have Python installed, you will see its version. If you get an error message when running that command, or you have a version earlier than 2.3, you need to download and install the latest version of Python.

If you're running a Debian-based distribution (like Ubuntu, sidux, MEPIS, KNOPPIX, etc), you can probably use sudo apt-get install python to get Python. If you're running an RPM-based Distribution, you can probably use something like Yum or YaST to install Python.

A sure-fire way to install Python on any Linux system, however, is to install from source. If you need to do this, you simply:

  1. download the source for the latest version of Python
  2. extract it: tar jxf Python-2.5.2.tar.bz2
  3. go into the newly-extracted directory: cd python-2.5.2
  4. configure it: ./configure
  5. compile it: make
  6. install it: make install

(I've only installed Python from source one time, so I might be wrong)

Setting Up Your PYTHONPATH...

Generally speaking, if you didn't have Python installed before starting this tutorial, you will need to setup your PYTHONPATH environment variable. This is a variable that lets Python know where to find useful things (like Django).

...On Windows

  • Open up your System Properties (Win+Break or right click on "My Computer" on your desktop and select Properties)
  • Go to the "Advanced" tab
  • Click the "Environment Variables" button
  • If you have permission to change system variables, click the "New" button in the bottom pane. Otherwise, create the PYTHONPATH variable for your user account using the "New" button in the top (User variables for [username]) pane.
  • Set the variable name to PYTHONPATH
  • Set the variable value to C:\Python25\Lib\site-packages (replace C:\Python25\ with whatever it is on your system if needed)
  • Save it

You may also need to add the python executable to your PATH. If you can successfully run python from a command prompt window, you don't need to worry about it.

If you can't run python from a command prompt, follow the procedure above, but use the PATH variable instead of PYTHONPATH. PATH most likely already exists, so you just need to append/prepend the existing value with something like C:\Python25\ (again, this might need to change depending on where you installed Python)

...On Mac OS X

Your PYTHONPATH should already be setup for you.

...On Linux

Usually you just need to edit your ~/.bash_rc script to setup your PYTHONPATH environment variable. Go ahead and open that up in your preferred text editor and make sure there's something in it like:

export PYTHONPATH=/usr/lib/python2.5/site-packages:$PYTHONPATH

Save any changes necessary and run the following command:

source ~/.bash_rc

This will take care of updating your current session with any changes you made to your ~/.bash_rc.

Installing Django

Once you have Python and have verified that you have version 2.3 or later, you are ready to install Django. Currently, the latest stable release is 0.96.1, but this is grossly out-dated. Django 1.0 will be released on September 2nd 2008, so the "unstable" copy of Django is pretty close to what 1.0 will have to offer. There are some incredibly useful improvements in the unstable version that I don't think I could do without anymore, so that's what I'll talk about installing here.

First, you need to have a subversion client. On Windows, the most popular one is called TortoiseSVN. On Mac OS X, I have played with a few, but I think Versions is a pretty decent one. Linux also has several to choose from, but if you're using Linux, you're probably going to use the command line anyway (right?).

For brevity, I will just use the subversion commands necessary to accomplish this task (instead of discussing all GUI interfaces to subversion).

The exact location that Django should be installed differs from system to system, but here are some guidelines for typical setups:

  • Windows: C:\Python25\Lib\site-packages
  • Linux: /usr/lib/python2.5/site-packages
  • Mac OS X: /Library/Frameworks/Python.framework/Versions/2.5/lib/python2.5/site-packages

If you want a definite location, run the following command:

python -c "from distutils.sysconfig import get_python_lib; print get_python_lib()"

Once you know that location, go there in your command prompt or terminal session. Then execute this command svn co http://code.djangoproject.com/svn/django/trunk/django django. You will see loads of output, showing all of the files that you are downloading as you install Django.

As soon as that process completes, you should run python -c "import django" to make sure everything worked properly. If the command doesn't display an ImportError, you're good. Otherwise, you need to try again.

Getting Access to Django Scripts...

Once you can successfully import django, you might want to make sure you can run the django-admin.py script that comes with Django.

...On Windows

This process is very similar to what we did with the PYTHONPATH environment variable earlier.

  • Open your System Properties again
  • Go to the Advanced tab
  • Click the Environment Variables button
  • Find your PATH environment variable (either for your user or system-wide)
  • Make sure that the variable value contains something like C:\Python25\Lib\site-packages\django\bin
  • Save any changes
  • Open a fresh command prompt
  • Try to run django-admin.py. If you're successful, you're ready to get started with Django. Otherwise, you need to fix your path to django/bin or just call the django-admin.py script using an absolute path when needed.

...On Mac OS X

You can run a command similar to this:

sudo ln -s /Library/Frameworks/Python.framework/Versions/2.5/lib/python2.5/site-packages/django/bin/django-admin.py /usr/local/bin

...On Linux

If you have "root" privileges on your Linux system, you can execute a command like:

sudo ln -s /usr/lib/python2.5/site-packages/django/bin/django-admin.py /usr/local/bin

If you don't have "root" privileges, you can setup your own /usr/local/bin:

mkdir ~/bin

Make sure your ~/.bash_rc contains something like:

export PATH=$HOME/bin:$PATH

Then update your current session with any changes you made to ~/.bash_rc by running this command:

source ~/.bash_rc

And that should do it! Now you should be ready to get started with Django.

Feel free to leave a comment if you're having problems installing Django. Good luck!

Check out Installing Django on Shared Hosting.

Why I Like Python

For the past 8 years or so, I've been very much involved with programming using the PHP scripting language. It is a powerful scripting language that suits building websites very well. PHP has a huge set of useful built-in functions, and more recent versions support object-oriented programming. I first started teaching myself PHP when I got tired of having to build each and every web page on my site manually. I hated having to change dozens of web pages just because I added a new link to my navigation. All sort of reasons like this prompted me to investigate PHP. Little did I know then that this language would occupy so much of my time in the future.

I rapidly learned that PHP offered much more than just allowing me to update one part of my website to change all pages. I started tinkering with all aspects of what PHP offered, and I'm still learning about it. After many years of searching, I finally found a programming language that was easy, fast, and efficient for my needs.

Through the years, I continued to develop various applications using PHP. I attempted to write my own forum/bulletin board software while I was still in high school. If I may say so myself, the forum really had some awesome concepts behind it. But my problem was that I lost interest too fast. I also built a very large application that reduced a 1.2GB MS Access database down to less than 15MB using PHP and MySQL. The new application offered many enhancements over the previous system. For one thing, it was much faster. Second, it allowed multiple simultaneous users to modify the database. Three, so far it has lasted more than 3 years, compared to the 1 year maximum that the MS Access solution always seemed to hit before it crashed.

Using PHP, I helped revolutionize the way one of the companies I work for developed websites. I built a simple in-house web framework that supposedly reduced development time by allowing us to forget about the mundane details involved in virtually every website and just get to the developing. In a matter of two weeks (with a full class load and another job), I managed to write an e-commerce solution for the same company using PHP.

Basically, PHP has treated me well over the years. But this post is not supposed to be about PHP. If that's the case, why have I rambled about PHP this whole time, you ask? Well, it's mostly to demonstrate that I have a lot of experience with the language. I have a pretty good feel for what it's capable of and how I can accomplish most anything I need.

With all of that in mind, I've encountered my frustrations with PHP. They may seem petty and moot to most people, but they have turned out to be the determining factor in what scripting language I prefer. Here is a short list of things I now despise about PHP:

  • dollar signs ($) to signify variables -- while this is a useful feature, it becomes quite bothersome when you're programming all day long (at least it does for me). I'll get to why later.
  • using an actual arrow (->) to access attributes -- most other modern programming languages simply use a period (.) for this functionality. I'll comment more on this and why it frustrates me later as well.
  • lack of true object-oriented constructs -- in other object-oriented languages, like Java, if you have a string and you want to determine its length, you call the length() method of that string. In PHP, you call a function such as strlen($var). This sort of behavior plagues the language.
  • too many unnecessary keystrokes -- as I mentioned before, all mutable variables are preceded by a dollar sign ($). That is 2 keystrokes (shift and 4) every time you want to refer to a variable, wheres most languages nowadays have none). Likewise, accessing attributes of objects in PHP uses an arrow (->), which is three keystrokes (minus, shift, and .). Most other object-oriented languages only require a period (one keystroke) for such functionality. The main reason I make such a big deal out of the number of keystrokes is simple. The more keystrokes a program requires, the more likely you are to have bugs. The fewer keystrokes a program requires, the less likely it is that your program will be broken. It boils down to maintainability. Also associated with the number of keystrokes is the pure laziness within me and most other programmers.

These frustrations have been bothering me for several years now. I continued using PHP mostly because it's so widely supported, but also because I could not find a suitable replacement for it. I investigated a few others, but they apparently didn't have a great influence on me right now because I don't remember any names.

When the whole Ruby on Rails bandwagon was rolling through town, I decided to hop on to see what all of the hubbub was about. I started studying the Ruby script language, and I found that it had some really neat things about it. It uses a more solid approach to object-oriented programming, which I really liked. I also noticed that it employs some intriguing structures for accomplishing things in ways I've never seen before. Despite these things, Ruby still didn't seem like a viable replacement for my PHP. It didn't come up to snuff in performance in many cases, so I essentially abandoned it.

For at least a year now, I've been interested in learning Python. I've heard a lot about it over the years, but I just never seemed to make the time to actually sit down and study it. That is, not until about the beginning of August of 2007. After I made my decision that Ruby and Ruby on Rails weren't quite up to par for my needs, I stumbled upon the Django Project, which is a web framework similar to Ruby on Rails, only built using Python.

I decided this was my chance to actually sit down and learn a little about this "Python" so I could see what it had to offer. I mostly used Django as my portal to Python. As I started learning Django, I became more and more familiar with the way Python works and how I work with Python.

At some point in time, I decided that I actually liked Python, and my wife let me buy some really cool books to help me learn it. By the beginning of October 2007, I had convinced my supervisor at work to let me start building websites using Django instead of our home-grown PHP framework.

And here comes a story. This is the main reason I blabbered about my experience with PHP so much at the start of this article. Again, after all these years, I feel very confident that I can do just about anything I want efficiently and elegantly with PHP.

Back in October of 2006 (after using PHP for some 7 years), I was asked to write a PHP script to parse some log files and output various bits of information in a certain format. After maybe a week, I had a script that did the job fairly well. Most of the time it worked, but there were occasions when it didn't and I had to fix it. The script turned out to be 365 lines of code with very few comments scattered throughout. It's also a maintenance nightmare, even for me.

In October of 2007, I rewrote that same script in Python. After only a couple days, the script seemed to be perfect. It did its job, and it did it well. With comments for just about every single line of code, the Python version of the script took up a mere 118 lines of code. Take out the comments and it is 56 lines of code. The script is several times more understandable and maintainable than its PHP counterpart. I also believe that it is much more efficient at doing its task. Keep in mind that I had only been using Python for about 2 months at this point in time.

It's been through various experiences like the log parser that I have decided I prefer Python over PHP. Obviously, I'm not quite as comfortable with it as I am with PHP, but I don't feel too far behind. Now, less than 6 months after deciding that we'd use Django at work, I don't think my supervisor could be happier. Building a typical website with our PHP framework takes between 1 week and a couple months. Thanks to Python and Django, most of our websites can be "ready" within just a few hours. That time assumes that the website's design itself is ready for content to be put into it and also that the client does not require custom-designed applications.

Python and Django have helped revolutionize the way we do things at work, and I can hardly stop thinking about it. Python fixes nearly all of the frustrations I had with PHP. The frustrations it doesn't take care of are worth the sacrifice. Python is capable of object-oriented programming. It uses a period (.) to access object attributes. Variables are not preceded by some arbitrary symbol.

Also, the fact that Python code can be compiled to bytecode (like Java) is enormously beneficial. Each and every time a PHP script is executed, the PHP interpreter must parse the code. With Python, the first time a script is executed after an edit, the program is compiled to bytecode and subsequent executions are faster. That is because the bytecode is processed directly by the Python Virtual Machine (as opposed to being compiled to bytecode _each_ time and then executed). Python also offers a vast amount of standard library functions that I would really appreciate having in PHP. But from now on (at least for the foreseeable future), I will try to do all of my scripting in Python and leave PHP for the special cases.